How To Set Up Your First Store On Shopify


I'm looking for...
Are you a beginner in the world of dropshipping and looking to set up your first store on Shopify? Don’t worry, you’re not alone. Starting your own e-commerce business can be overwhelming, especially if you’re new to the industry.
Thankfully, with this eCommerce platform and its user-friendly interface and robust features, it has become the go-to choice for many dropshipping beginners. And, with the right guidance and knowledge, you can have your store up and running in no time.
In this article, I will walk you through the step-by-step process of setting up your first online store on Shopify, providing you with the essential tips and tricks to ensure a successful start to your dropshipping journey.
Create Your Online Store in just 5 Minutes – For Free
Pick your niche, our AI builds your store, add 10 winning products and we teach you how start selling today. Start picking your niche
What Is Shopify & How Does It Work?
Shopify is an e-commerce platform that allows you to set up your own online stores. It provides all the necessary tools and features to manage and sell products online. With Shopify’s user-friendly interface, setting up your first store is a breeze.
Product management is made easy with Shopify’s intuitive dashboard. You can easily add, edit, and organize your products, including product descriptions, images, and variants. What’s more, order processing is streamlined with automated notifications and a centralized system to manage and fulfill orders.
Also, Shopify integrates with over 100 payment gateways, allowing you to accept payments from various sources, including credit cards, PayPal, and more payment gateway options. This flexibility allows you to provide customers with their preferred payment methods.
👉 Learn How To Add Afterpay To Shopify: My 4-Step Guide + Examples.
One of the greatest advantages of Shopify is its ease of use and customization options. You can choose from a wide selection of professional themes, customize your store’s design, and add your own branding elements.
👉 Discover Is Shopify Legit in 2024? +6 Common Shopify Scams.

Build your Shopify store in minutes, not weeks
Start dropshipping with a free AI Shopify store, automated supplier, winning products and free courses. If you don’t make at least 1 sale, we will pay you $50 for your time.
Build your free storeA Step-By-Step Guide On How To Set Up Your First Store On Shopify
To be successful at dropshipping and learn how to create a Shopify store, you need to understand what dropshipping is and do your research first.
This way, you will identify your target market, find in-demand products, and come up with a unique business name.
💡 Tip: Learn about The 8 Best GoDaddy Alternatives For E-Shop Hosting In 2024
Now, your main goal is to create your first Shopify store. So, start taking the following steps toward your goal.
👉 Discover Is Shopify Legit in 2024? +6 Common Shopify Scams.
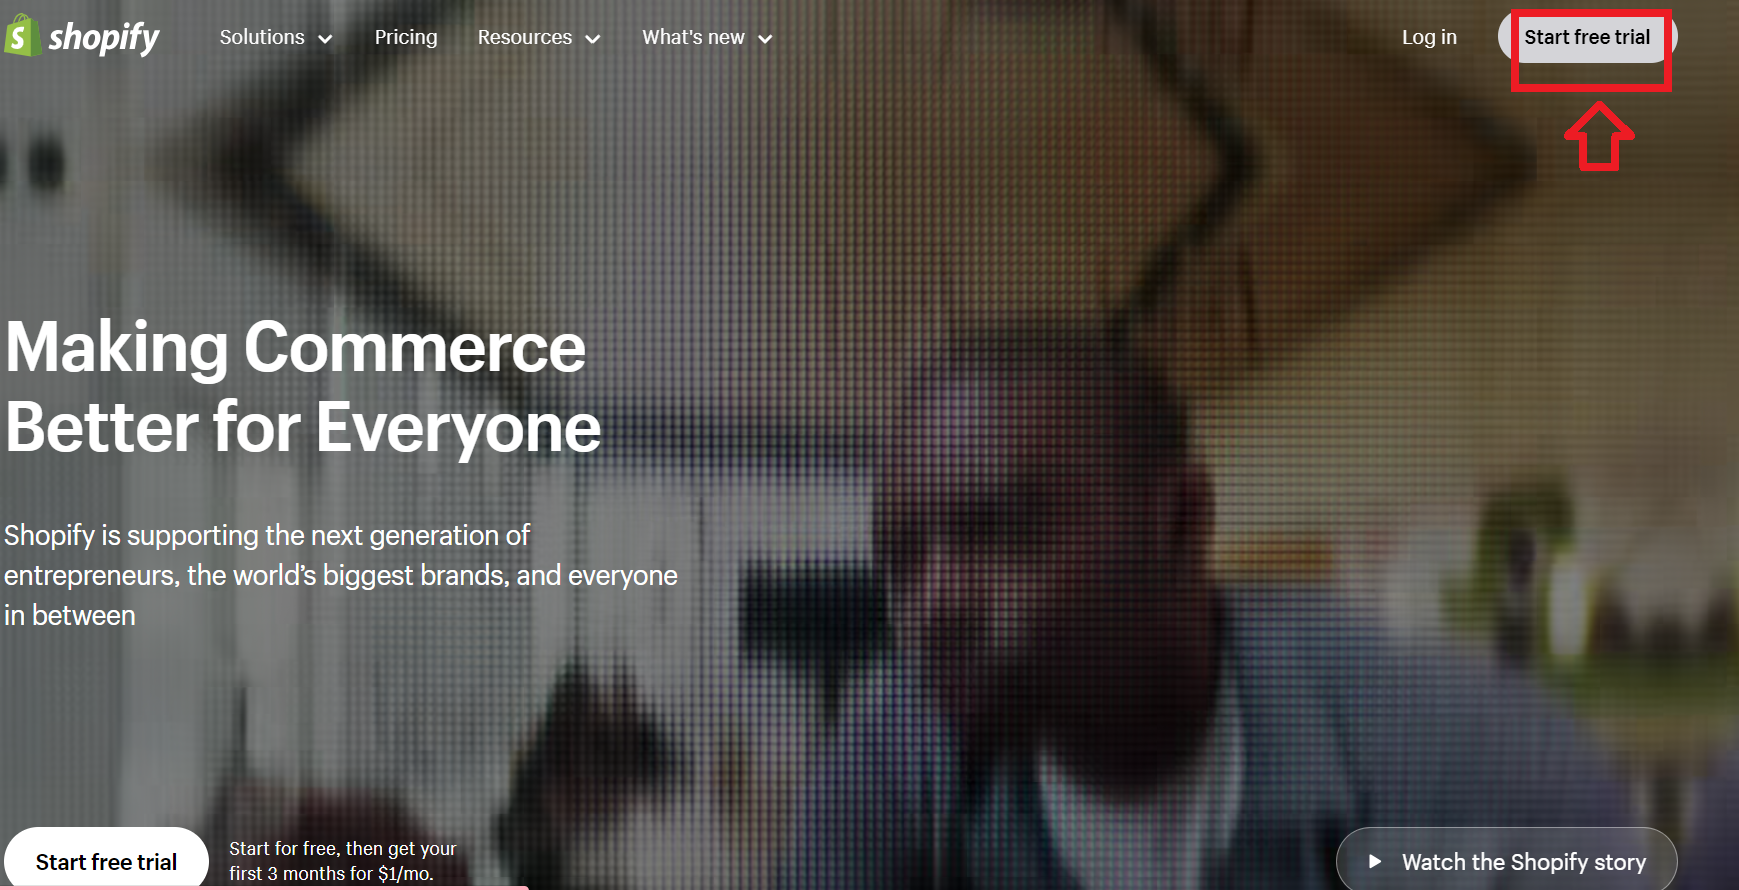
1. Sign Up For A Shopify Account
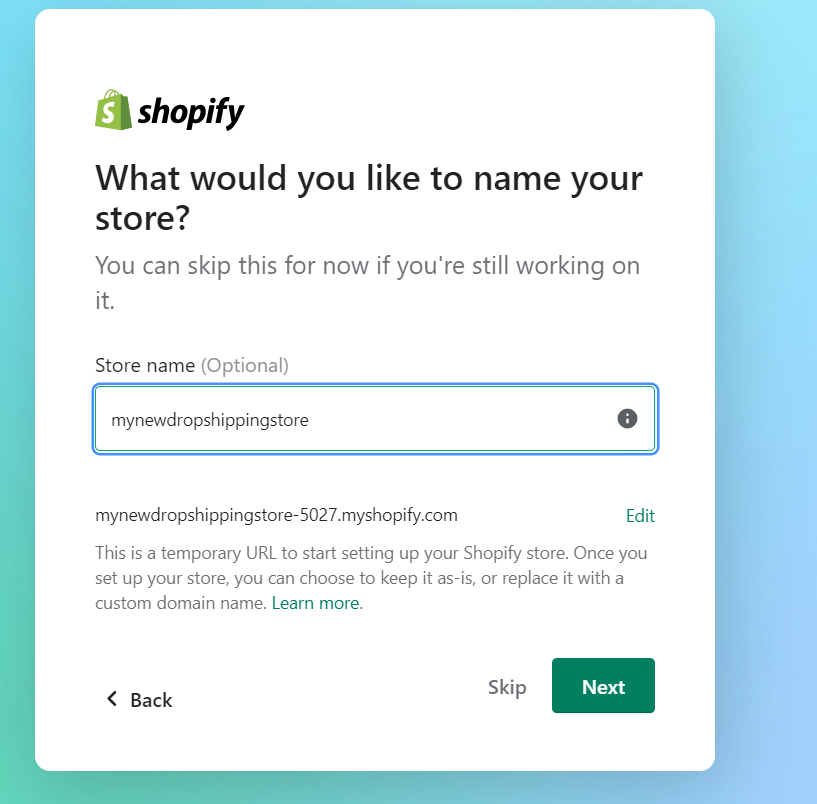
Sure, to sign up for a Shopify account, you need to go to Shopify.com and use the signup form. Hence, click on the “Start free trial” button in the right upper corner.
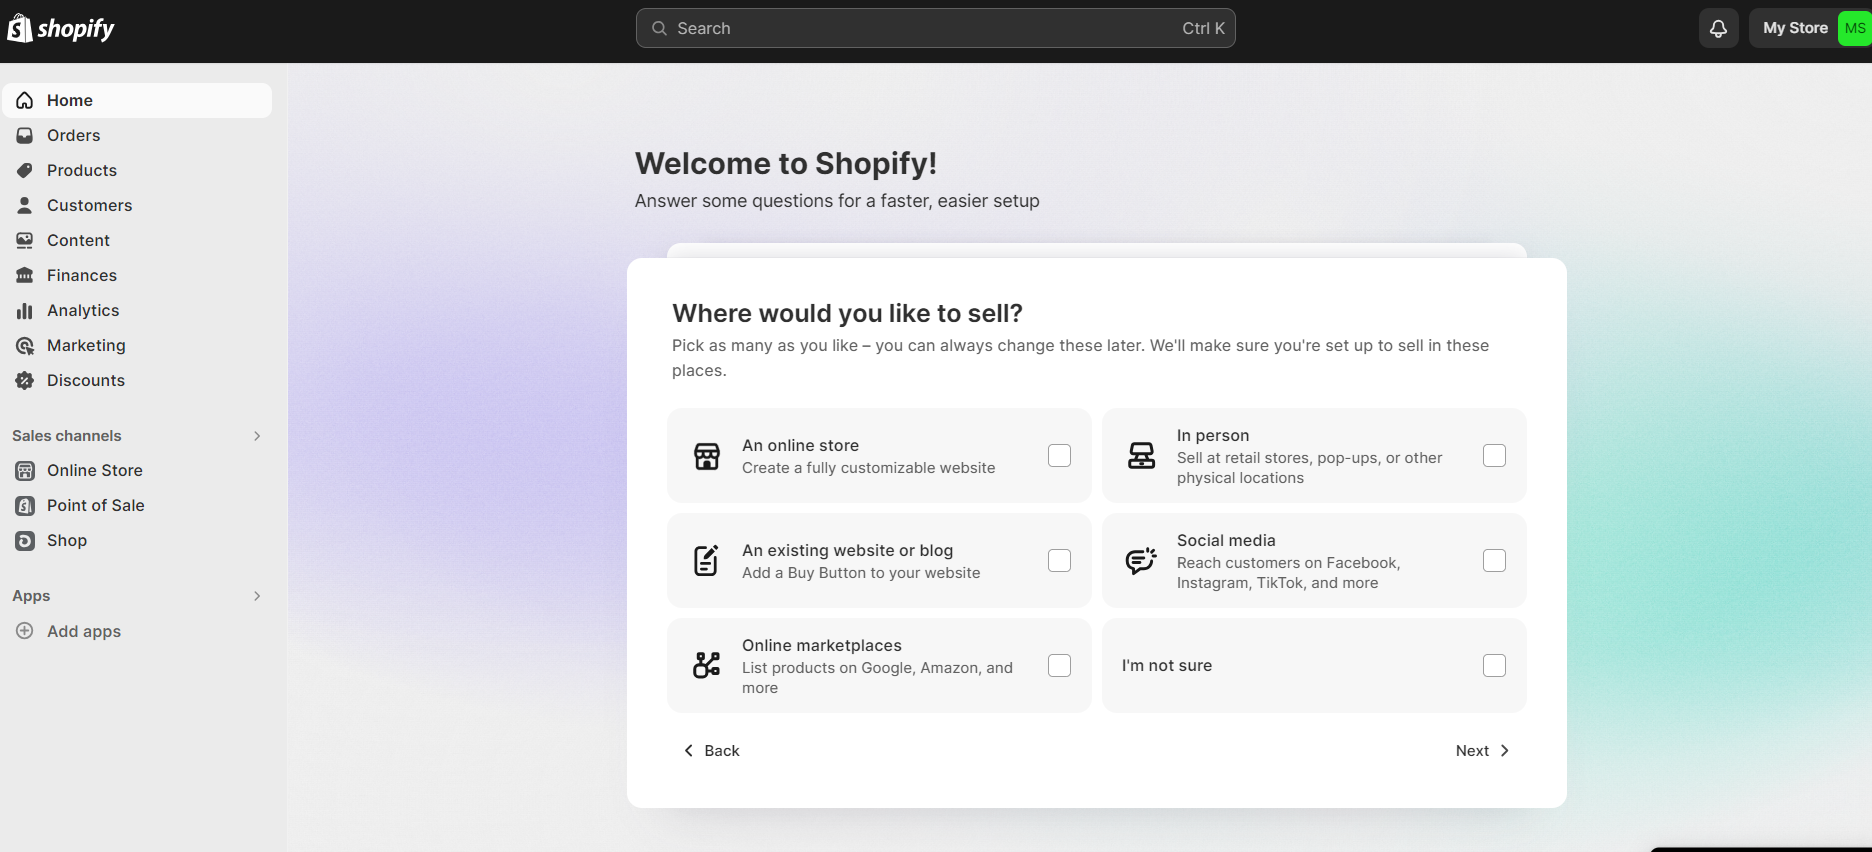
Next, Shopify will list a few questions about your store, what you are planning to sell, the store’s name, the location of your business, etc. Thus, you can choose to answer all these questions or skip them for now.
However, the example I will be using in this guide is a clothing dropshipping store called “My New Dropshipping Store”.
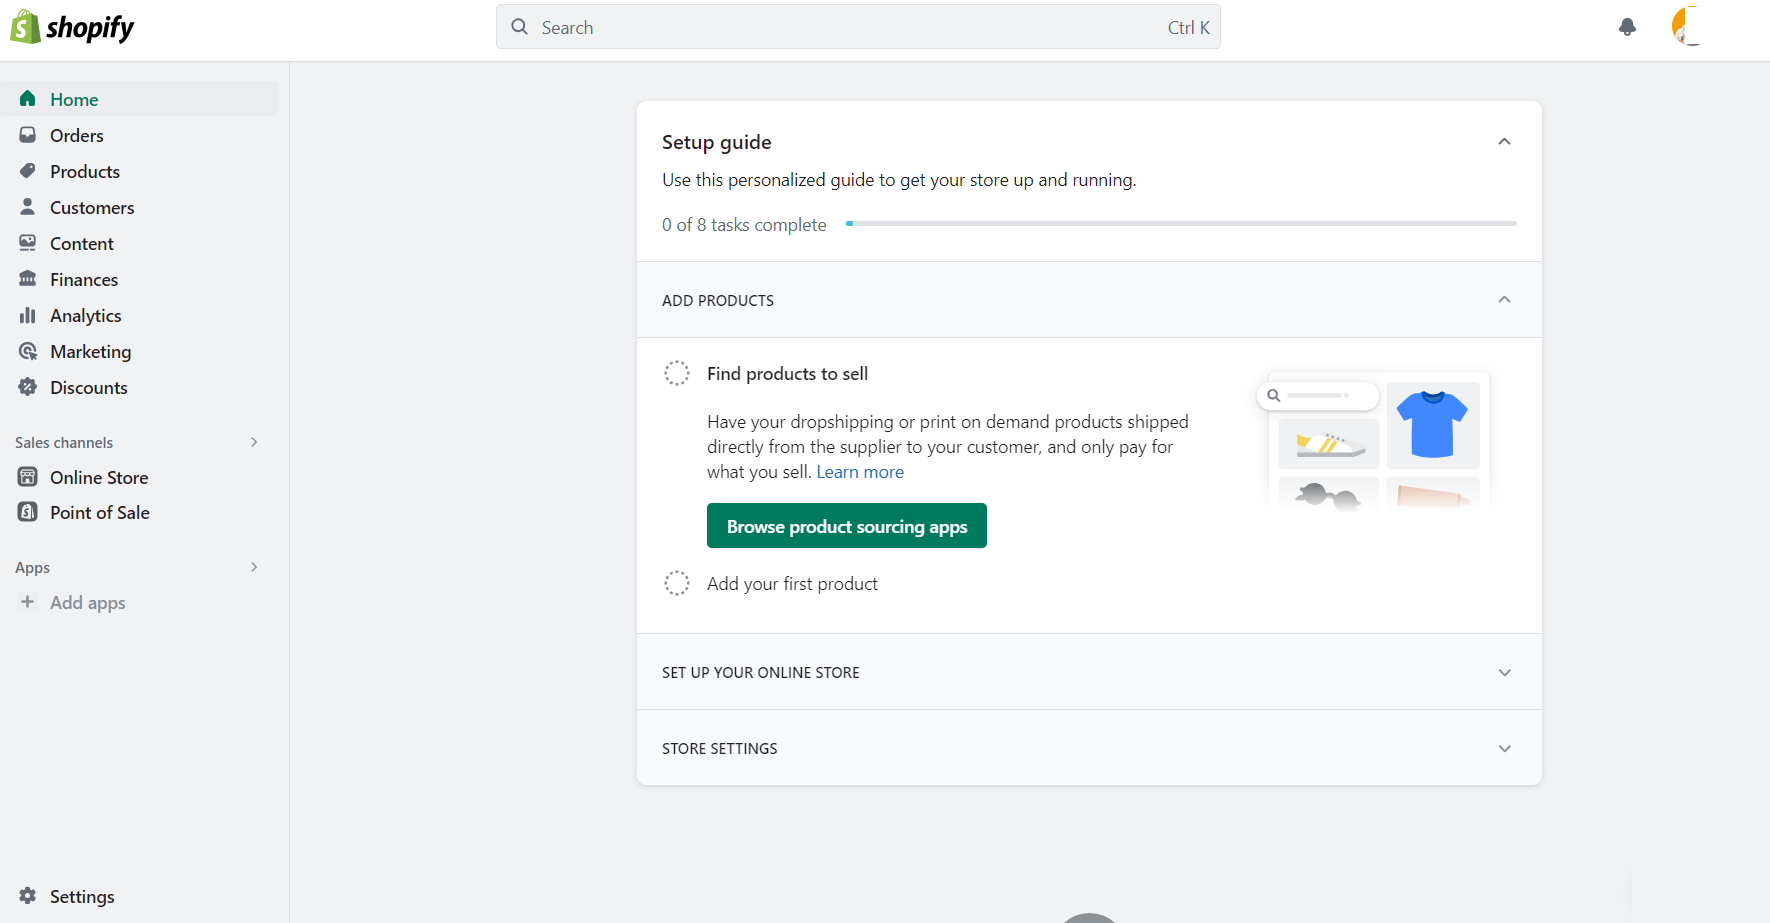
Once you have signed up, you will be directed straight to your store admin screen, or Shopify dashboard. And it will look like this.
With this, you have taken the initial step in how to set up your first store On Shopify. Next comes the customization of your first Shopify store.
👉 Learn How To Open and Manage Multiple Shopify Stores (Tips + Apps).
Now, let’s dive into the customization part of the set up of your first store on Shopify.
2. Customize Your Store
The truth is, there is a difference between an operational store and an exceptional Shopify store. But what is it that separates the best from the rest? Let’s find out together!
➡ Choose the right theme
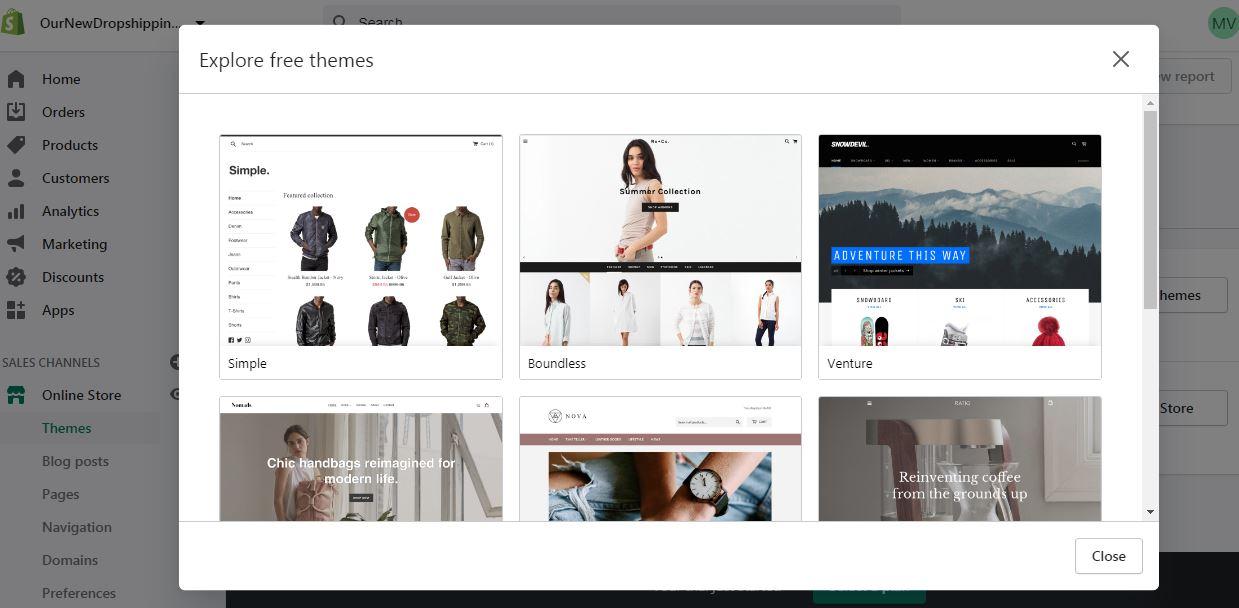
In the Shopify Theme Store, you will find both free and paid Shopify themes. And each theme has its own set of features and styles.
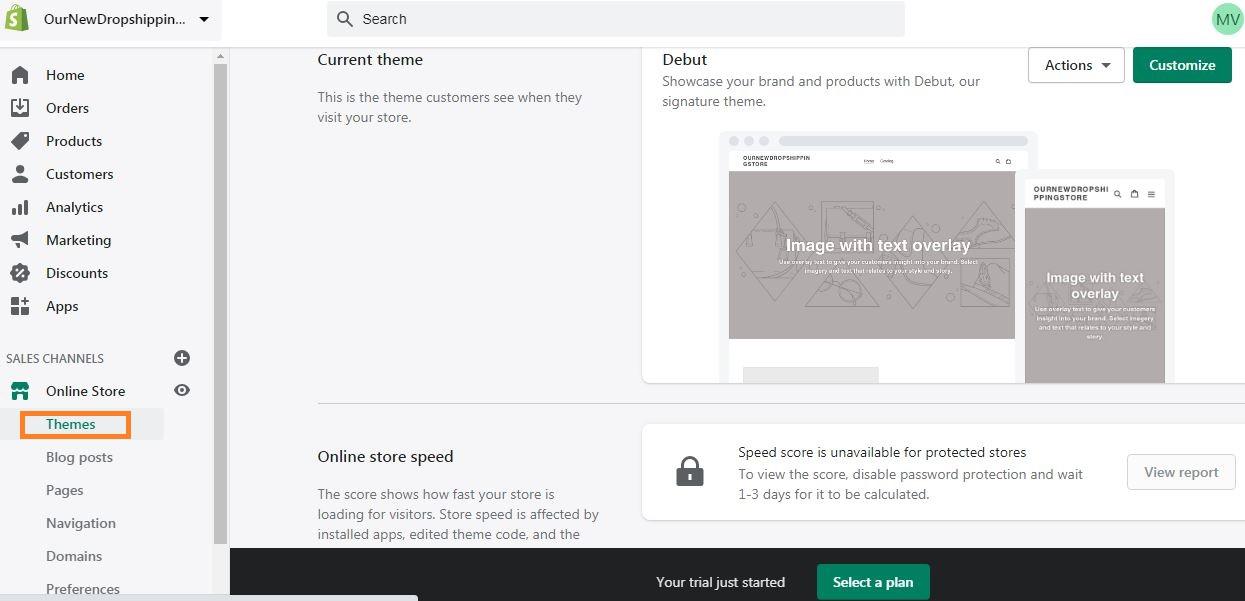
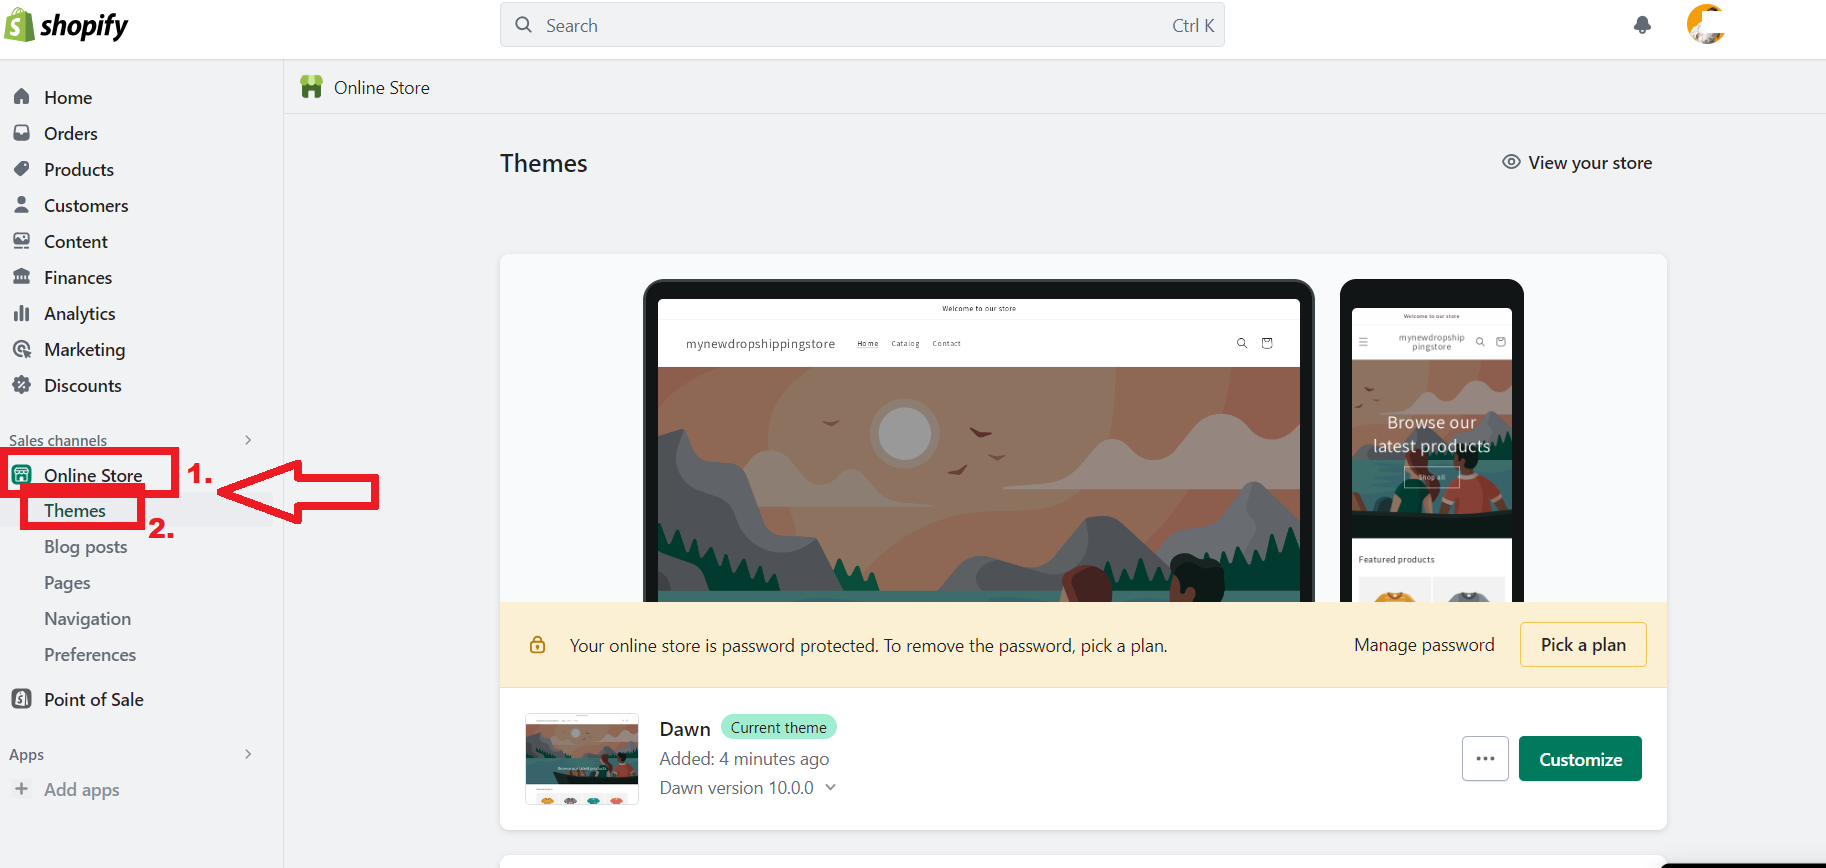
As you can see, you need to go to ‘Online Store’ and then click ‘Themes’. From here, you can choose and customize the theme you want for your dropshipping store.
Also, keep in mind that some themes are specifically designed for single-product businesses, whereas others are for larger product catalogs.
Moreover, some themes are universal and suitable for selling various products, whereas others were designed with a specific niche in mind. For example, the Dawn theme is suitable for a modern clothing store.
Before browsing themes, make a list of must-have features. This means that you must give some thought to the functionality you will need, like customization and flexibility. Next, you can check on each Shopify theme’s features before using it. For instance, I will check on Dawn Theme features.👇
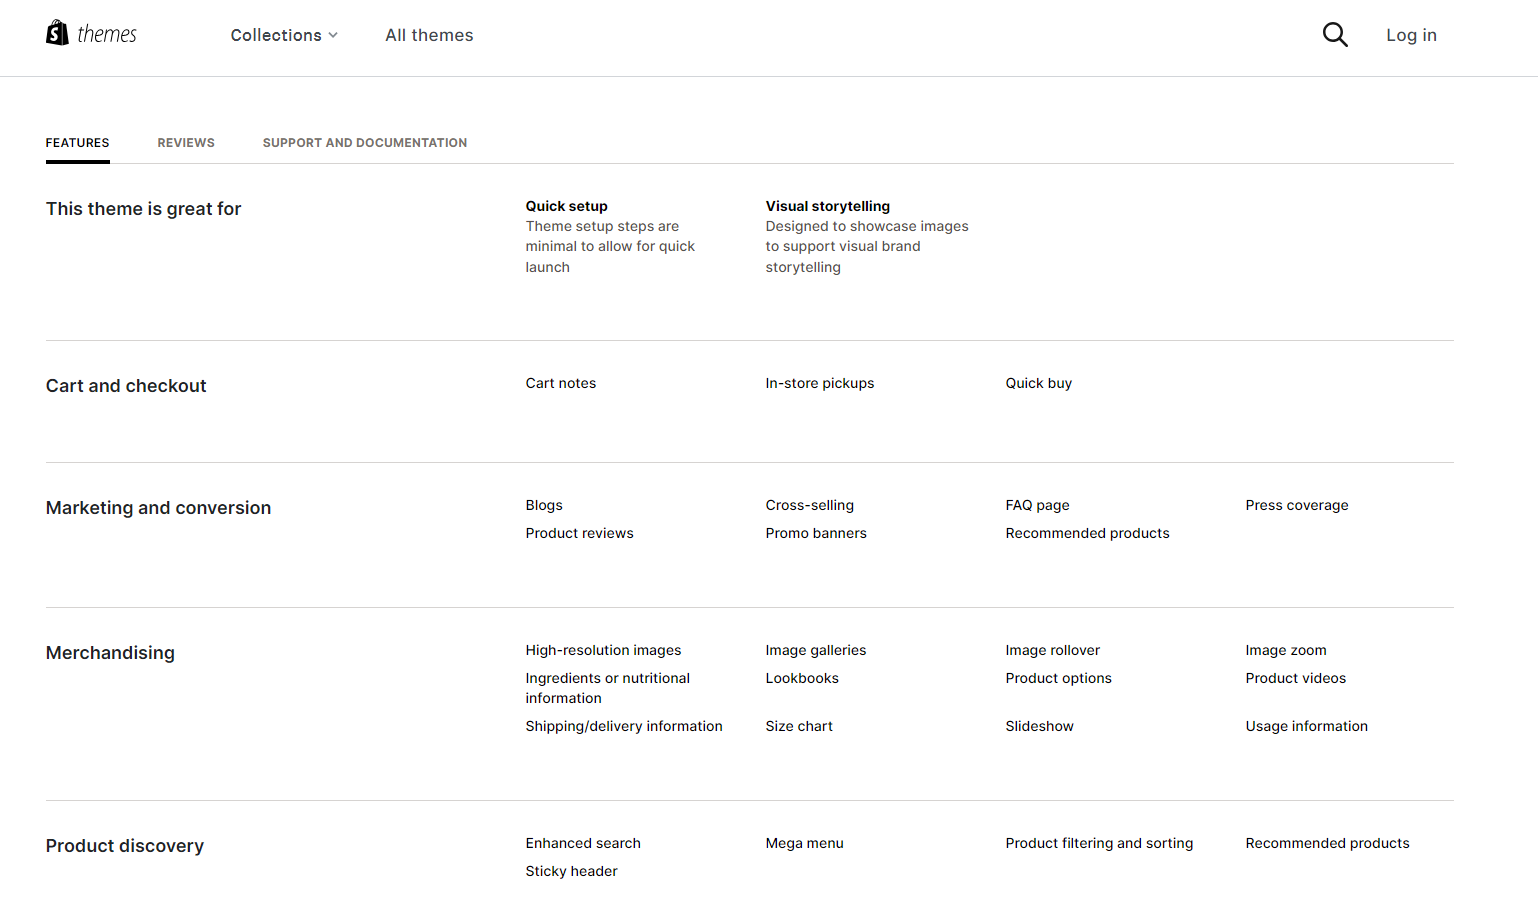
Also, make sure your chosen theme has a beautiful and modern design. To get ahead in the game, don’t miss my ultimate review & guide – Debutify Shopify Theme.
💡 Tip: Check out the 11 Best Free Shopify Themes For Dropshipping Stores.
➡ Design Your Homepage
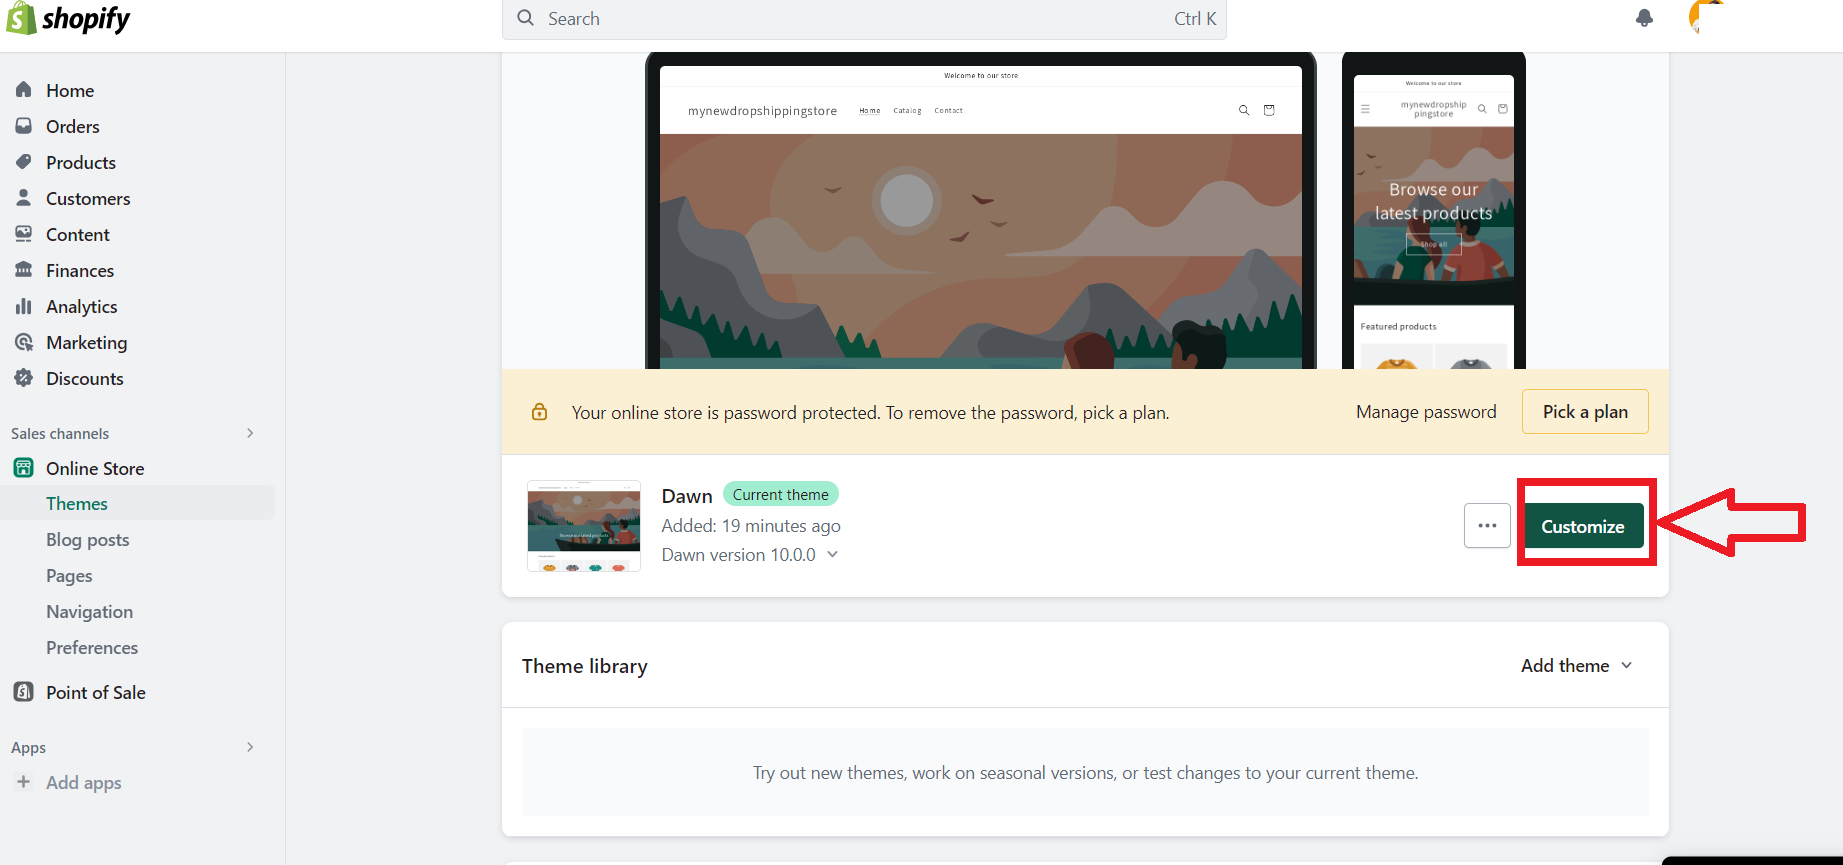
Once you have chosen a theme, you need to customize it. You should not worry in case you are unsure if it is the right theme for your first Shopify store.
Sure, if you do not like the theme, you can change your mind later. So, to customize your chosen theme, click on the “Customize” green button. 👇
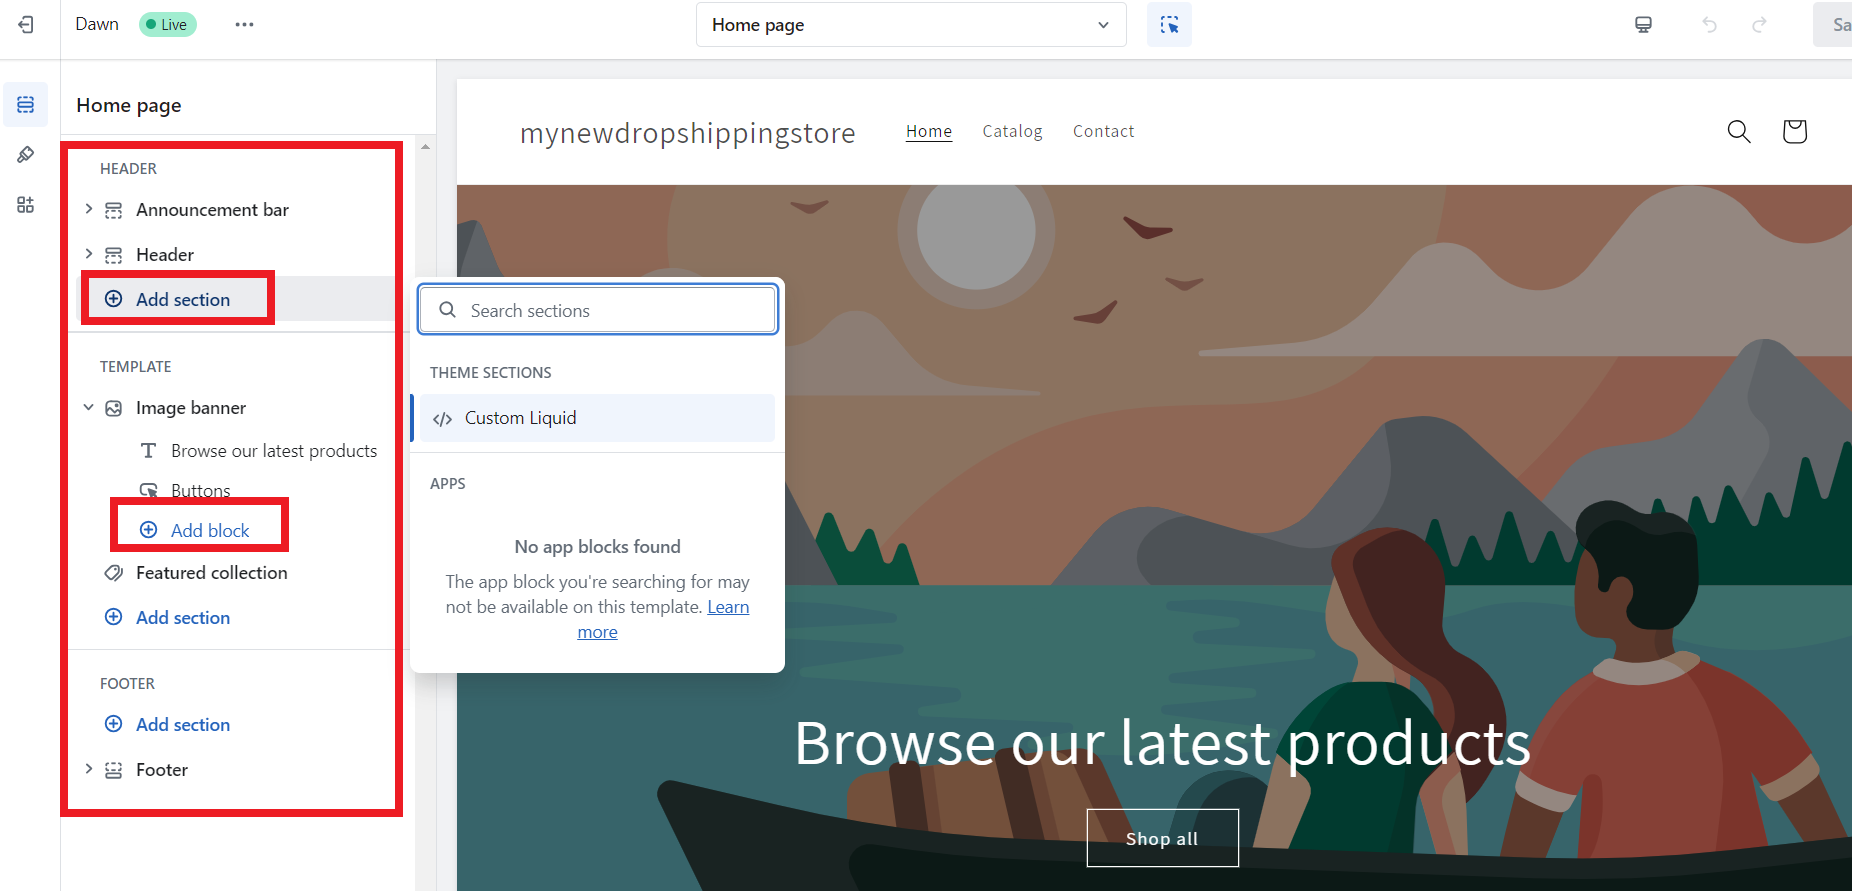
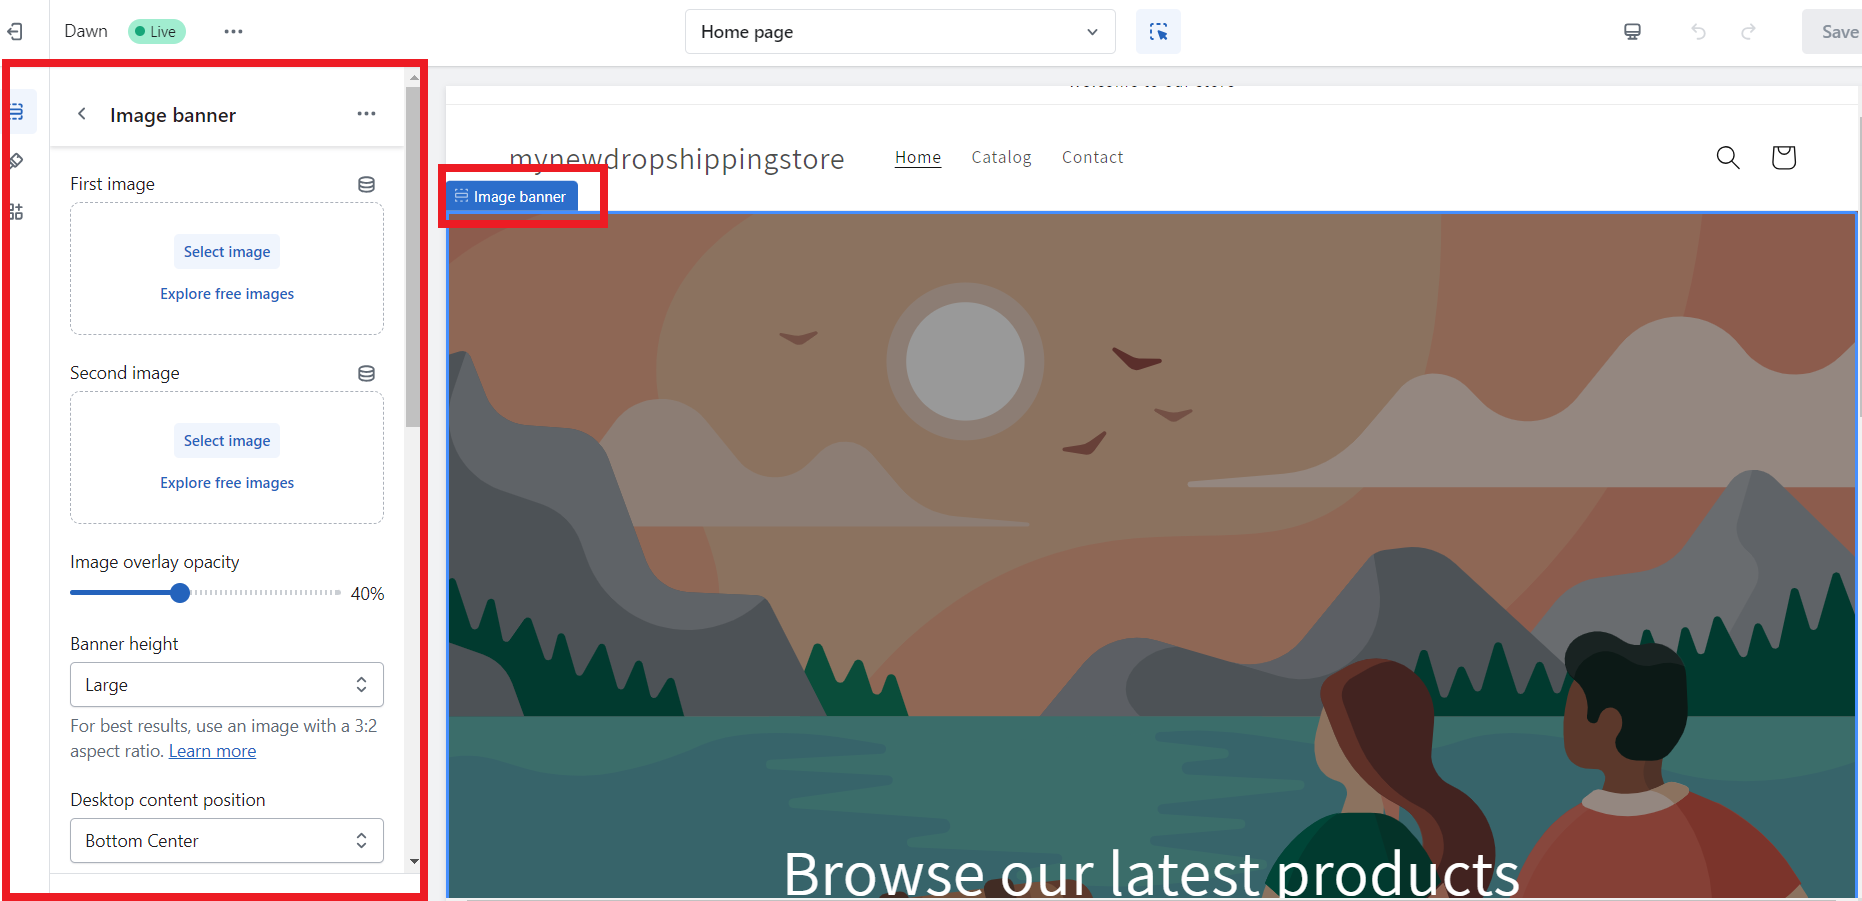
Your theme has sections and blocks that you can remove, add, rearrange, or temporarily hide. In addition, this gives you control over all the basic functionality of your dropshipping store. Plus, with the Shopify drag-and-drop editor, the whole process is simplified.👇
Next, while designing your Shopify landing page, focus on your visitors. Simply help your visitors understand what your dropshipping business is about and what you sell.
Hence, what I do, in the header section, I make sure my navigation menu is so clear that visitors and customers can find their way around my site.
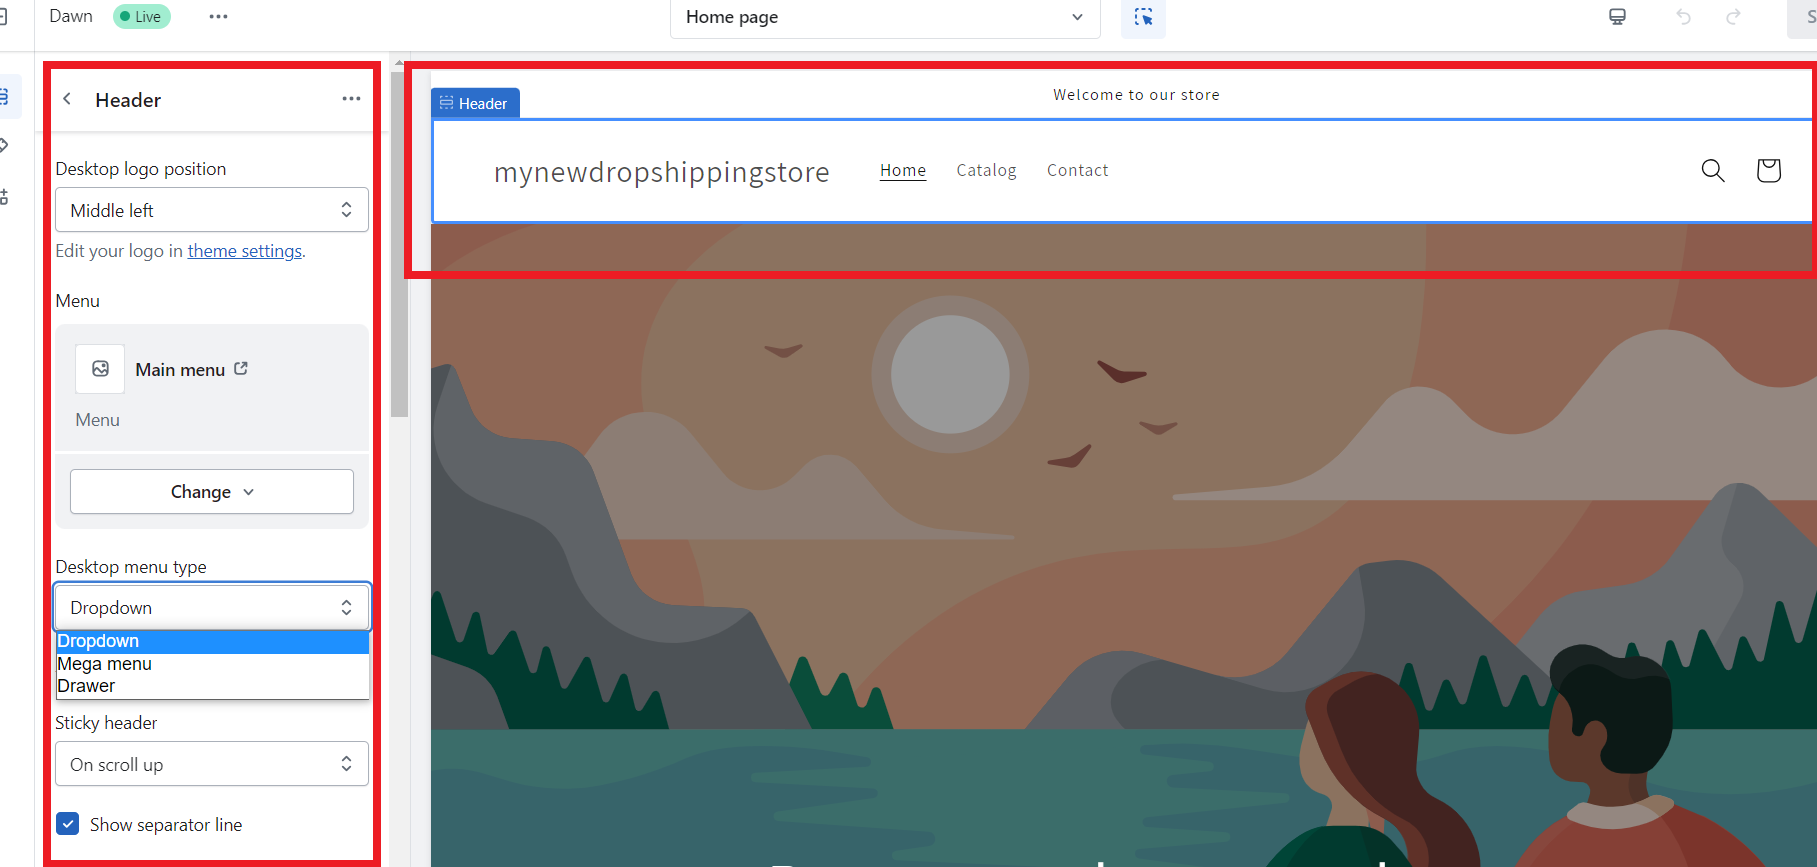
👉 Learn How To Add Favicon On Shopify In Minutes.
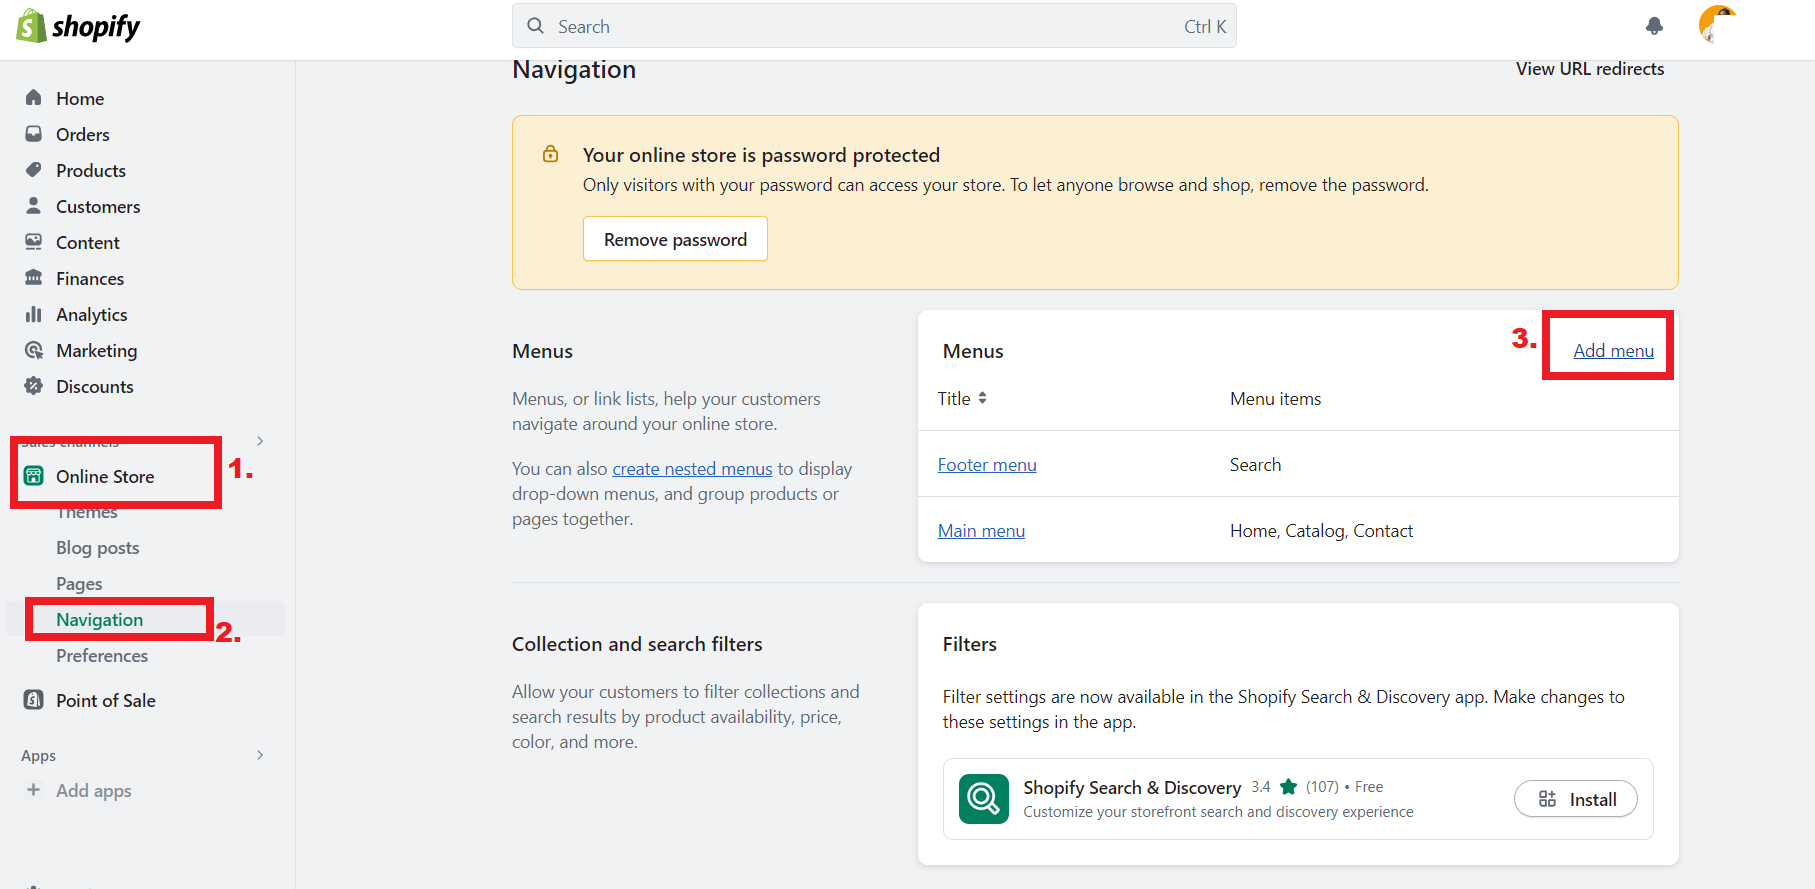
➡ Create the Main Menu
To create the main menu/navigation for your Shopify store, start by navigating to the Shopify admin dashboard. From there, go to the “Online Store” section and click on “Navigation”. This is where you can manage your store’s navigation settings.
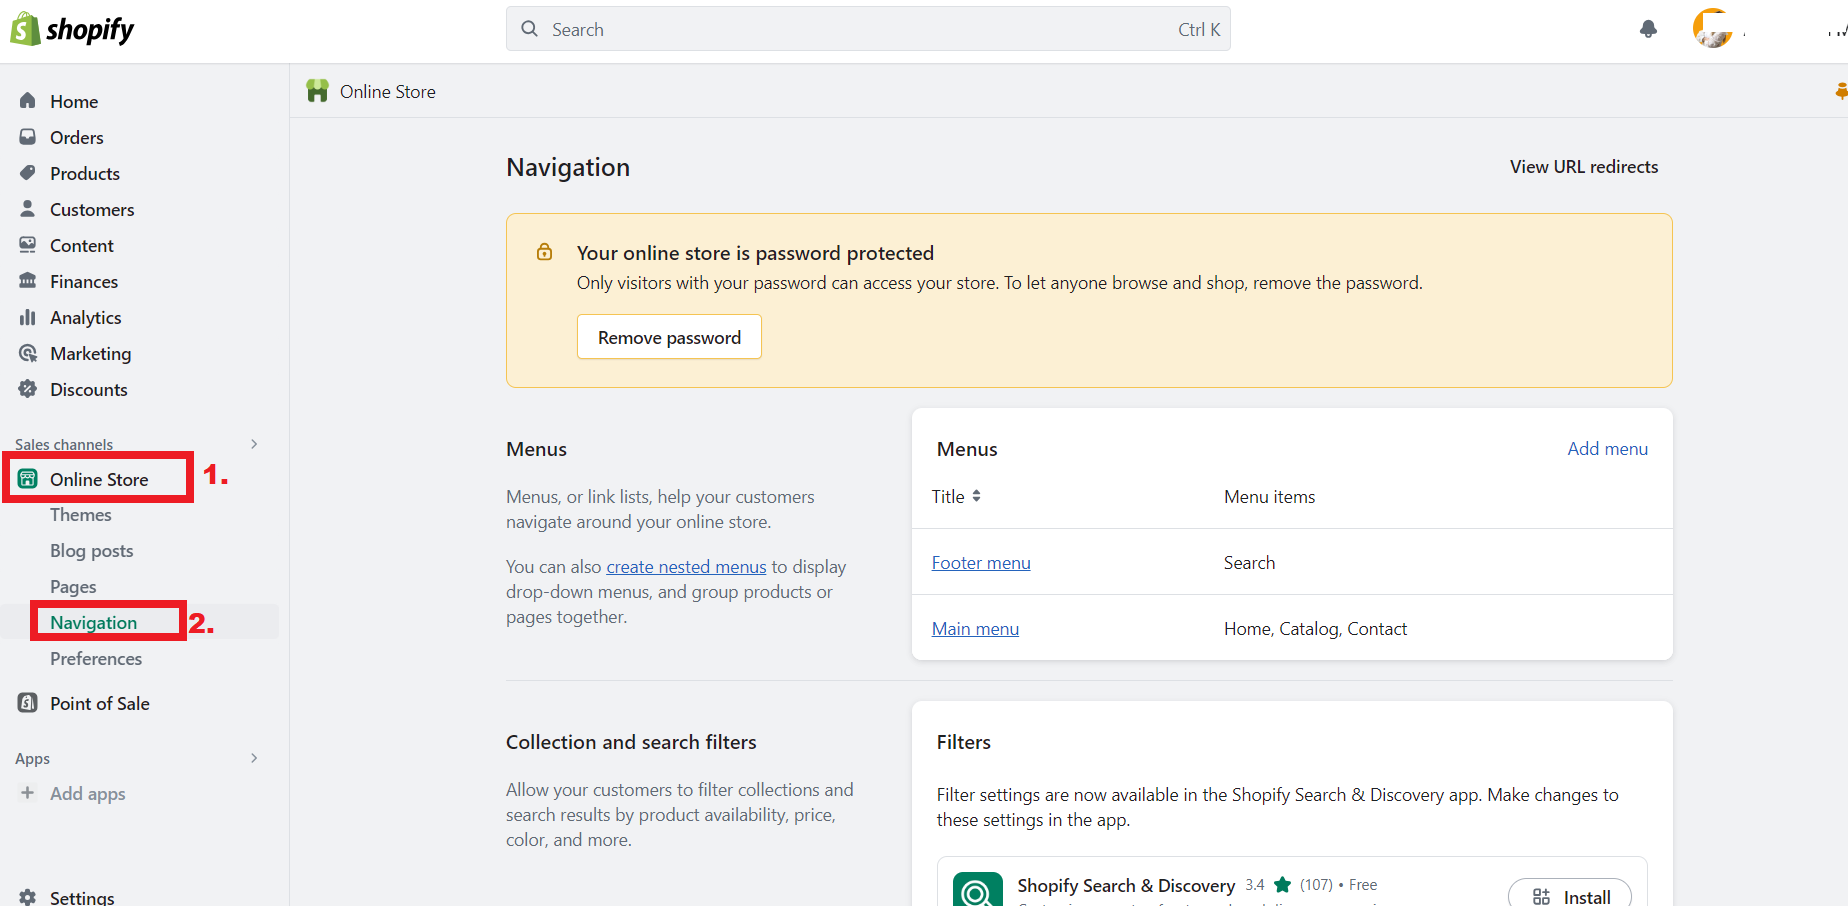
Once you are in the Navigation section, click on the “Main Menu” option. Here, you can add menu items to your main menu to customize the navigation of your store. Also, to add a menu item, simply click on the “Add menu item” button.
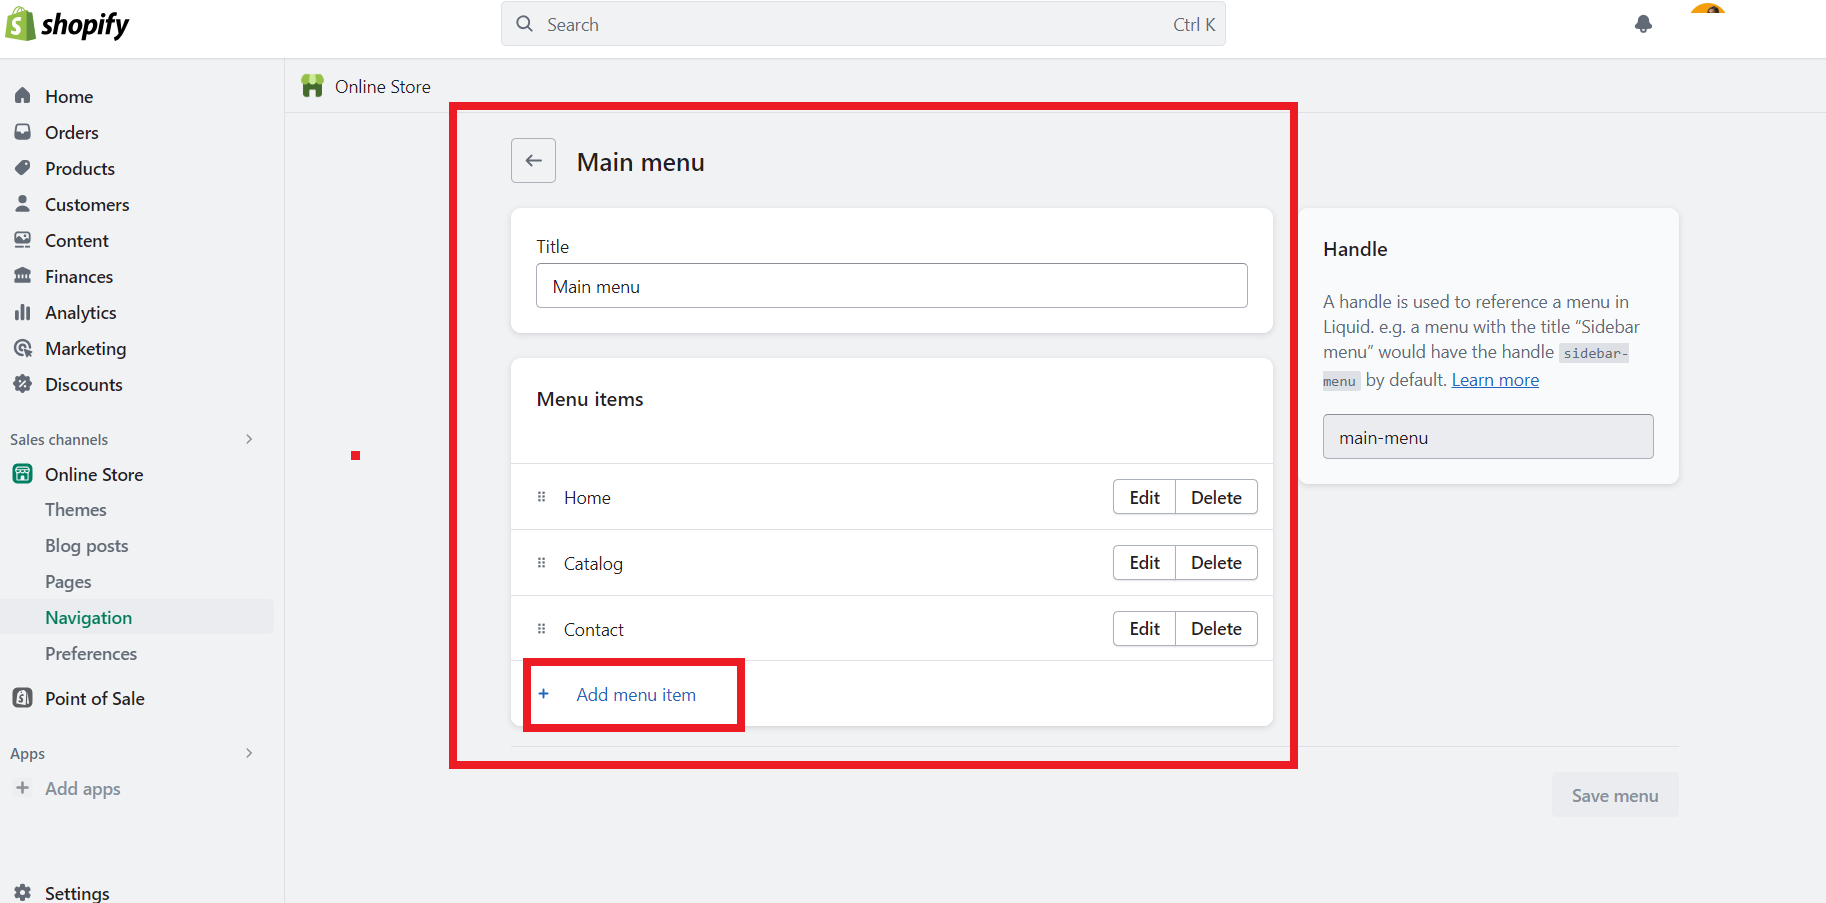
Plus, you have the option to add pages, collections, or even external links to your menu. Choose the desired pages or collections from the available options, and they will be added as menu items.
➡ Upload Main Banner
To upload the main banner for your Shopify store, follow these simple steps. Firstly, search for a banner editing tool like Canva.com. With Canva, you can easily create stunning banners for your store. Here you can add text, background, graphics, and more.
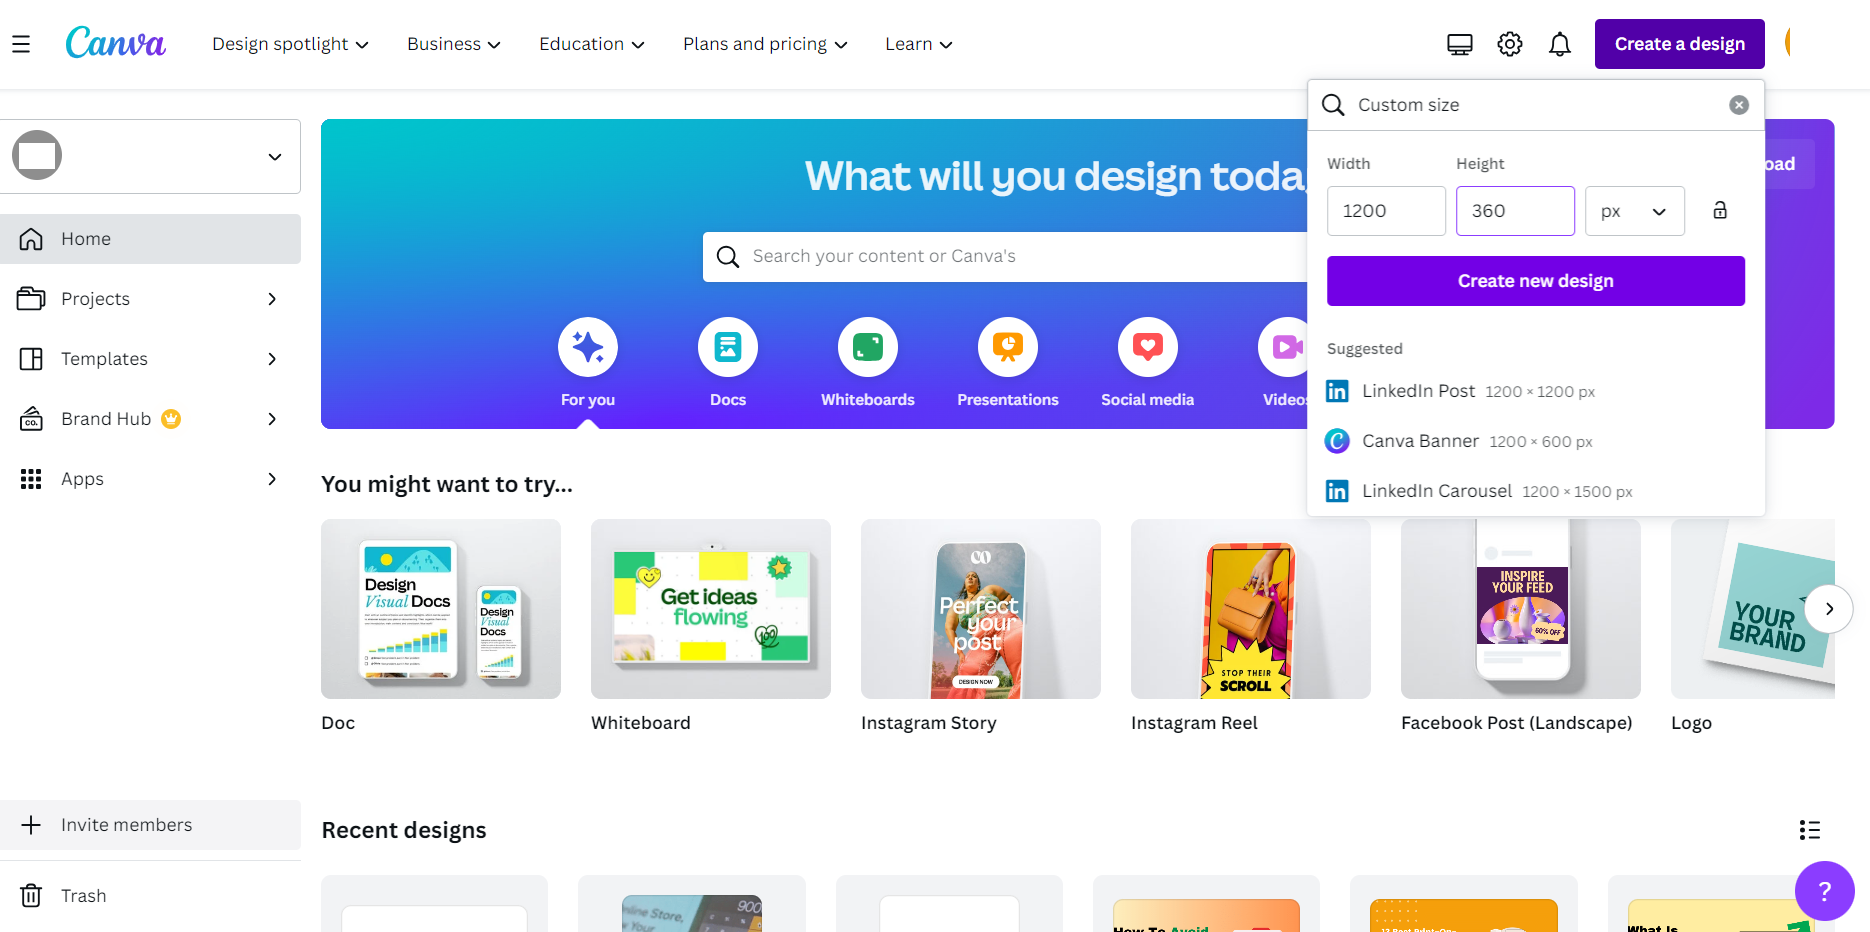
My suggestion for you is to choose the banner dimensions of 1200x360px. This size is recommended to ensure your banner fits perfectly on your store’s homepage. Plus, to encourage conversions, include a clear and prominent “Buy Now” button. This button should lead to a page where customers can easily make a purchase.
Now that your banner is ready, go to your Shopify admin dashboard and navigate to Online Store > Themes > Customize Theme > Edit Homepage Slideshow. Insert your freshly created banner in this section to make it the main focal point of your store’s homepage.👇
➡ Manage Typography & Colors
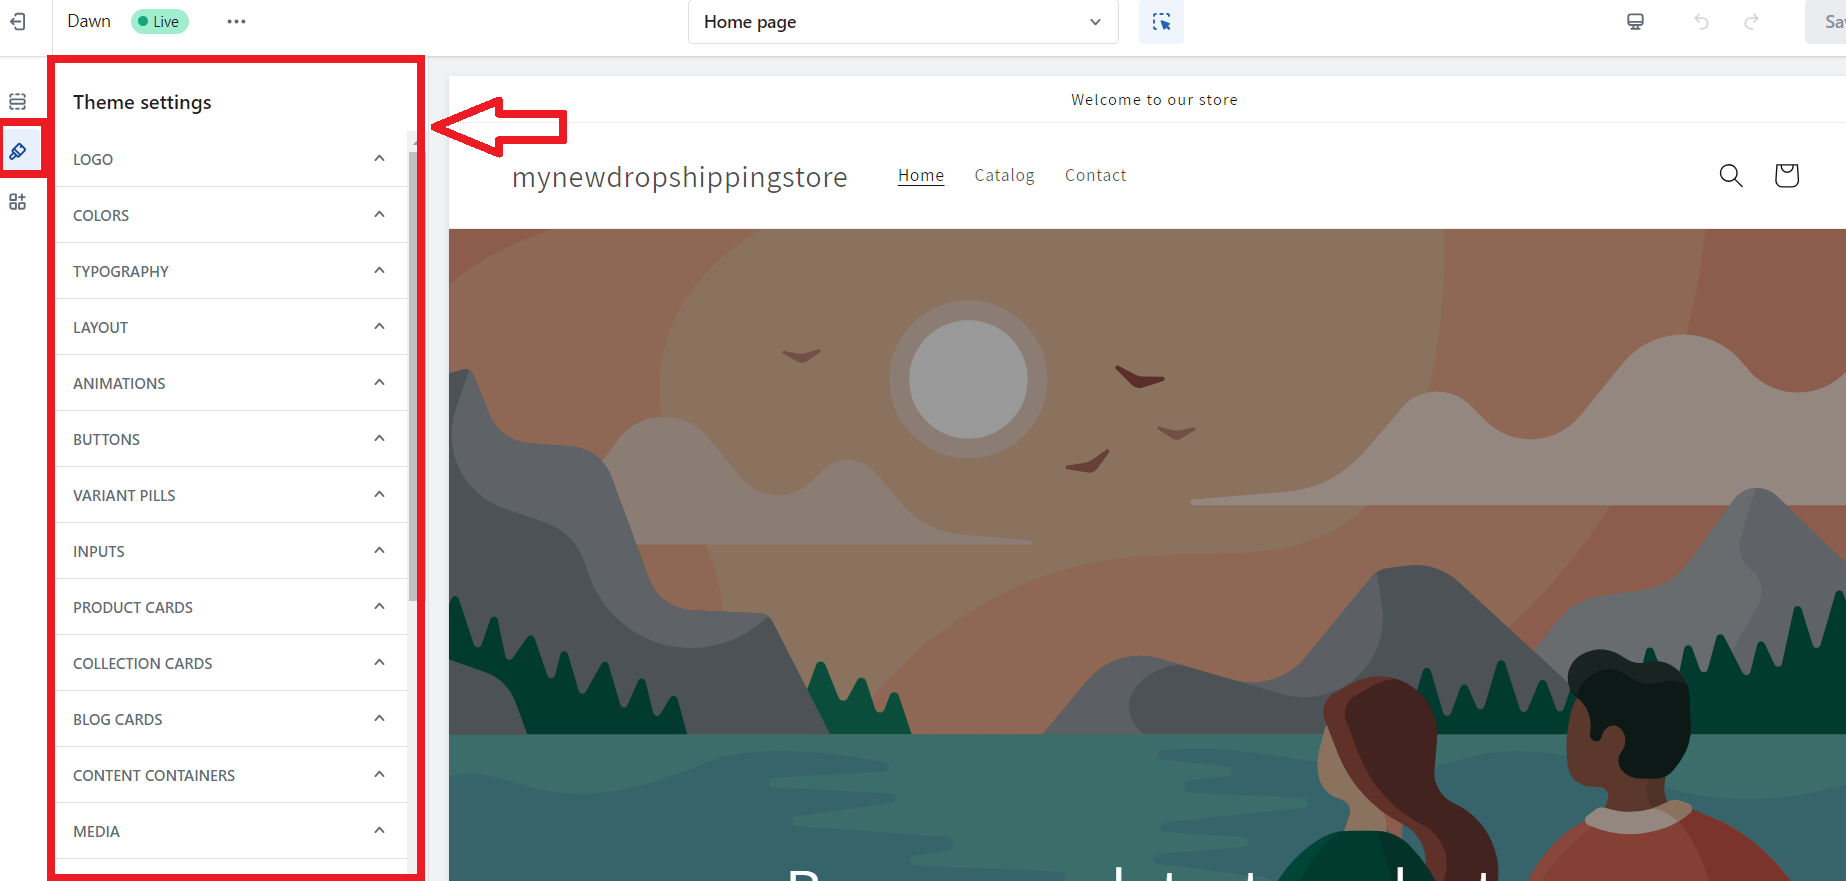
Furthermore, to customize the look and feel of your first Shopify store, including typography and colors, go to Theme Settings. Hence, from the left sidebar menu choose the “Theme Settings” section, which is presented by a brush graphic.
➡ Edit Featured Products
First, navigate to the “Customize Theme” option in your Shopify admin dashboard. Once there, select “Home page” and then “Featured Products.”
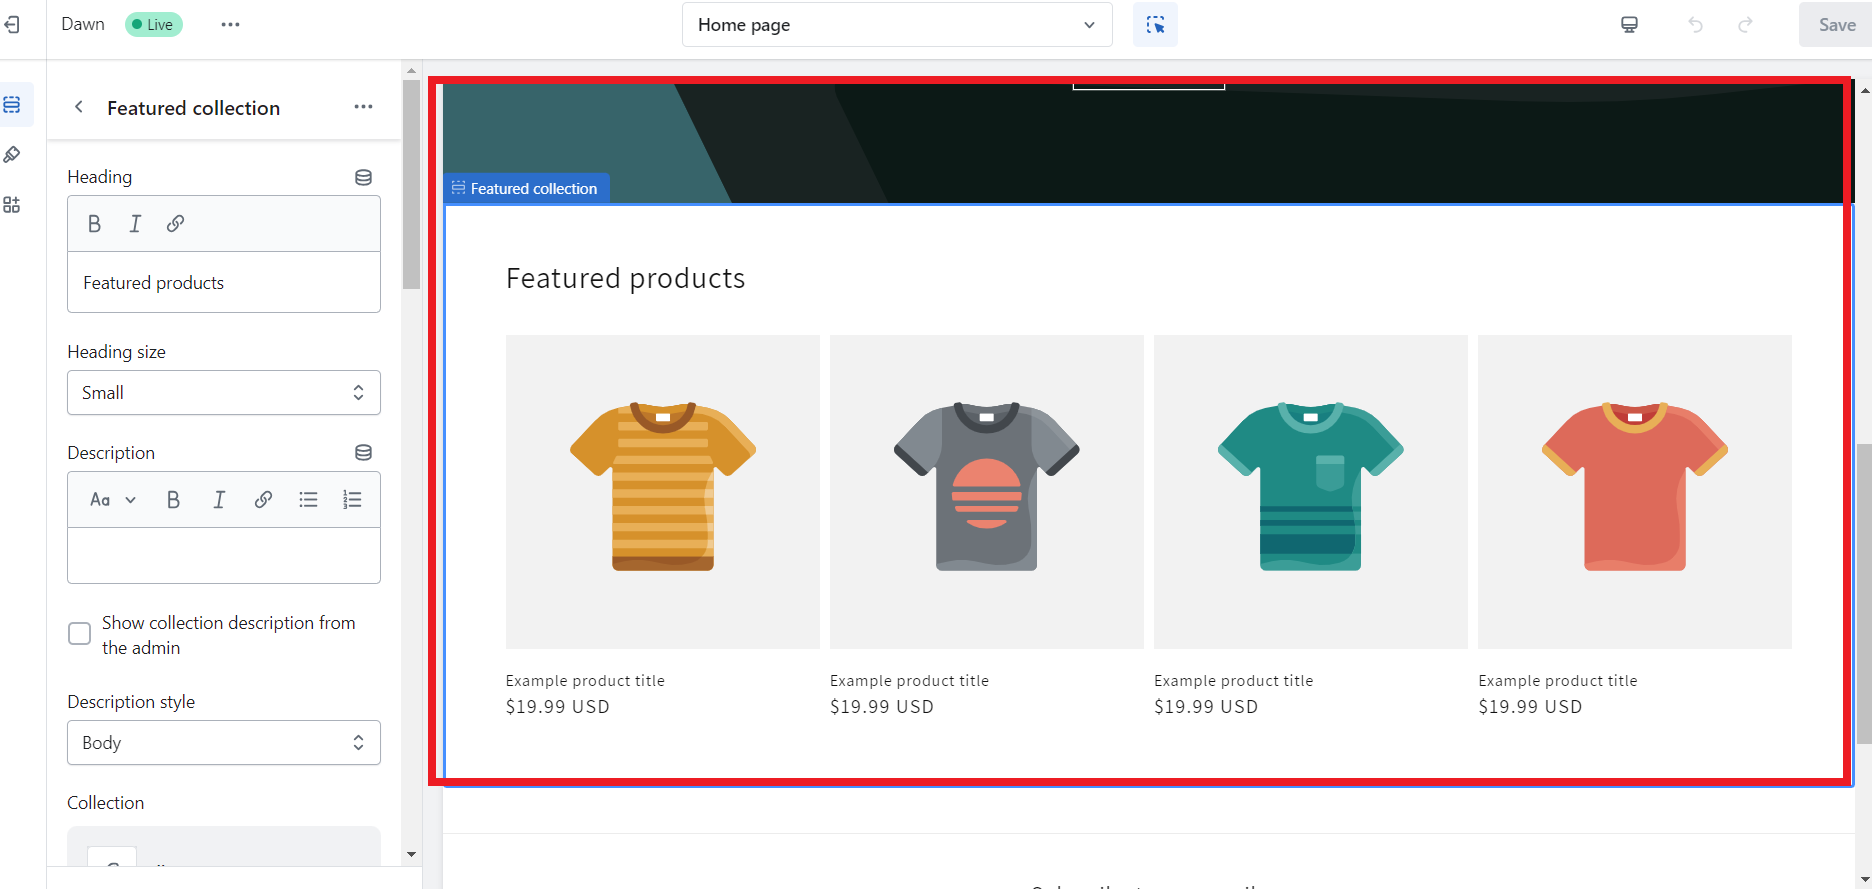
To populate this section with products, you will need to create a collection named “Featured” within your Shopify admin. Then, go to the product you wish to showcase and add the “Featured” tag to it. Repeat this process for all the products you want to include in the featured products section.
Once tagged, these products will automatically appear on your Home Page under the “Featured” section. This allows you to easily showcase your most popular or latest products, improving the visibility of your best-selling items and encouraging potential customers to explore more.
➡ Customize the style of your checkout
Under the same tab, you can customize the style of your checkout as well. As your customers will use your checkout pages to enter payment and shipping information for their orders, avoid distracting them and making the information hard to read.
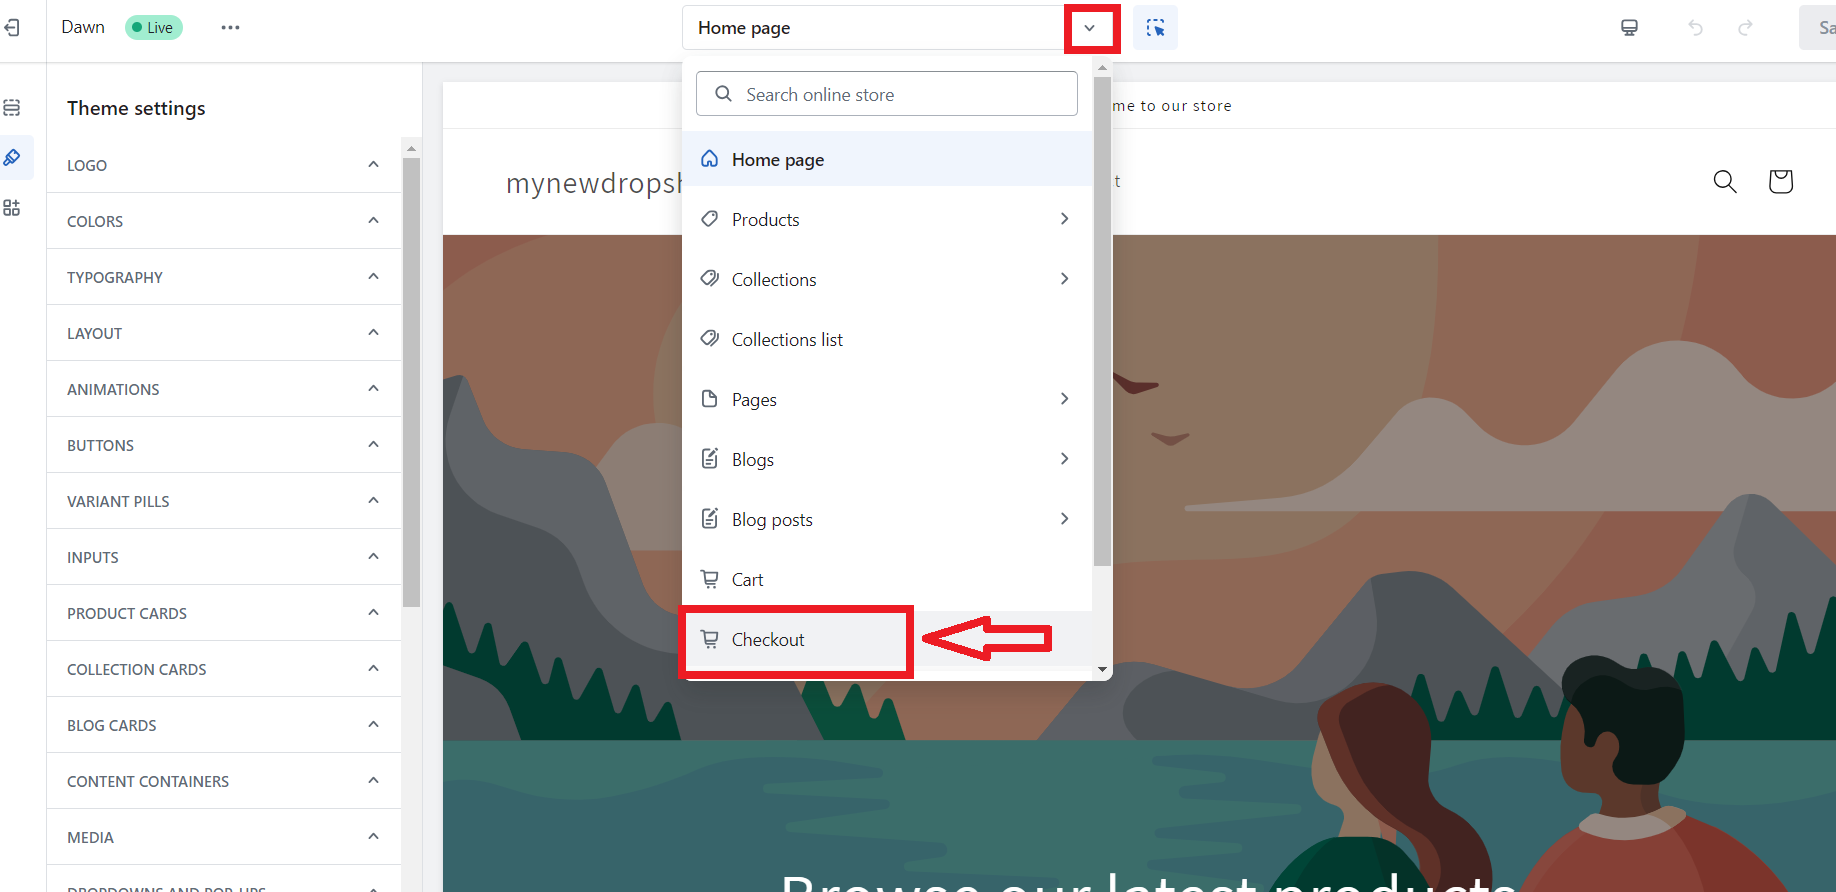
Though you may want to add different colors to your checkout pages, you should keep the design simple. It is also a good idea to add your logo here.
Plus, do not forget to set up automatic reminder e-mails for customers who will reach your checkout without completing their purchases. By doing so, that person will receive an e-mail about their cart abandonment.
Another important thing to do when customizing the style of your checkout is to give customers an option to subscribe during the checkout process.
Then, you can reach out to them with discount deals and new products. This is a good e-mail marketing technique to generate more sales.
👉 Read about Setting Up Shopify Discounts: 5 Important Things You Should Know.
👉 Check out the Top 11 Shopify Checkout Apps: How to Optimize Your Checkout Page?
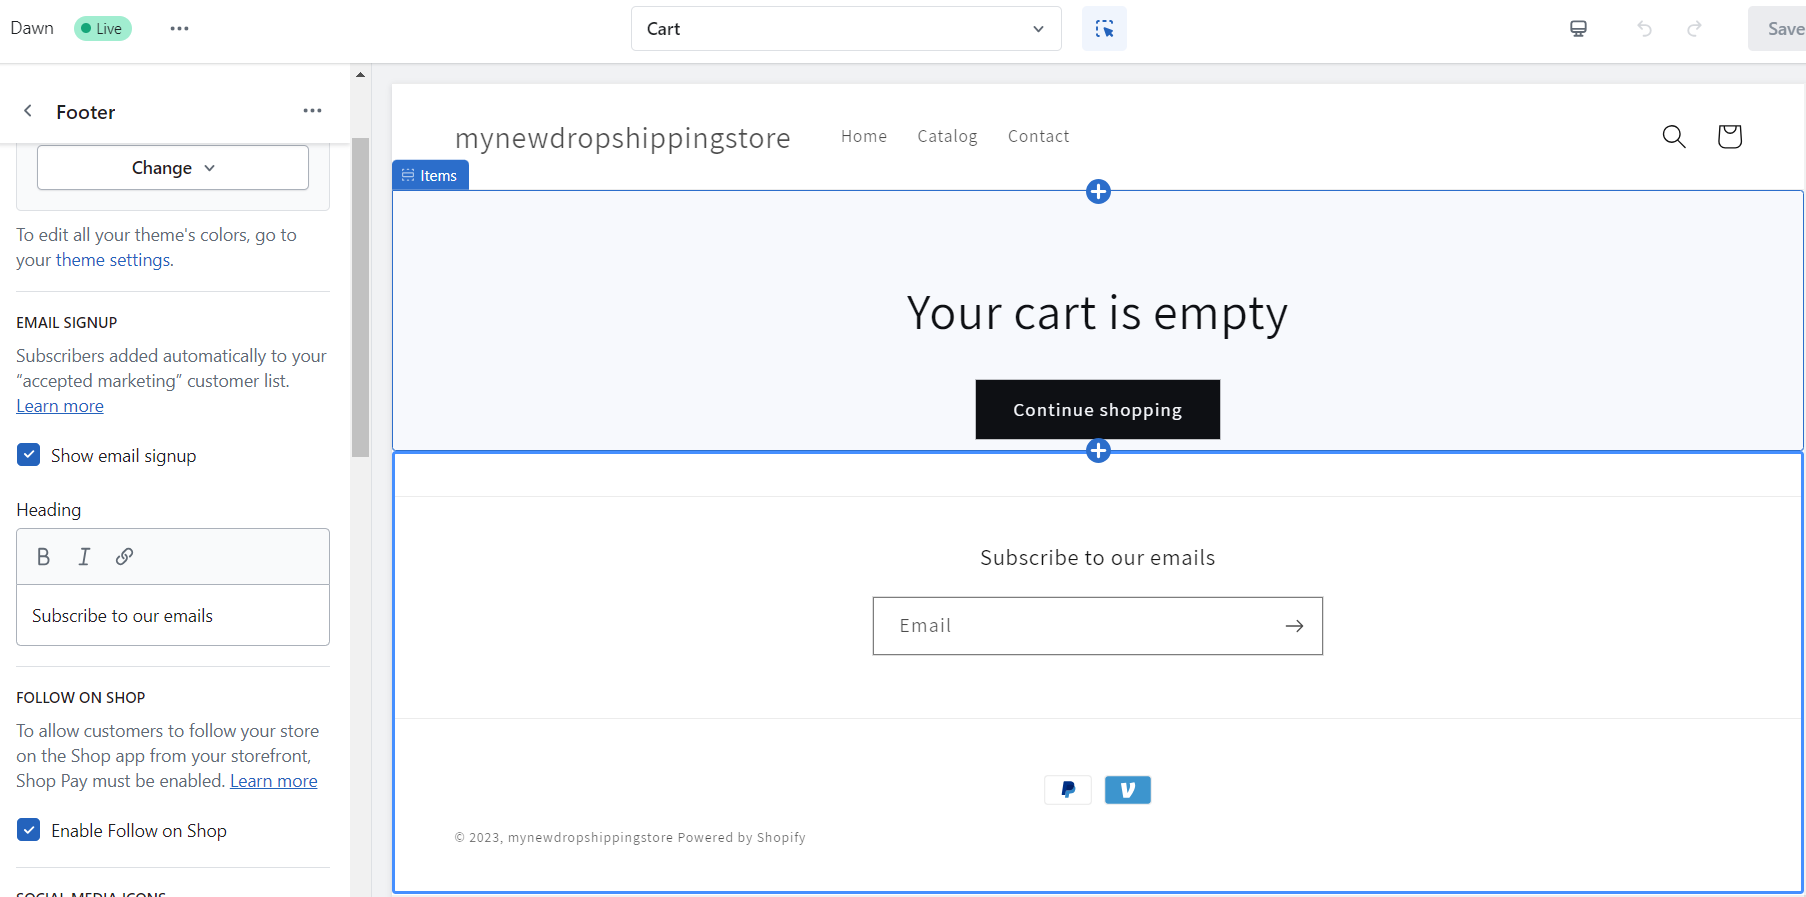
➡ Set up your Footer
Setting up a professional and organized footer for your Shopify store is essential to providing a seamless user experience for your customers.
In fact, I love saying about footers that they should have the functionality of a Sitemap, where users can find their way out if they feel lost on your website.
Therefore, here’s what you need to do.👇
Navigate to the “Online Store” section. Then, select “Navigation” from the sidebar menu. Click on “Add menu” to create a new menu for your footer. Hence, enter a suitable title for your footer menu, such as “Footer menu.”
Hence, as you can see, I already have the Footer menu added. But, as for you, continue to step 3 from the photo above, and follow the rules.
Furthermore, determine the content you want to include in the footer. I suggest you add such links to important pages like “About Us,” “Contact Us,” “Shipping & Returns,” and “FAQs.” You can also include links to your social media profiles and any other relevant pages.
What’s more, you can also list your website’s popular pages, like Products, Collections, etc, by clicking on “Add menu item” and select the relevant page from the dropdown menu.
3. Install dropshipping apps
Shopify has many powerful dropshipping apps that can help you optimize and grow everything from product sourcing to marketing. Hence, you can access the Shopify app store from your dashboard.
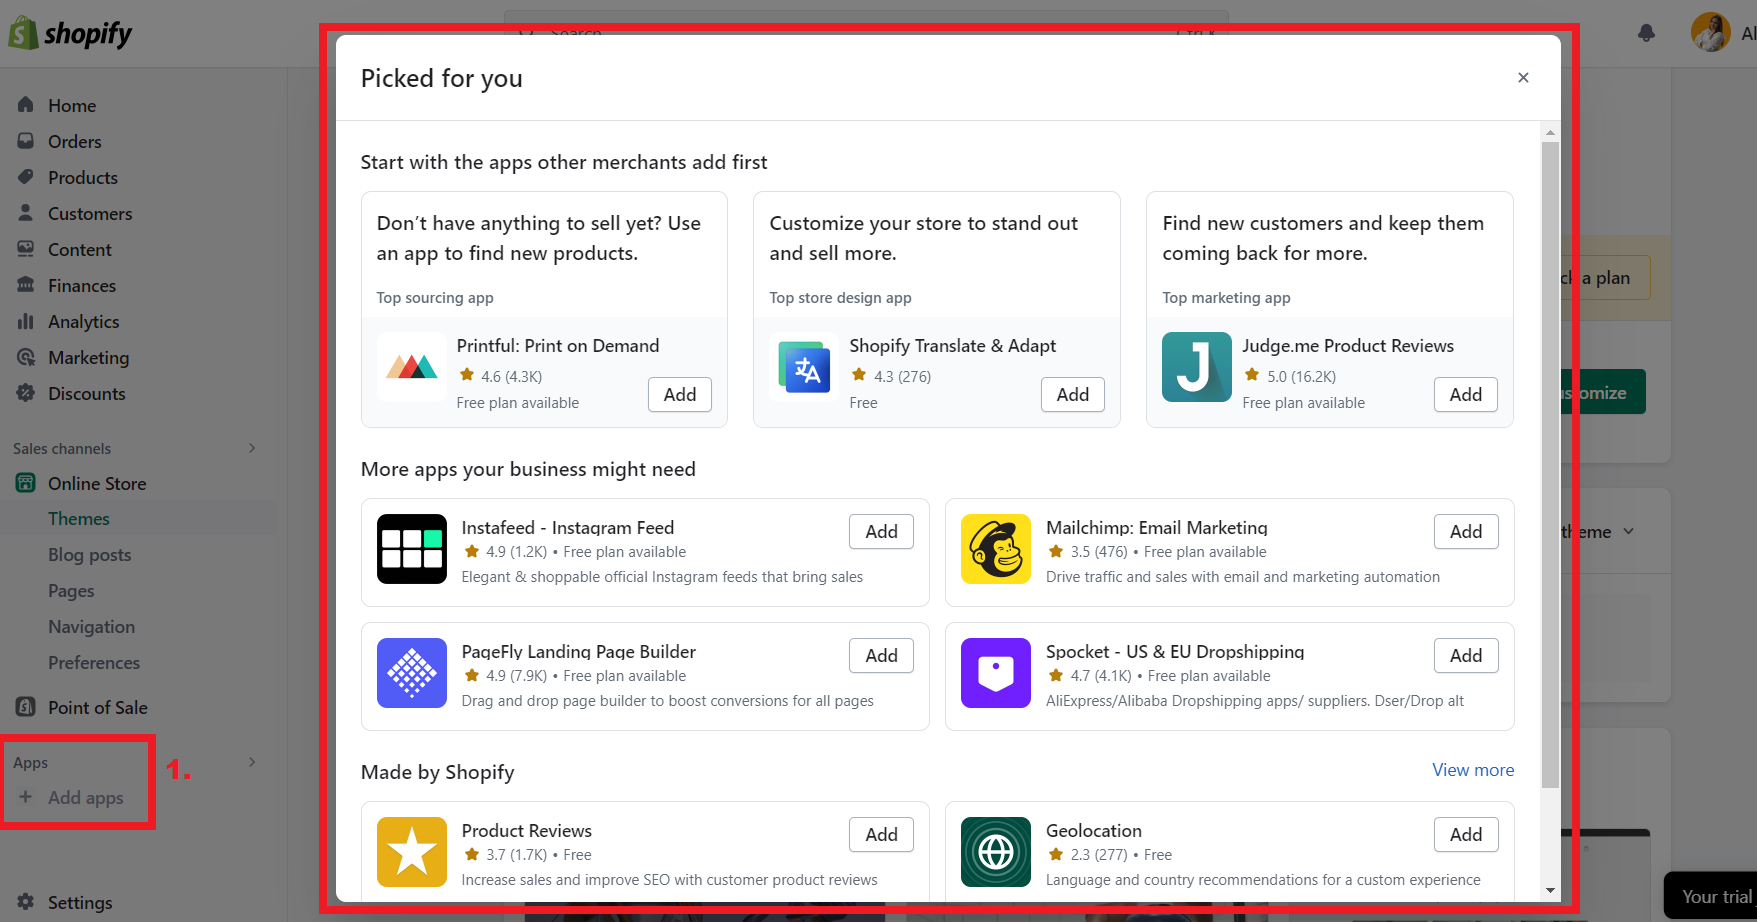
Or, you can simply go to the Shopify app store, and search for apps you want.
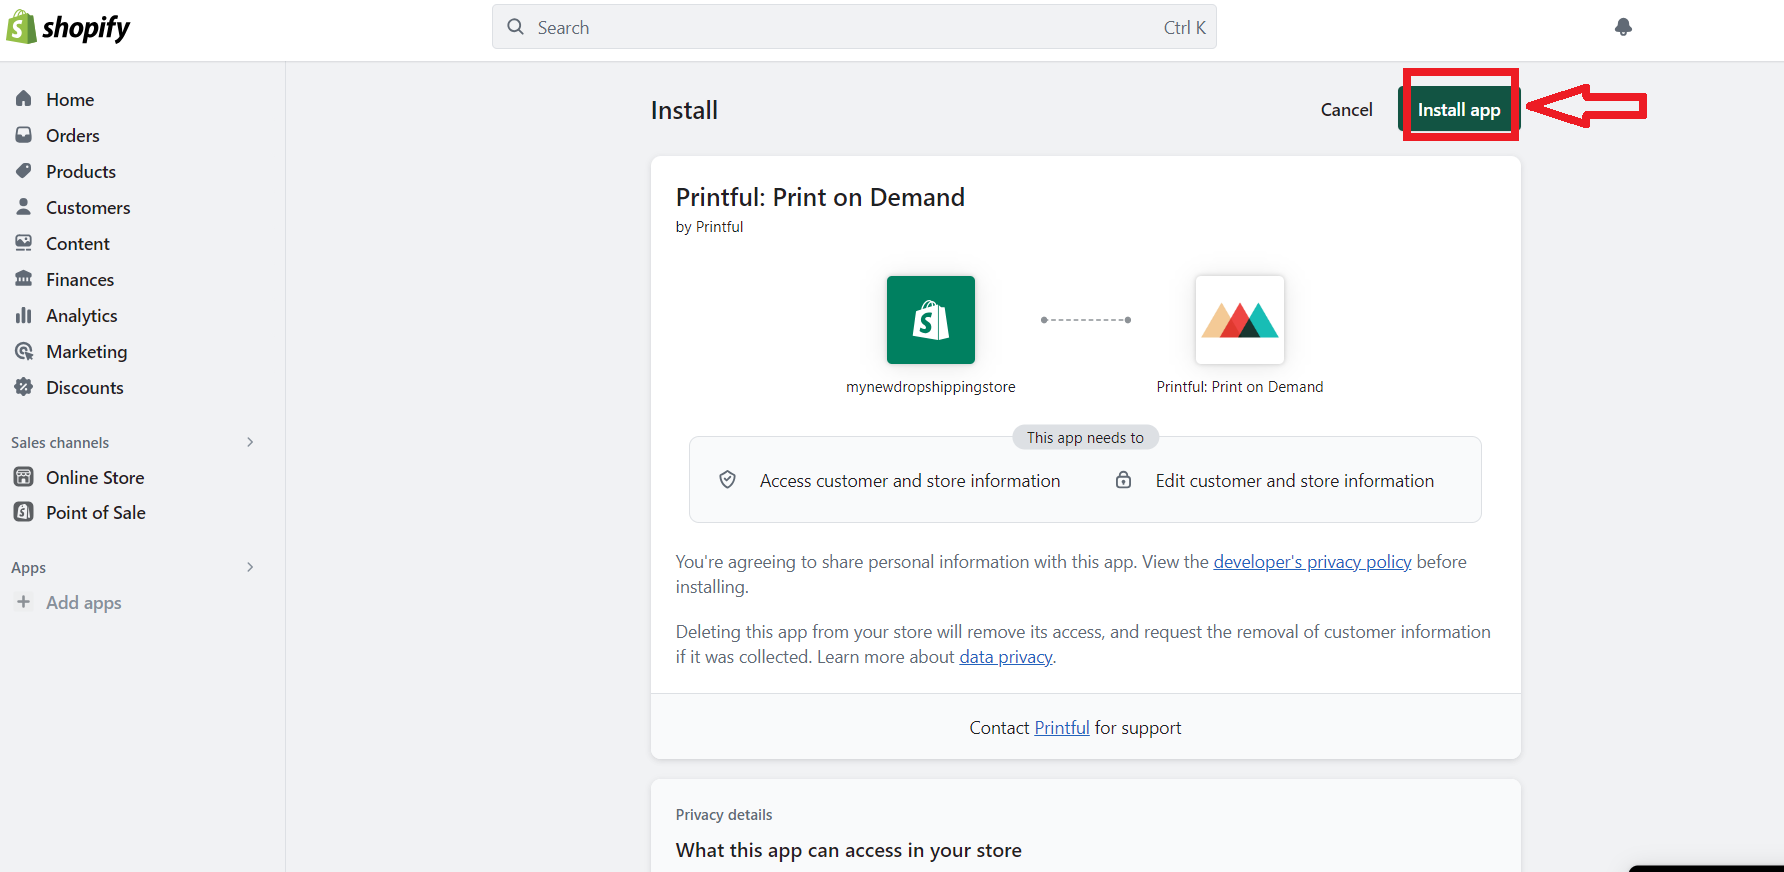
Hence, once you find your desired app, just click on ” Add App“.
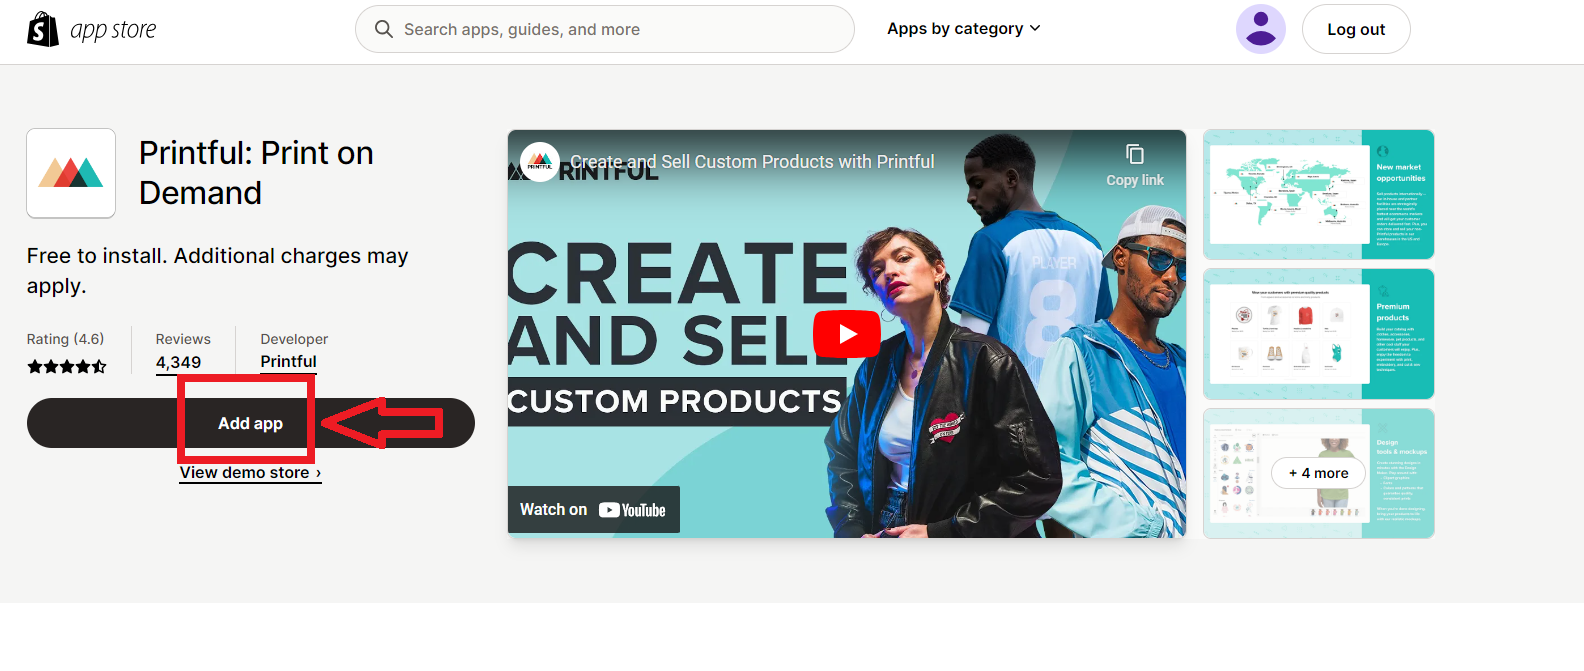
After that, you can install the app from the Shopify dashboard.
For example, some of the best Shopify dropshipping apps to find suppliers and products include BigBuy, Spocket, and Inventory Source.
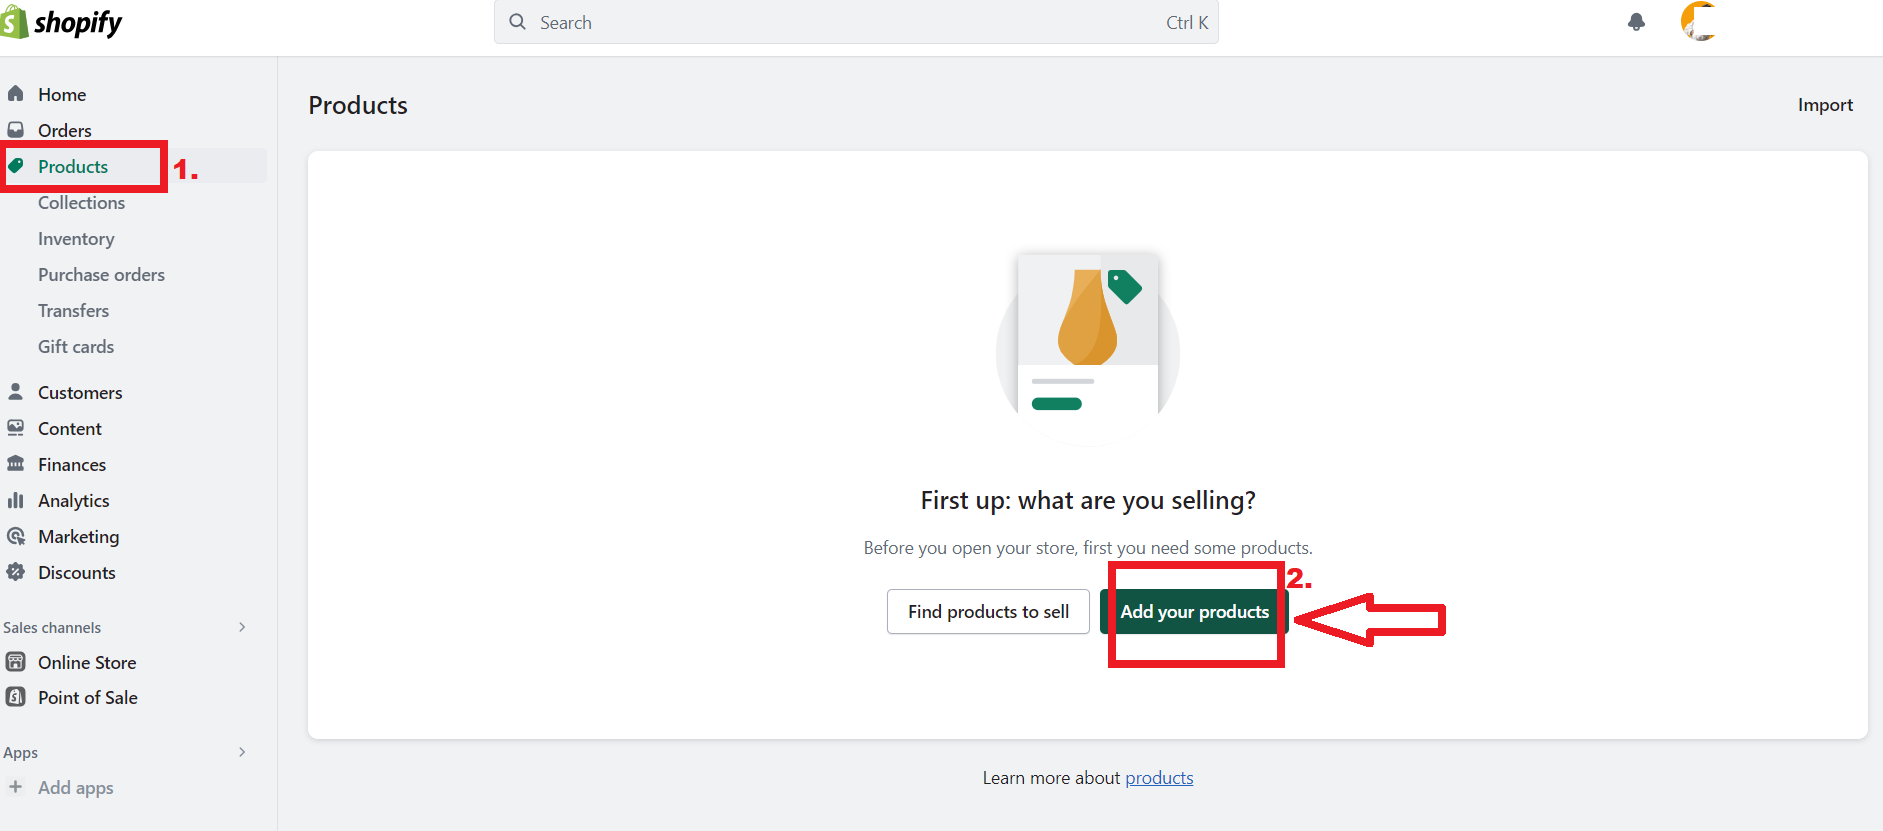
4. Upload Your Products
To set up your first store on Shopify, you must upload some products. First, click ‘Products’ and then click the ‘Add your product’ button to create your first product listing.
What’s more, Shopify also gives you an option to find products to sell. So, if you click on that button, you will be redirected to the Shopify app store which has numerous product research tools to choose from.
👉 Read my in-depth Shopify Magic Review: A Game-Changer for E-Commerce?
For example, I personally use Sell The Trend which has over a million products to choose from. Not just that, but with its AI analyzer I can get deep insights about product sales, costs, profit margins, competitors, and more.
👉 What To Sell On Shopify In 2024? Top Products & Tips.
Once you have found a product that you want to import into your store, you can click on “Add to store”, and add the product to your import list.
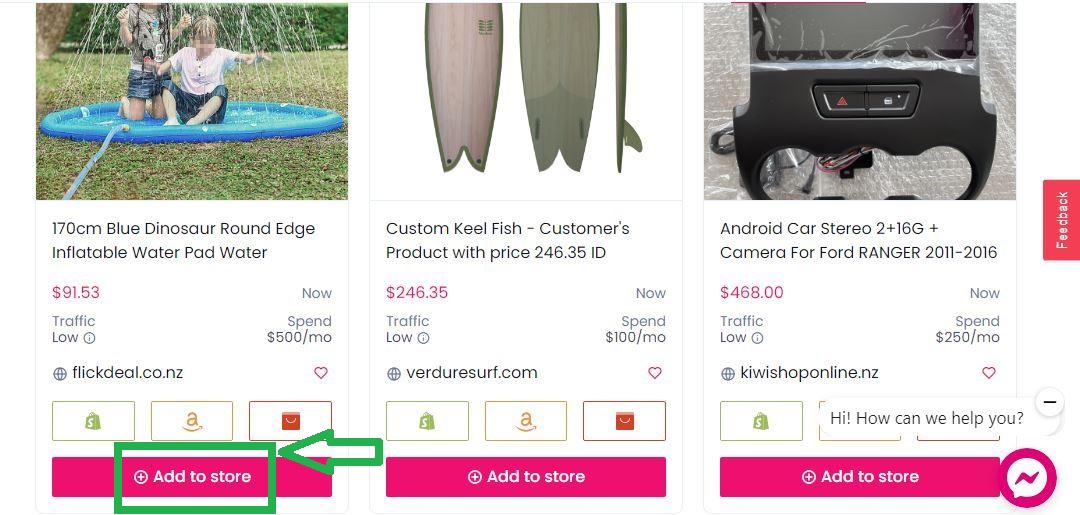
Additionally, you can import your dropshipping items either individually or in bulk. As long as you want to import a single product, you will see the ‘Import to store’ button next to the product that you want to add. Then, click that button.
However, in case you want to import several products in bulk, you need to check the products you want to add and then select ‘Import all to store’. You will find your imported products on the ‘Products page’.
Not only will you have to create your first product listing, but you will also have to customize your products with titles, descriptions, photos, and other details like quantity and collections. Here is how to do that:
➡ Title and Description
This is where a customer goes to learn about your product and decides whether or not to purchase it. So, create a short product title to let customers know what the product is.
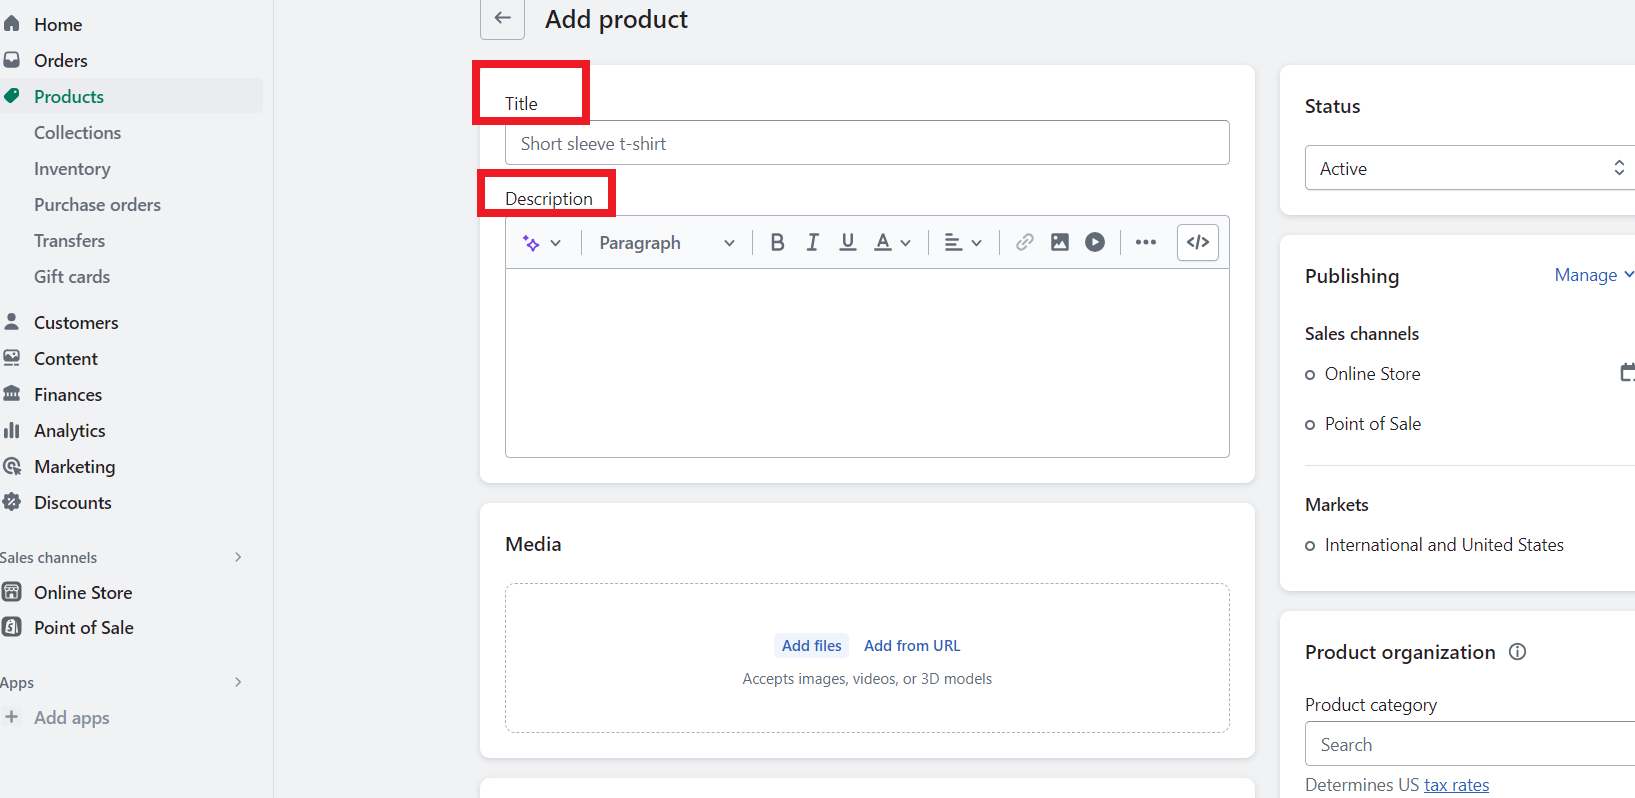
When it comes to product description, create a creative description providing customers with enough information to make them want to buy your product instantly. Make sure your product description answers the following questions:
-
- What makes my product different or more appealing to customers than other similar products on the market?
-
- How does my product address my customers’ biggest pain points?
-
- What do customers gain from buying my product?
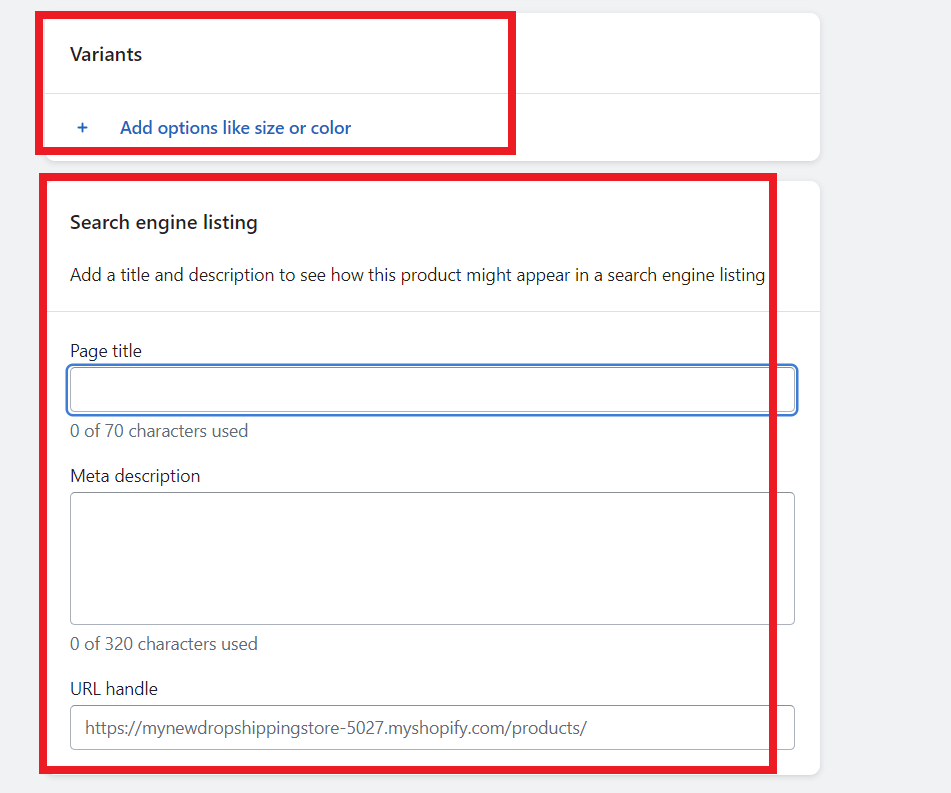
Plus, you can add product variants like size or colors. Also, you may want to optimize your product pages for SEO with good keywords, meta descriptions, etc. You can do so at the bottom of the ‘Product page’.
➡ Photos
Yeah, I strongly recommend taking your own professional product photos. But you can also use the product photos from your dropshipping suppliers. So, it is up to you to decide what to do.
👉 Learn more: How To Optimize Shopify Image Sizes In 2024 + Pro Tips.
Just keep in mind that you should keep all photos in the same dimensions to keep your first Shopify store looking tidy. As illustrated below, you can upload your product photos in the ‘Media section’ of the ‘Product page’.

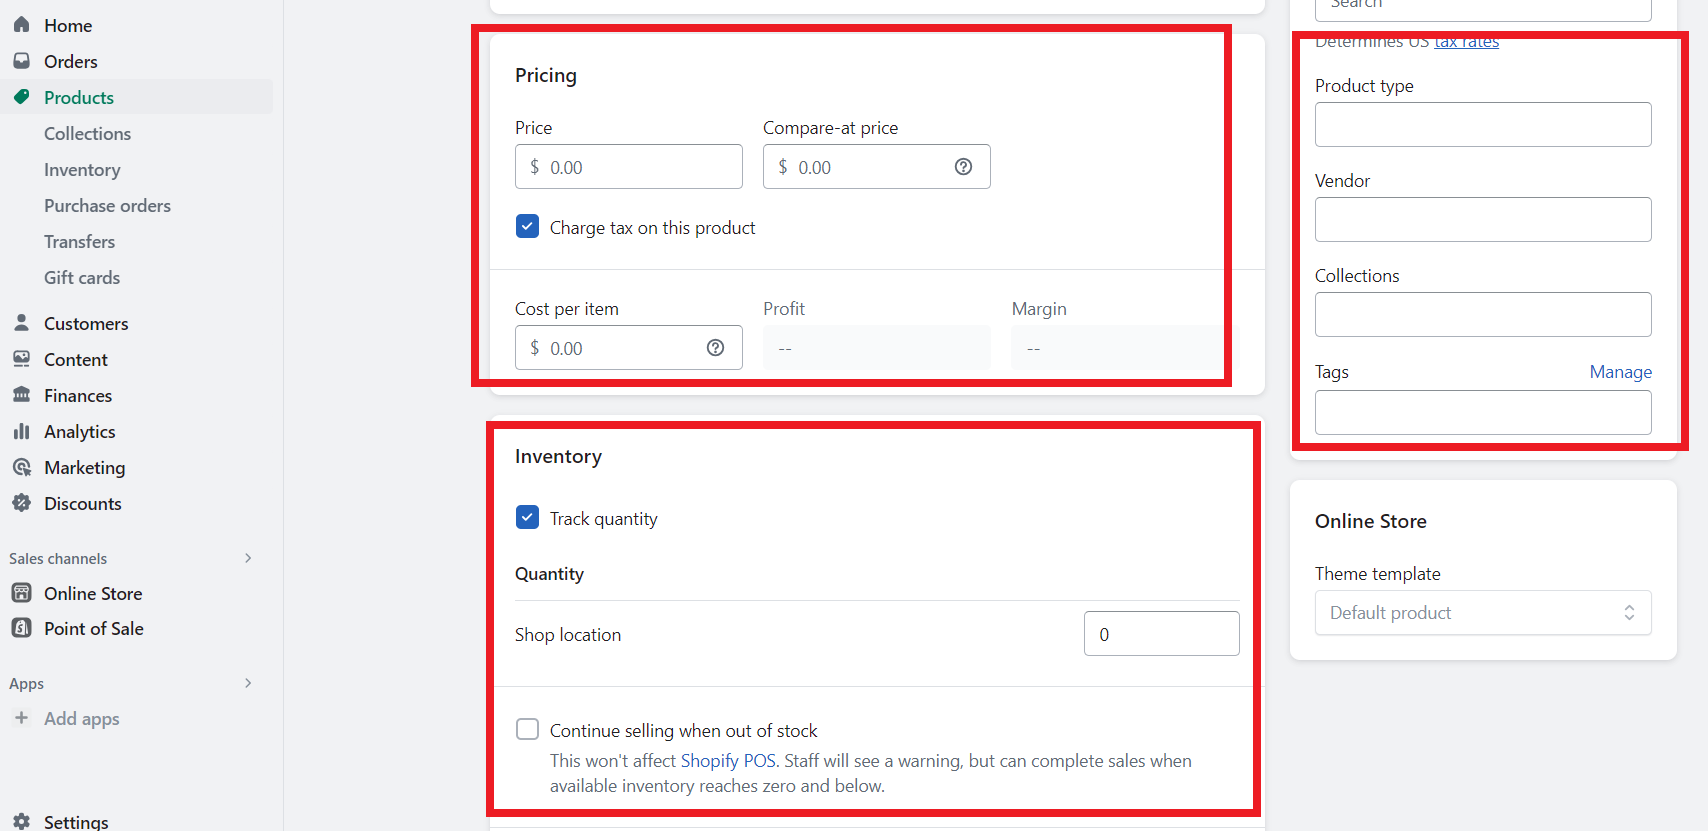
Here, you can also set prices for your products and create product categories. On this e-commerce platform, product categories are called collections (a group of items with similar features that people may look for when visiting your store).
For instance, if you are about to set up your first clothing store on Shopify, your visitors may look for clothes specifically for kids, men, or women. That’s why it is very important to create product collections.
Also, you can also specify product pricing, inventory, etc.👇
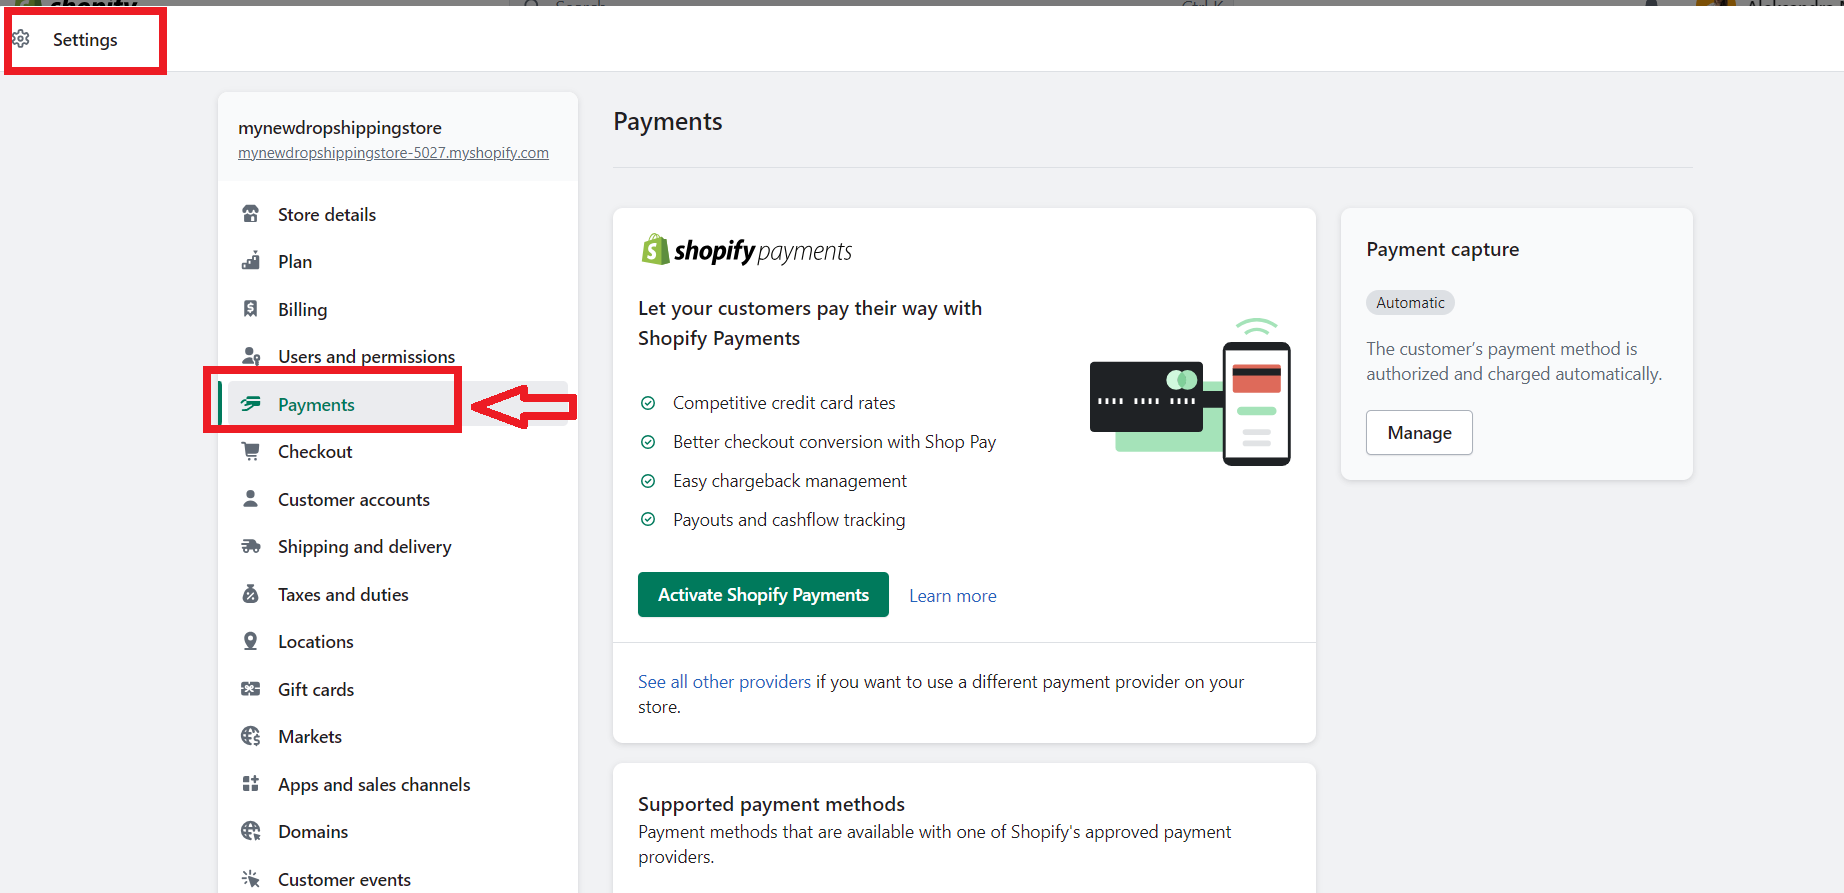
5. Set Up Payments
Want to get paid by your customers and accept various forms of payment gateways such as Shopify Pay, Google Pay, credit cards, etc? If so, you need to use Shopify Payments when you set up your first store on Shopify.
👉 Check out the 7 Best Payment Gateways For Shopify In 2024.
Under ‘Store settings’ (which you will access at the bottom from the Shopify dashboard sidebar,) you need to select ‘Payments’. When choosing a payment gateway, ensure you know exactly what payment methods your target audience prefers. Thus, you may have to conduct a survey or do your own research. Then, you can choose a payment method accordingly.
👉 Learn How To Pause Or Cancel Shopify Subscription? [2024].
6. Create Some Key Policies And Pages
Aside from designing your homepage and uploading your products, you also need to create some key policies and pages for your first Shopify store. You need to do so to make your visitors trust your site and tell them who you are and what you do.
Luckily, Shopify has a few useful tools that can help you create Terms & Conditions, Privacy Policies, Return & Refund Policies, etc. Also, you can specify your policies by going to ‘Settings’ and then clicking ‘Policies’.👇
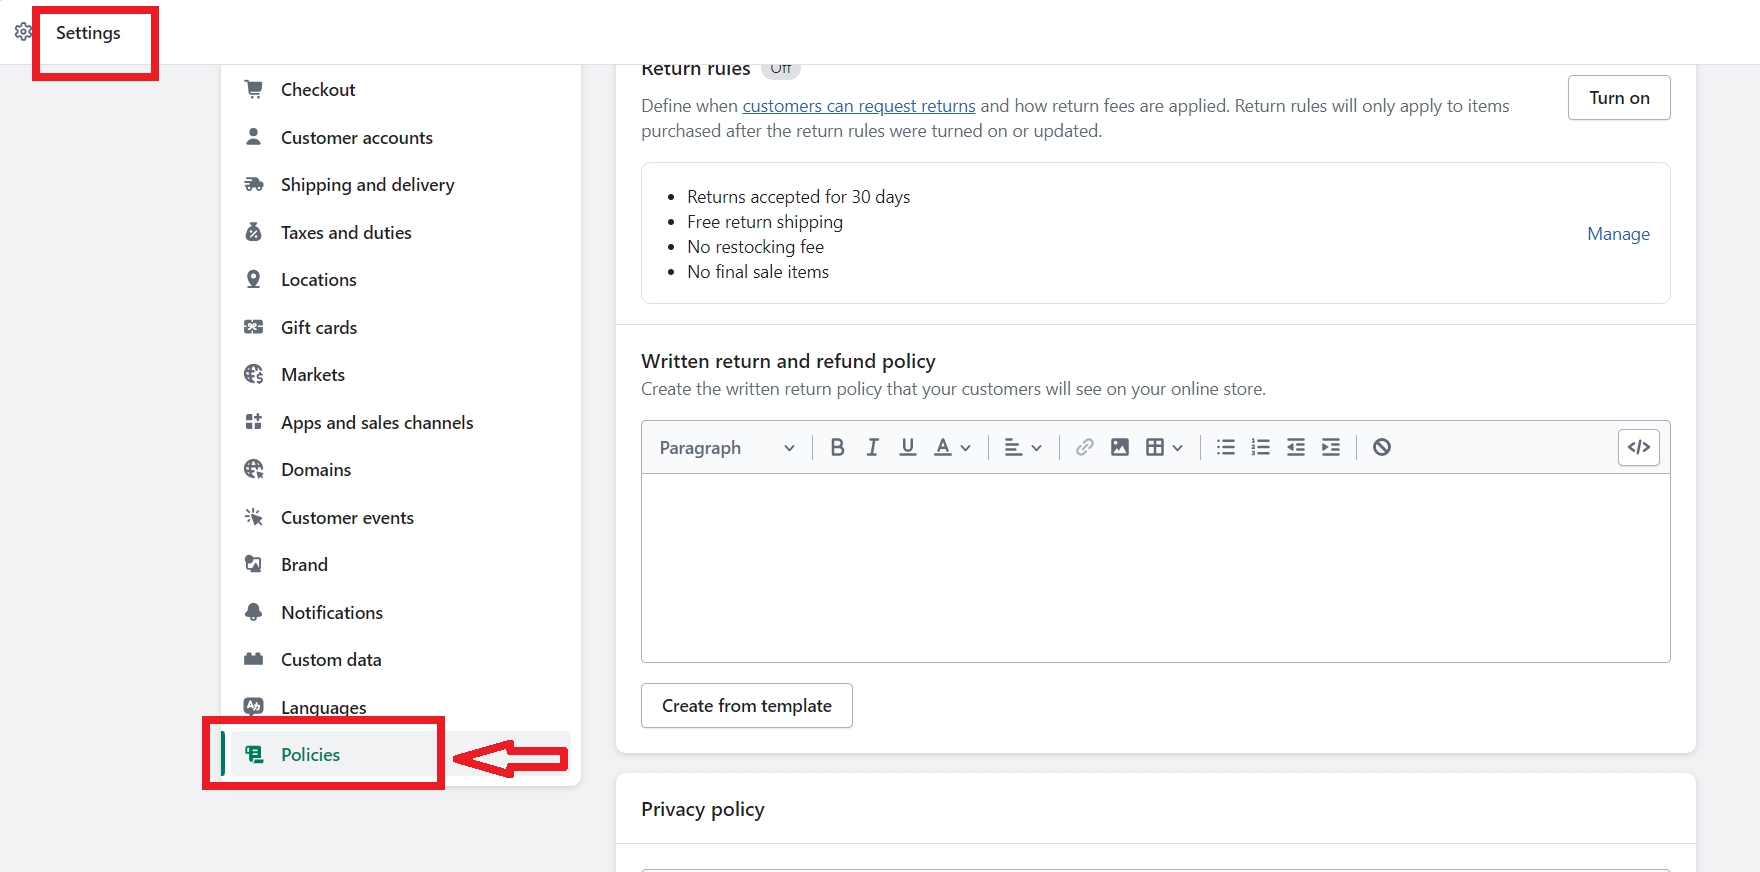
Once you have created these policies, they will be automatically linked in the footer of your checkout pages.
Furthermore, people who visit your site and are willing to buy something may need to see your policies before they check out. Therefore, you should link your policies in the navigation menu so that your customers can find them.👇

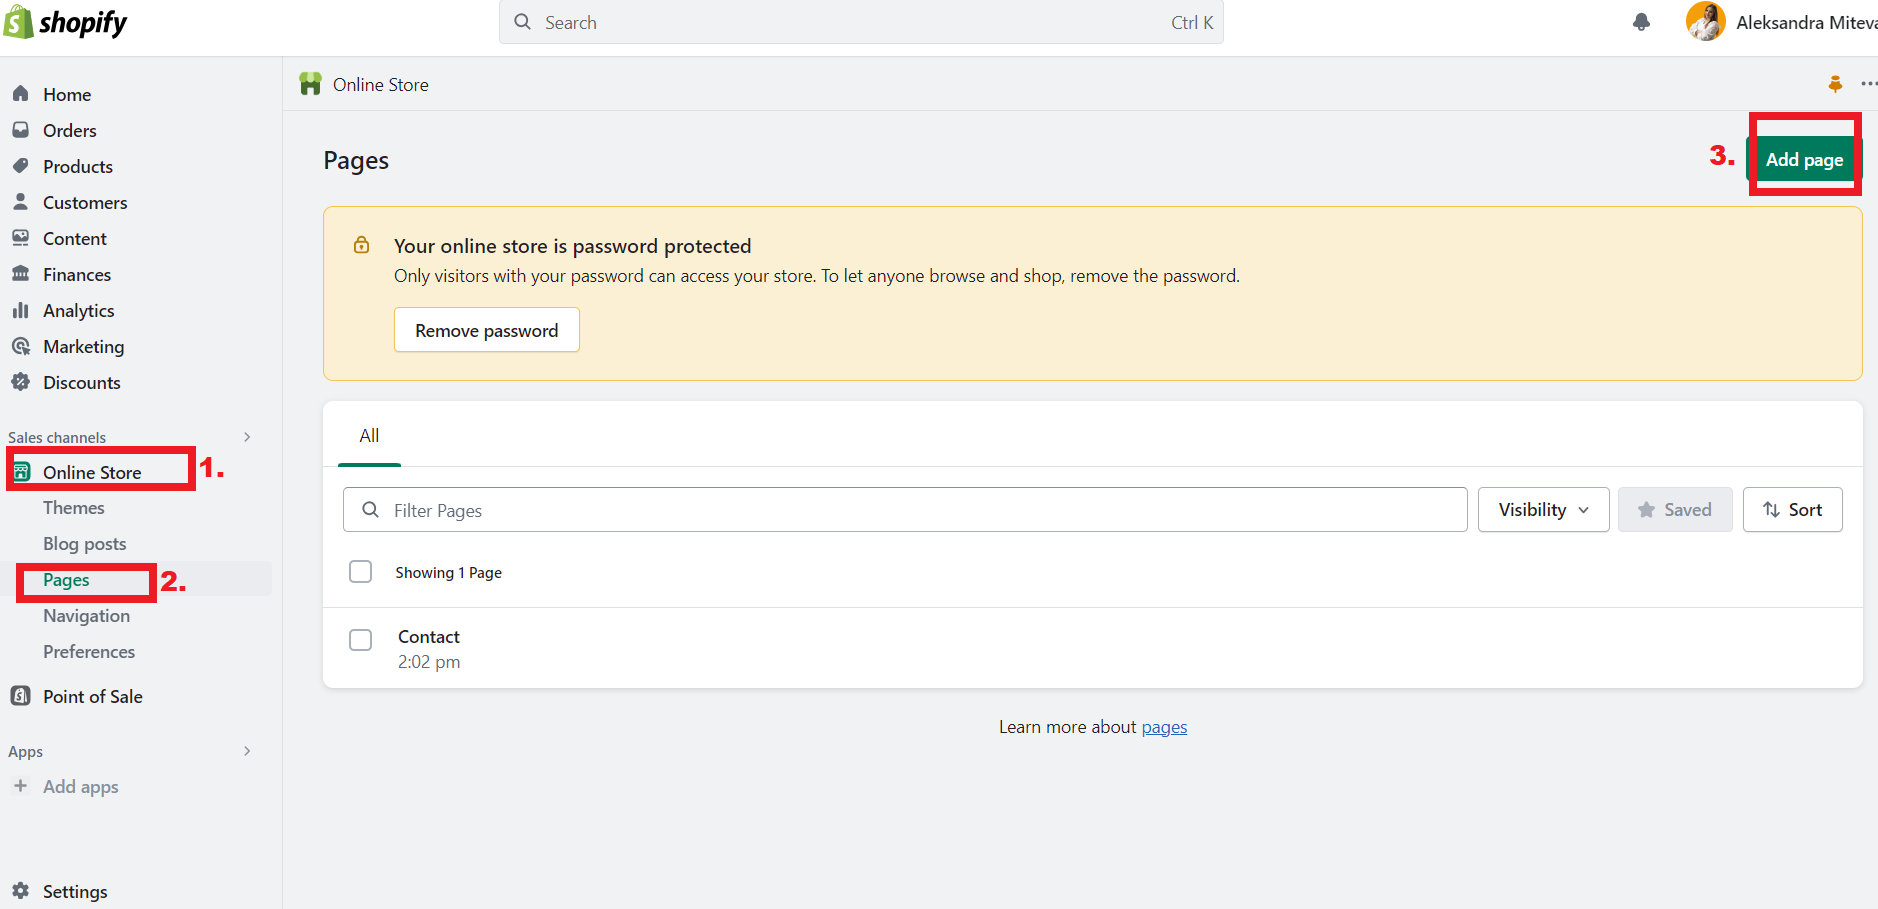
Moreover, you should also create the ‘About Us,’ ‘Contact Us’, and ‘FAQ pages’ to add information about your first Shopify store. These pages are sometimes some of the first stops when someone visits your site.
So, make sure they are informative, useful, and unique to make a great impression on your visitors. You can create them under ‘Online store’ > ‘Pages’ > ‘Add page’.
💡 Tip: Check out Shopify vs Squarespace For Dropshipping – Which is Better in 2024?
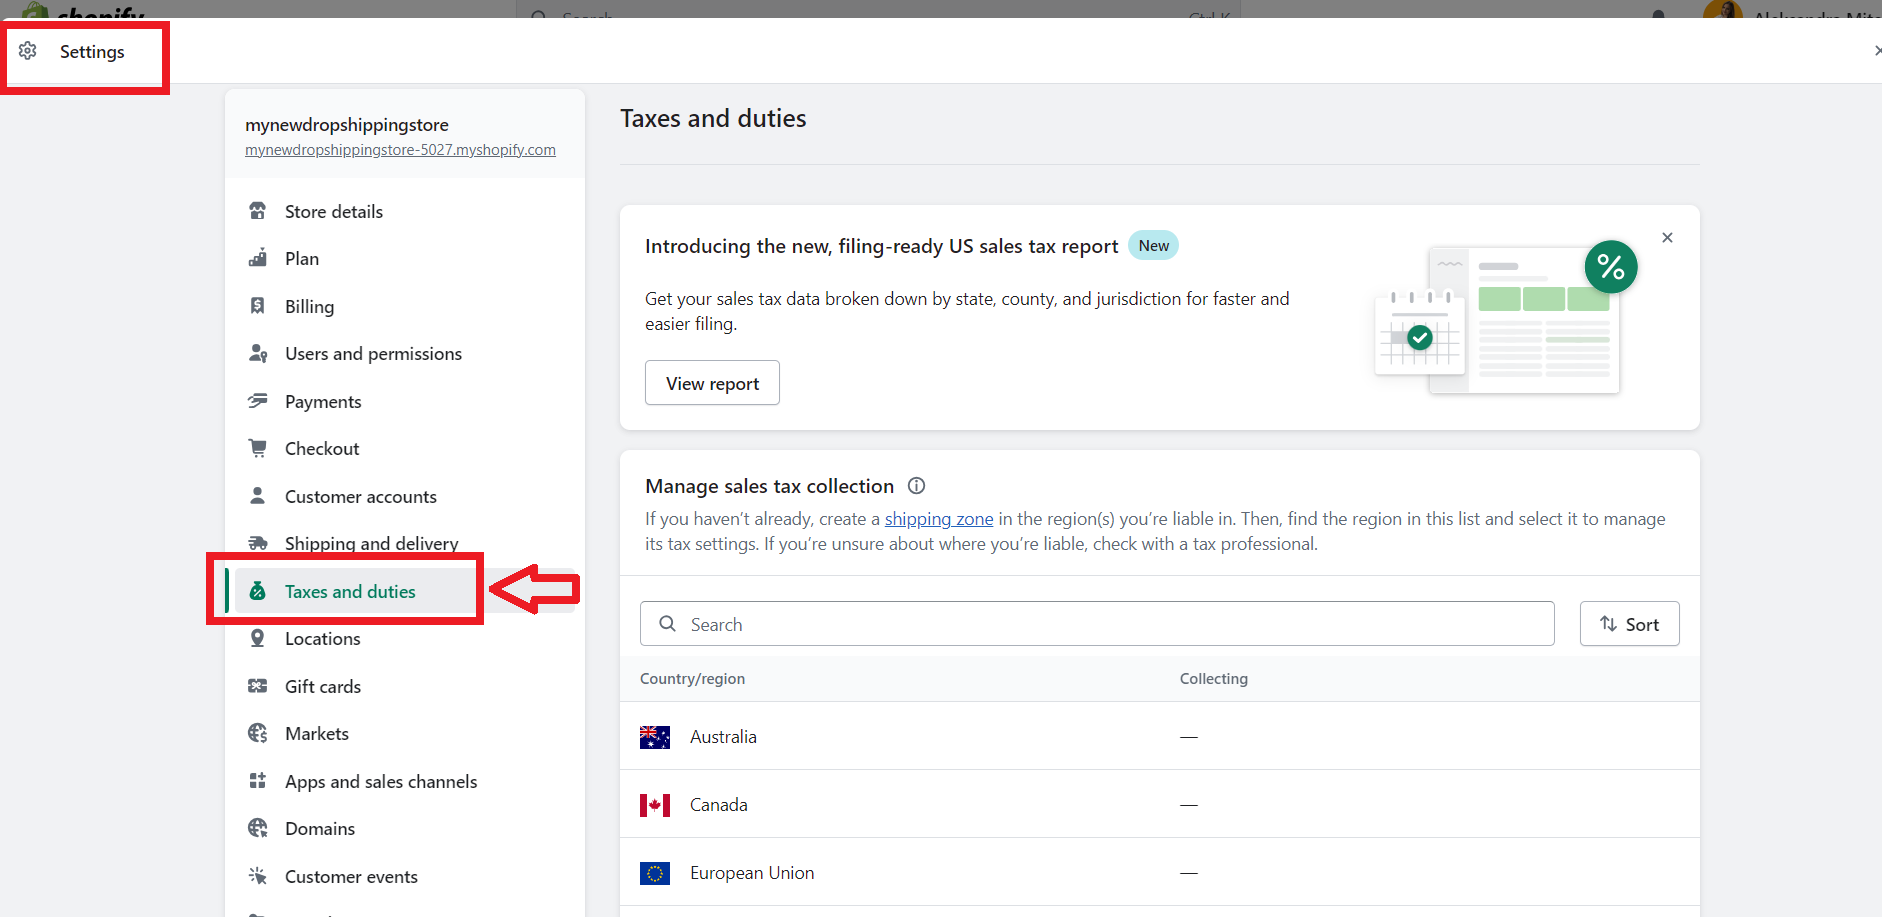
7. Set Up Your Taxes Properly
When you create a Shopify store, you also need to set up your taxes properly. As a dropshipping store owner, you need to collect sales taxes from your customers and report and remit those taxes to your tax authorities.
Fortunately, Shopify auto-calculates taxes and updates them regularly. What does this mean? This means that you can set your dropshipping store on Shopify to automatically manage the tax rates you charge to your customers.
Remember, Shopify can help automate charging sales taxes, but it does not remit or file your taxes for you.
This is why you should consult a tax professional who can determine your tax liability and advise you on how to file and pay your taxes.
To set up your taxes, go to ‘Settings’ and then click ‘Taxes and duties’.
👉 Read about Dropshipping Taxes and Payments – Must-Know Facts.
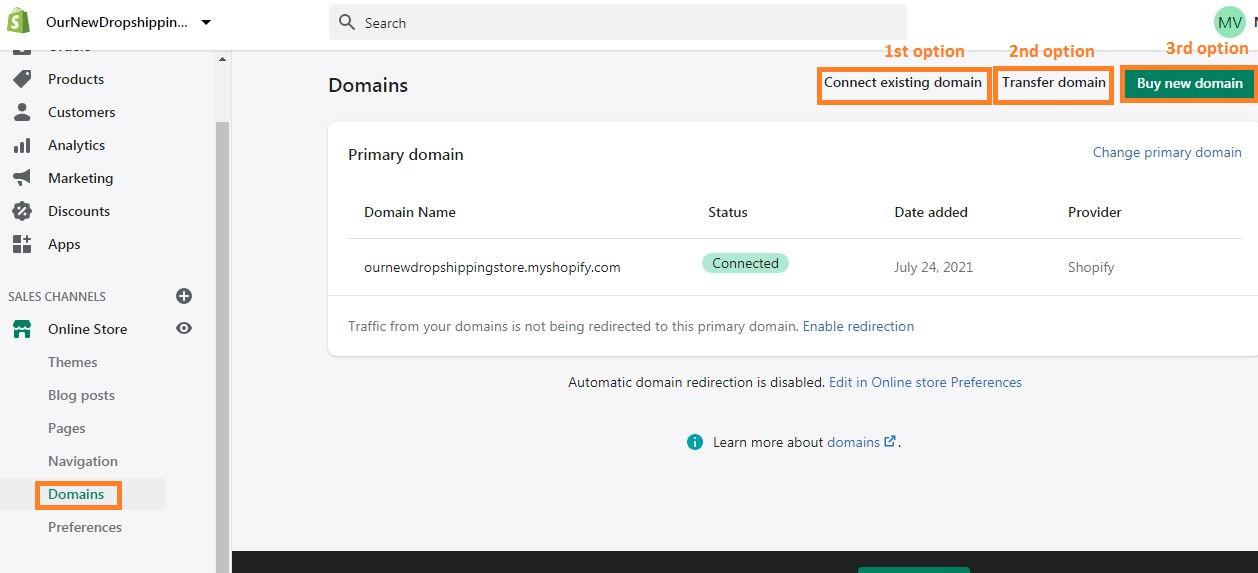
8. Add A Custom Domain
When you set up your first store on Shopify, your primary domain does use the format ‘your-first-Shopify-store-name.myshopify.com’. But this is not a great searchable site, and it may make you seem unprofessional.
Without a good custom domain (a unique branded name that identifies your site), you can’t establish your brand. Therefore, you need a custom domain.
You can customize the domain for your dropshipping store by going to ‘Online store’ > ‘Domains’. Then, you will see you have three options:
-
- Connect to an existing domain (You can select this option if you already own a custom domain.)
-
- Buy a domain from Shopify (You can buy a Shopify domain that reflects your brand.)
I recommend that you choose the third option, i.e., buy a domain from Shopify. Of course, the choice is yours!
👉 Learn How to Remove ‘Powered by Shopify’ – Short Guide.
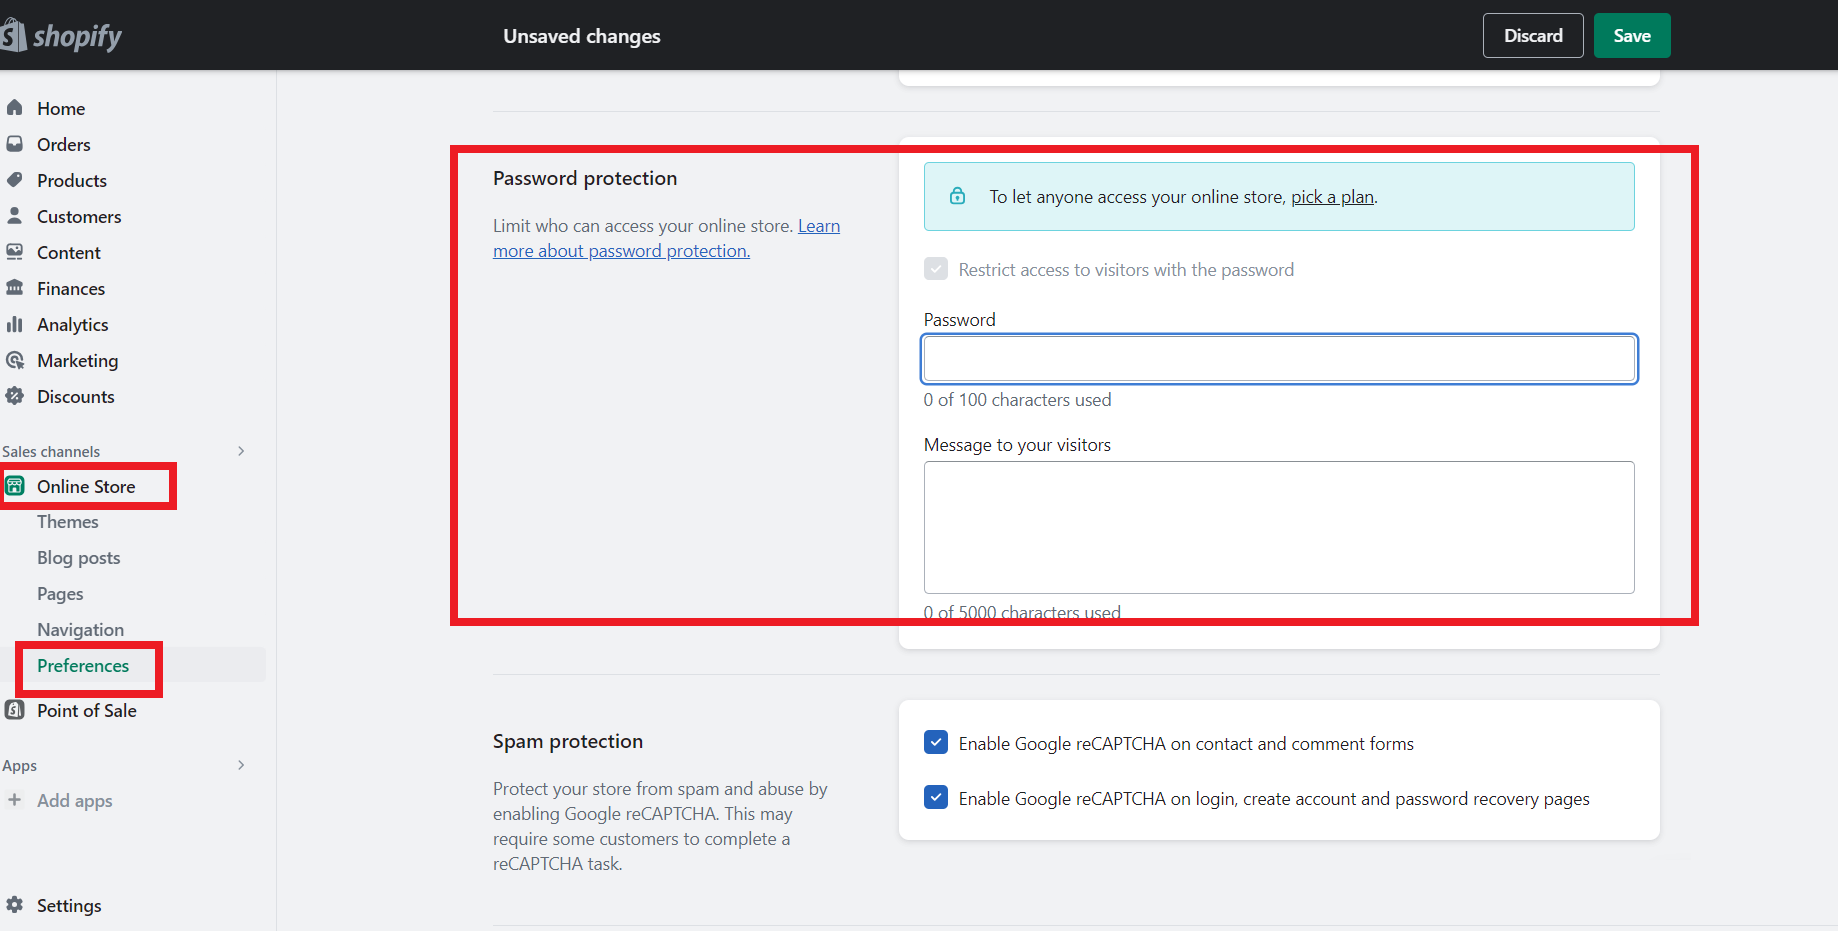
9. Launch Your First Shopify Store
Now that you have set up your first store on Shopify, you need to launch it. Before you do so, you must remove your storefront password. Otherwise, your customers cannot access your site even if it is published.
You can remove password protection by going to ‘Online Store’ > ‘Preferences’ > ‘Password protection’. However, to do so, you must pick a paid plan.
Also, it is important to place a test order to see how the checkout process works.


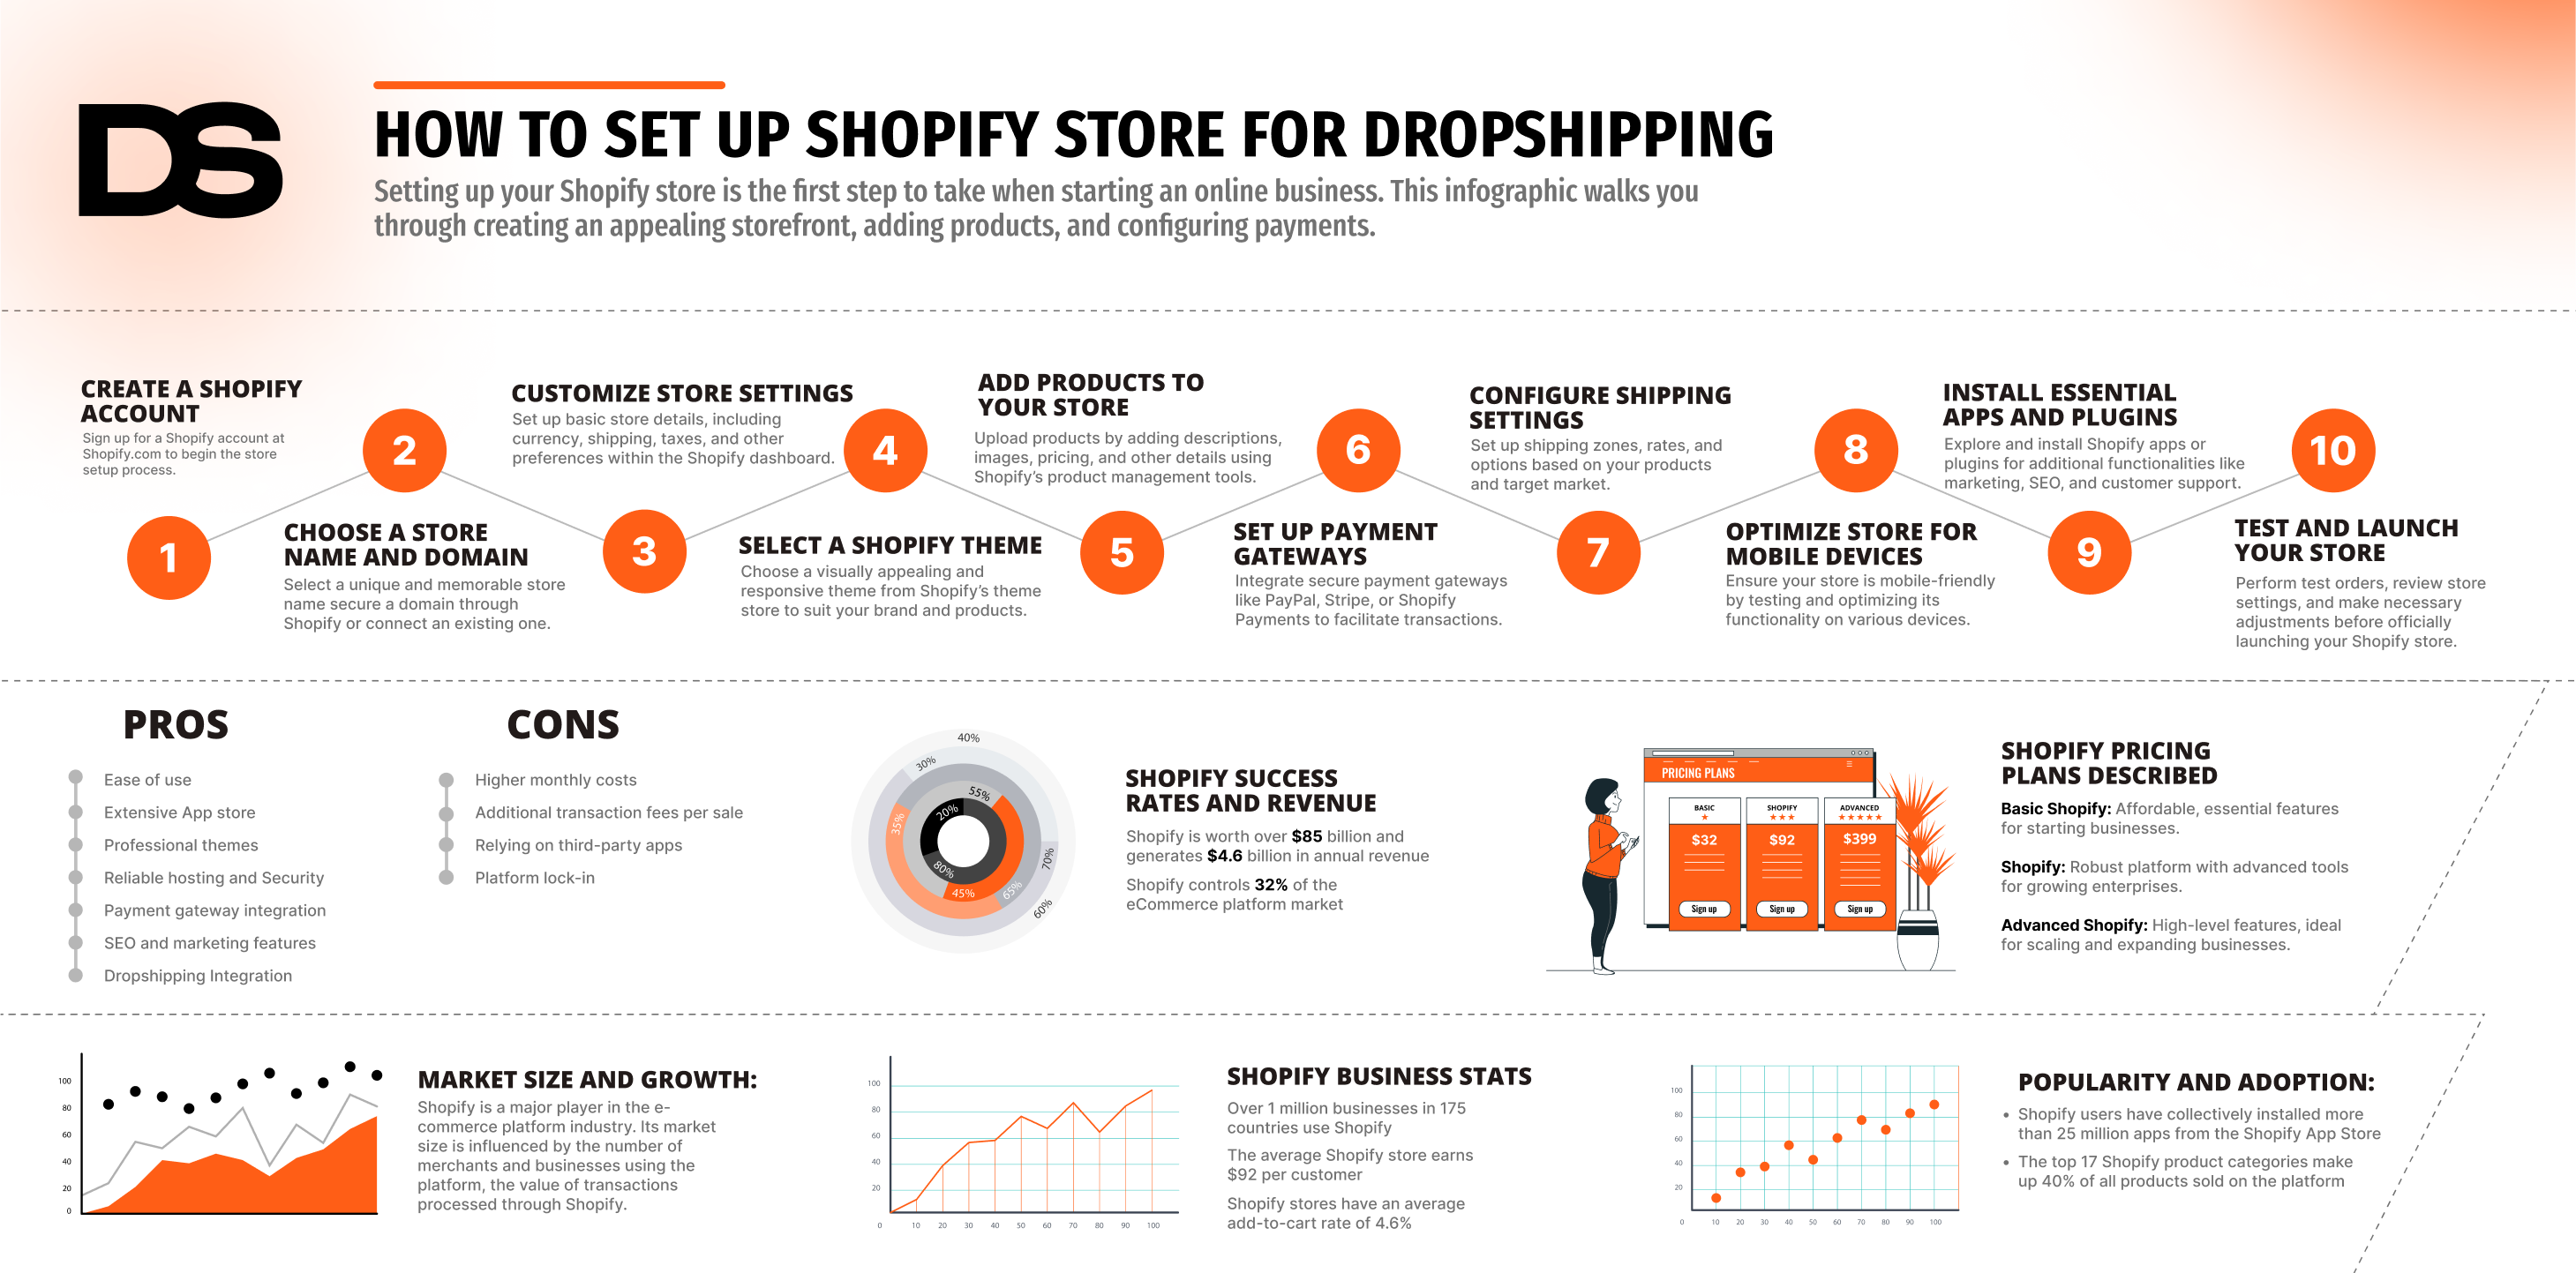
How Much Does Shopify Cost?
Shopify is one of the leading ecommerce platforms, offering various pricing plans to suit different business needs.
Let’s take a closer look at the different pricing plans and associated costs to help you set up your first store on Shopify.
👉 Learn about Shopify Conversion Rates: A Beginner’s Guide (2024).
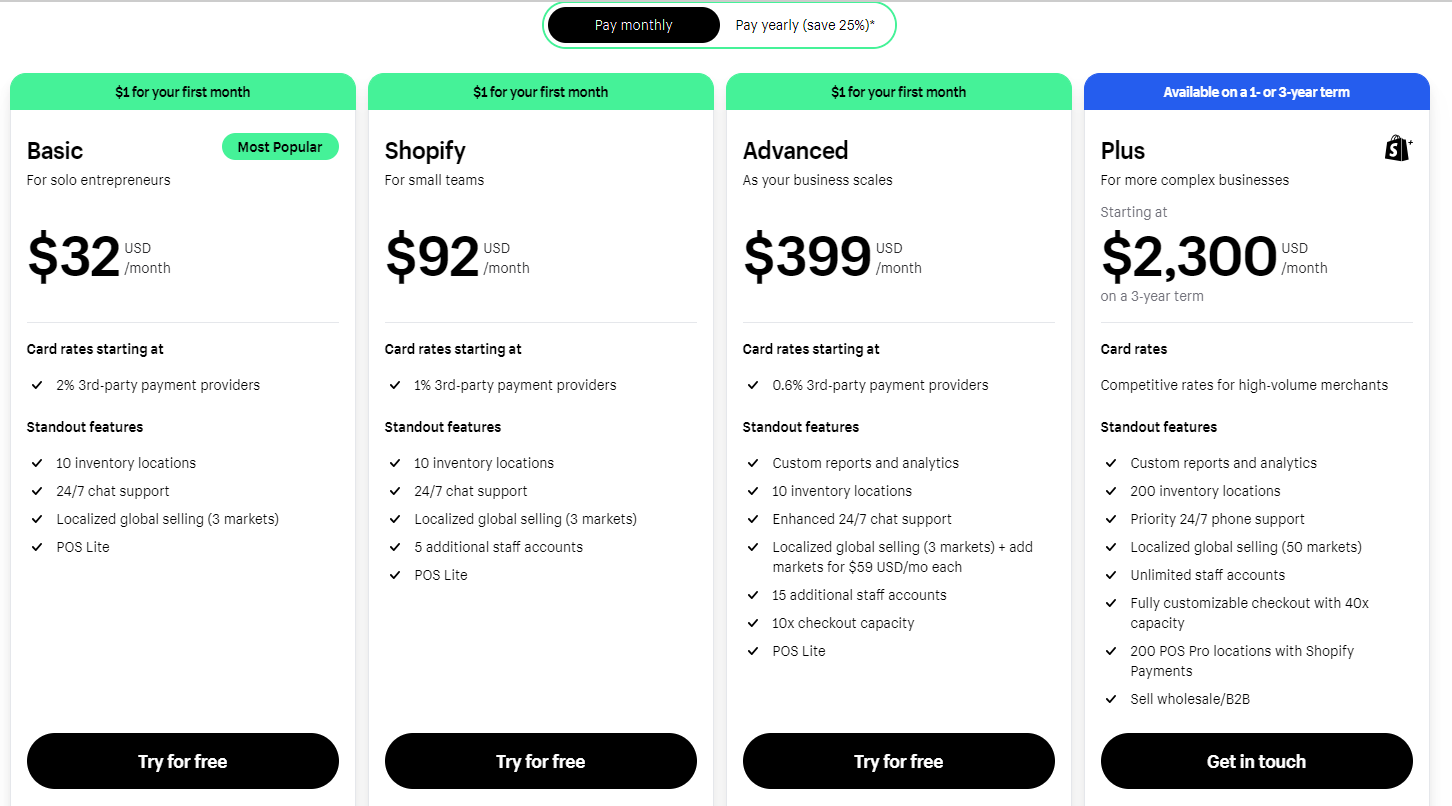
🔸 Shopify Starter Plan
The Starter Plan is the most budget-friendly option, starting at just $5 per month. This plan is ideal for those who are just starting out and have a limited number of products to sell.
🔸 Shopify Basic Plan
Next up is the Basic Shopify Plan, priced at $32 per month. This plan includes a 2.9% transaction fee plus 30¢ per transaction. It offers additional features like professional reports and gift cards.
🔸 Shopify Regular Plan
If you’re looking for more advanced features, the Shopify Plan is a great choice. Priced at $92 per month, it offers a lower transaction fee of 2.6% plus 30¢ per transaction. This plan includes features such as abandoned cart recovery and professional reports.
🔸 Shopify Advanced Plan
For high-volume businesses, the Advanced Shopify Plan is recommended. It costs $399 per month, with a reduced transaction fee of 2.4% plus 30¢ per transaction. This plan offers advanced features like an advanced report builder and third-party calculated shipping rates.
🔸 Shopify Plus Plan
Lastly, the Shopify Plus Plan is designed for enterprise-level businesses and is priced starting around $2,300 per month. It offers a lower transaction fee of 2.15% per transaction and includes additional features like dedicated support and customization options.
Which Plan Is Best For Setting Up First Store On Shopify? My Opinion
To begin, make the most of one of their 14-day trial applications and construct your dropshipping store. There are a variety of templates available for free that you can select from.
Alternatively, you have the option to utilize the Shopify Starter package for just $1 per month and receive three months without charge.
However, when you are a small dropshipping business with a limited budget, the Shopify Basic package is an extremely cost-efficient choice. The Basic package encompasses features such as an internet store, a secure shopping cart, limitless products, continuous support, and mobile commerce.
Moreover, it is excellent for reporting and shipping alternatives, as well as a broad array of add-ons that are accessible.
Nevertheless, once you feel that you have surpassed the capabilities of the reporting and shipping options, that is the moment to transition to Shopify Regular.
💡 LEARN in-depth Shopify Pricing Plans: What’s The Cost Of Dropshipping With Shopify?
It’s important to note that these pricing plans do not include additional costs such as domain registration and business registration. However, Shopify provides options to purchase a custom domain directly through their platform.
💡 Tip: Discover The Pros and Cons Of Shopify for Dropshipping In 2024.
FAQs- How To Set Up Your First Store On Shopify?
1. How much does it cost to start a Shopify store?
The cost to start a Shopify store can vary depending on your needs and preferences. Shopify offers different pricing plans, starting from $32 per month for the Basic Shopify plan, up to $399 per month for the Advanced Shopify plan.
Additionally, you may need to consider the cost of a custom domain, which typically ranges from $10 to $20 per year.
2. How do I start Shopify for beginners?
Starting your first Shopify store as a beginner is simple. Here’s a step-by-step guide about how to set up your first store on Shopify:
1. Visit Shopify’s website and sign up for an account.
2. Customize your store’s design by selecting a theme from Shopify’s theme store.
3. Add products to your store, create collections, and set up your payment and shipping settings.
4. Customize your store’s appearance by editing the theme settings, adding a custom domain, and creating a navigation menu.
5. Create important pages such as a privacy policy, terms of service, and refund policy to protect your customers and your business.
6. Optimize your store for better visibility on search engines by adding relevant keywords, and meta descriptions, and using Shopify’s built-in SEO features.
7. Preview your store to ensure everything looks and functions correctly, then launch it to start selling.
3. Is starting a Shopify store free?
Starting a store on this eCommerce platform is not completely free, but they offer a 14-day free trial to help you get started.
During the trial period, you can set up your store, upload products, and customize your theme. However, once the trial period ends, you will need to select a pricing plan to continue operating your store.
Start Your Dropshipping Journey With Your First Shopify Store
Setting up a Shopify store is a straightforward process that can significantly boost your business’s online presence.
By following the steps outlined in this article, you can easily create a professional and functional store that meets your business needs.
From choosing the right plan to customizing your store and launching it, each step is crucial in building a successful eCommerce site.
Start today and take advantage of Shopify’s powerful tools to grow your online business and reach more customers.
Hopefully, you will expand your dropshipping business and reach new heights in the future.
💡 Also, I suggest you check out the 13 Most Successful Shopify Dropshipping Store Examples and get Inspo.


![The Top 21 3PL Companies Compared [2025 List & Guide]](https://images.weserv.nl/?url=https://prod-dropshipping-s3.s3.fr-par.scw.cloud/2024/03/Frame-3922469.jpg&w=420&q=90&output=webp)