How To Cancel Shopify Subscription? [2025 Guide]
I'm looking for...
Are you wondering how to cancel your Shopify subscription or if pausing it might be a better option?
Whether you’re scaling back, switching platforms, or just taking a break, this guide holds the answers you need.
Discover the key differences between canceling, pausing, and deleting your account, and learn step-by-step how to safeguard your store data. Ready to make an informed decision?
Let’s dive in!
Create Your Online Store in just 5 Minutes – For Free
Pick your niche, our AI builds your store, add 10 winning products and we teach you how start selling today. Start picking your niche
Key Takeaways – How To Cancel Shopify Subscription?
| Step | Description |
|---|---|
| 1. Log In | Log into your Shopify account. Navigate to your admin dashboard and click on the “Settings” button at the bottom left of the screen. |
| 2. Access Plan Settings | In the Settings menu, click on the “Plan” tab to view your subscription and billing details. |
| 3. Deactivate Store | Scroll down in the Plan section and click the “Deactivate Store” option to start the cancellation process. |
| 4. Provide a Reason | Choose a reason for canceling your subscription from the list provided and proceed to the next step. |
| 5. Transfer Your Domain | If you have a custom domain, transfer it before canceling. Go to Settings > Domains, select your domain, and either remove or transfer it. |
| 6. Uninstall Third-Party Apps | Remove any third-party apps to avoid further billing. Navigate to Settings > Apps and sales channels, and uninstall each app. |
| 7. Export Store Data | Backup important data such as orders, products, and customer information by exporting CSV files through the Shopify admin panel. |
| 8. Confirm Deactivation | Enter your Shopify account password for confirmation, then click “Deactivate Store” to finalize the process. |
What is a Shopify subscription?
A Shopify subscription is a payment plan, either monthly or yearly, that grants you access to the Shopify e-commerce platform.
This subscription allows you to create, design, and manage your online store with ease. With a Shopify subscription, you gain access to a variety of features and tools, including website hosting, payment processing, and inventory management.
This makes it a comprehensive solution for anyone looking to run an online store on a robust e-commerce platform.
Types of Shopify Subscriptions
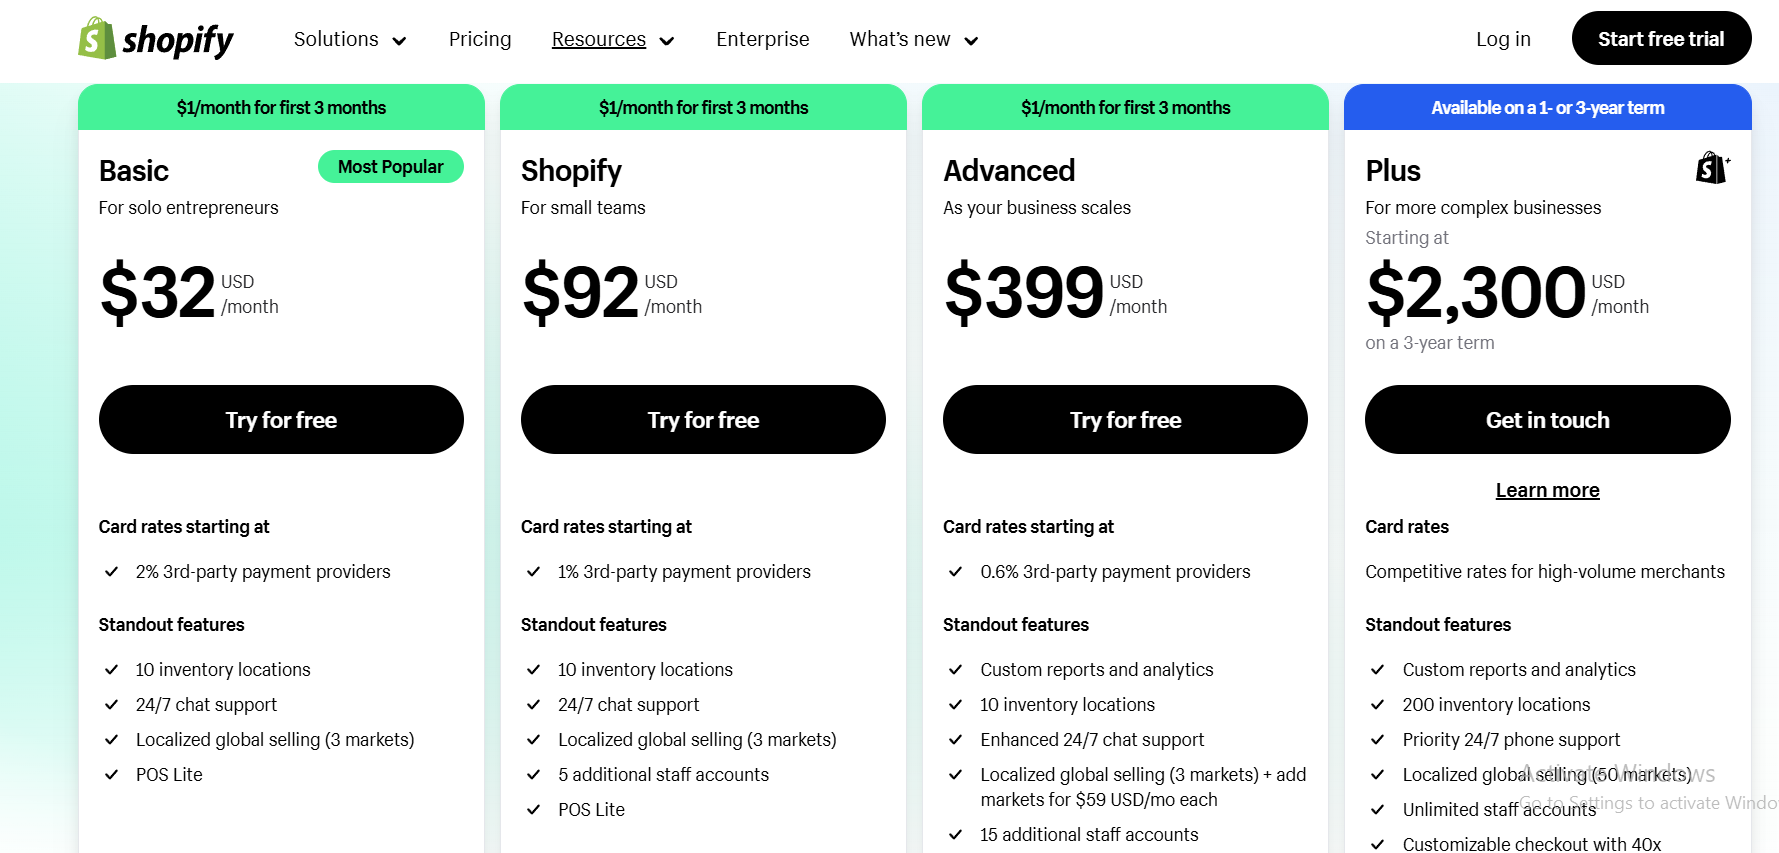
Shopify offers several subscription plans tailored to different business needs:
- Basic Plan ($32/month): Designed for solo entrepreneurs, this plan includes 10 inventory locations, 24/7 chat support, localized global selling (3 markets), and POS Lite. Card rates start at 2% for third-party payment providers.
- Shopify Plan ($92/month): Ideal for small teams, this plan features 5 additional staff accounts, 10 inventory locations, advanced support, and all the features of the Basic plan. Card rates are reduced to 1%.
- Advanced Plan ($399/month): Best for scaling businesses, this plan offers custom reports and analytics, 15 staff accounts, enhanced support, and localized selling with options to add markets for $59/month. Card rates are further reduced to 0.6%.
- Plus Plan (Starting at $2,300/month): Perfect for high-volume businesses, this plan includes unlimited staff accounts, priority 24/7 phone support, 200 inventory locations, localized global selling across 50 markets, and customizable checkout options.
Pause vs. Cancel vs. Delete Your Shopify Account – What’s The Difference?
When it comes to ending your Shopify subscription, there are a few different options available.
Therefore, I want to talk about the key differences between pausing, canceling, and deleting your Shopify account. Online store owners often consider these options carefully, weighing the benefits and challenges of each choice.
 Pausing Shopify Subscription
Let’s start with pausing your Shopify subscription. This is a great option if you’re planning to take a break from running your online store, but don’t want to permanently shut it down.
When you pause your subscription, you’ll retain access to all your data and settings. This means that you can pick up where you left off when you’re ready to start selling again.
However, it’s important to note that you won’t be able to make any sales while your subscription is paused.
 Canceling Shopify Subscription
On the other hand, canceling your Shopify subscription means that your store will be permanently shut down.
This is the best option if you’re sure that you no longer want to sell online. So, if you cancel your subscription, you won’t be able to access any of your data or settings. This means that if you change your mind down the line and decide to start selling again, you’ll need to start from scratch.
 Deleting Shopify Subscription
Now, let’s talk about deleting your Shopify account. Technically, this is the same as canceling a Shopify subscription.
So, if you delete your account, all of your data and settings will be permanently deleted. This means that you’ll lose access to everything, including your online store.
Therefore, if you’re considering deleting your Shopify account, it’s important to make sure that you’ve saved all of your data and that you’re prepared to start anew if you decide to sell online again in the future.
How Can I Pause My Shopify Subscription?
Next, as all of us have our own reasons to pause or cancel Shopify subscriptions, will have something in common. And, that is the process of pausing your Shopify subscription.
Therefore, here’s a step-by-step process on how to do it!
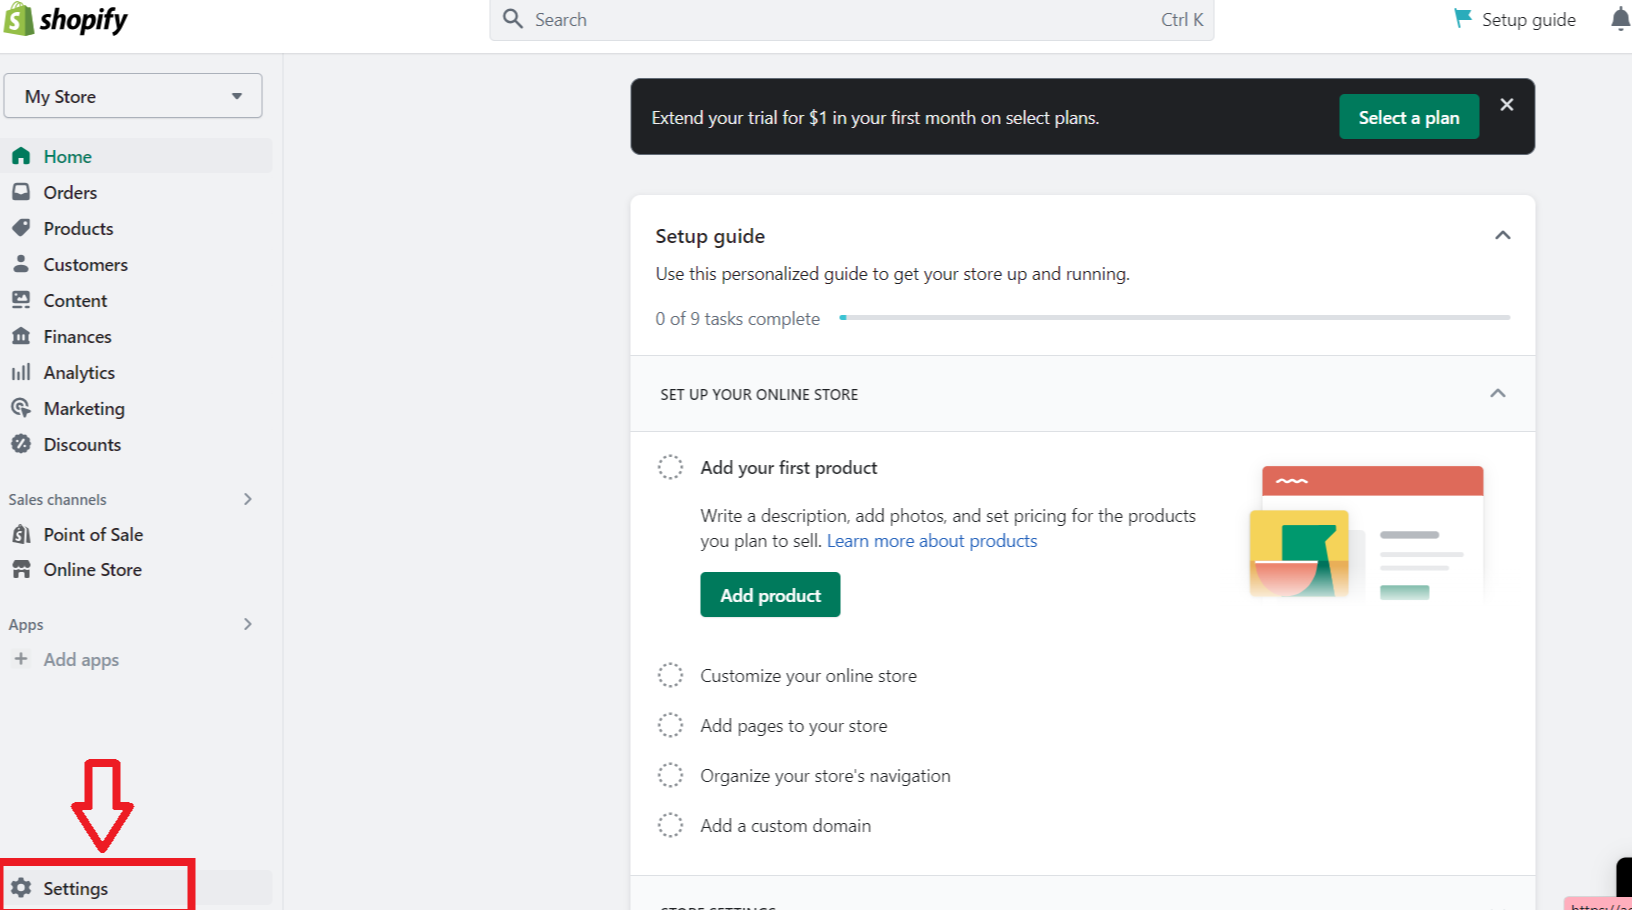
Step 1 – The first step to pausing your Shopify subscription is to log in to your account. Once you’re logged in, navigate to the admin panel by clicking on the “Settings” button located at the bottom left of your screen.
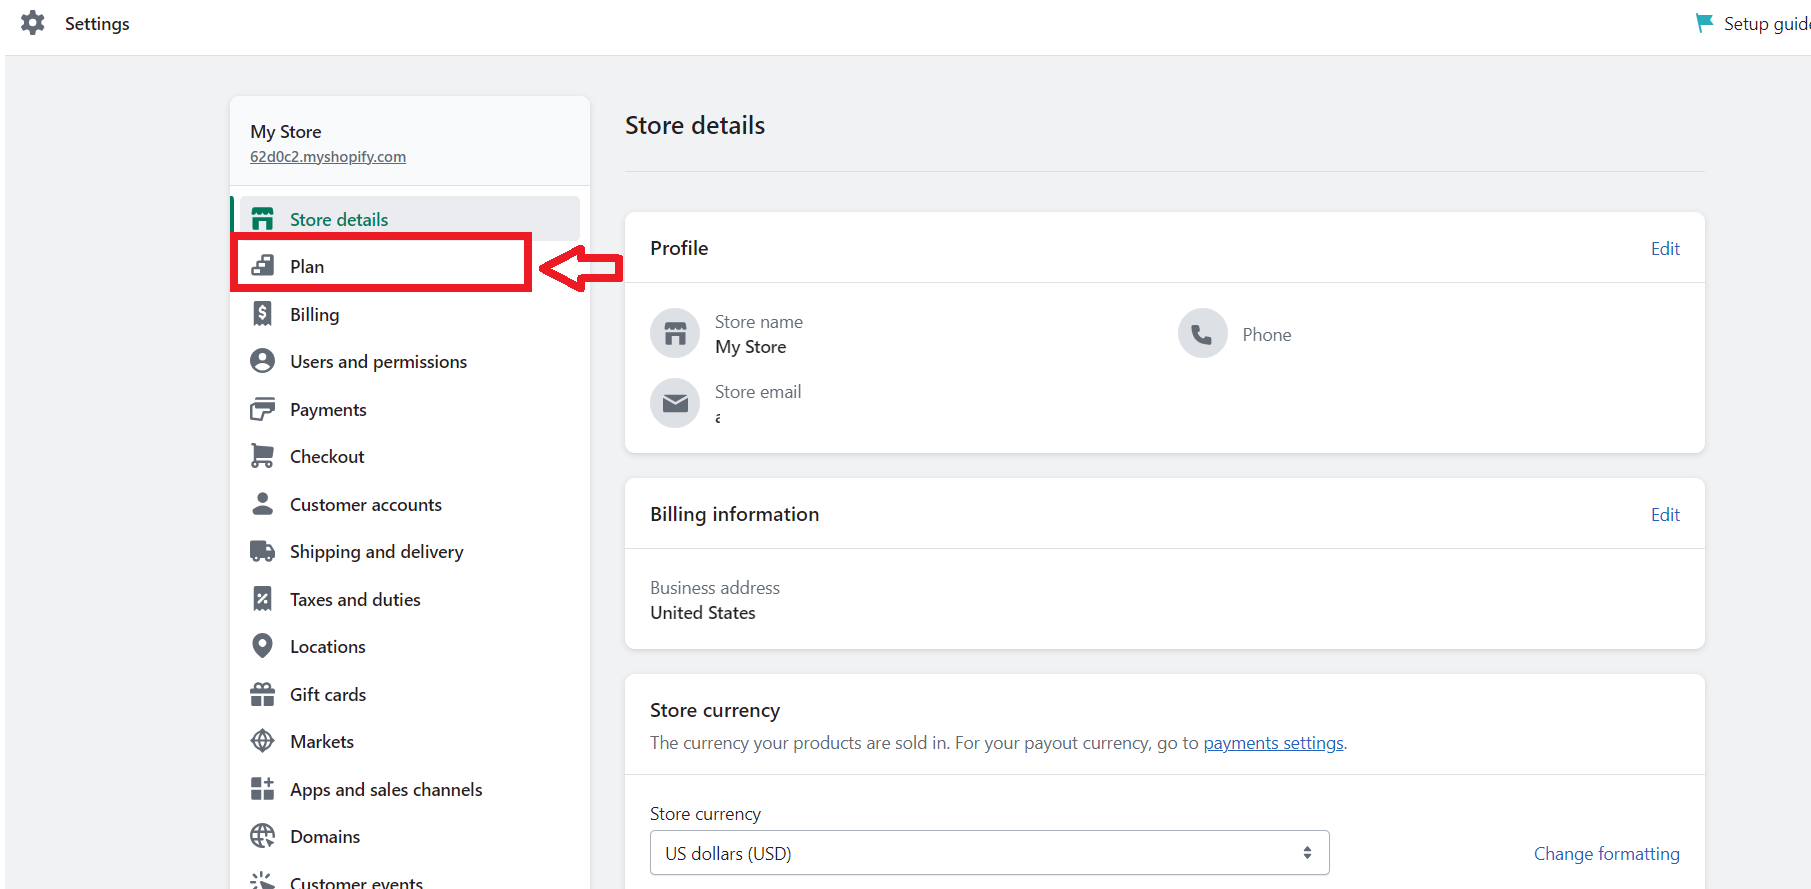
Step 2 – Next, click on the “Plan” tab located on the left-hand side of the screen. From here, you’ll be able to manage your subscription and payment information.
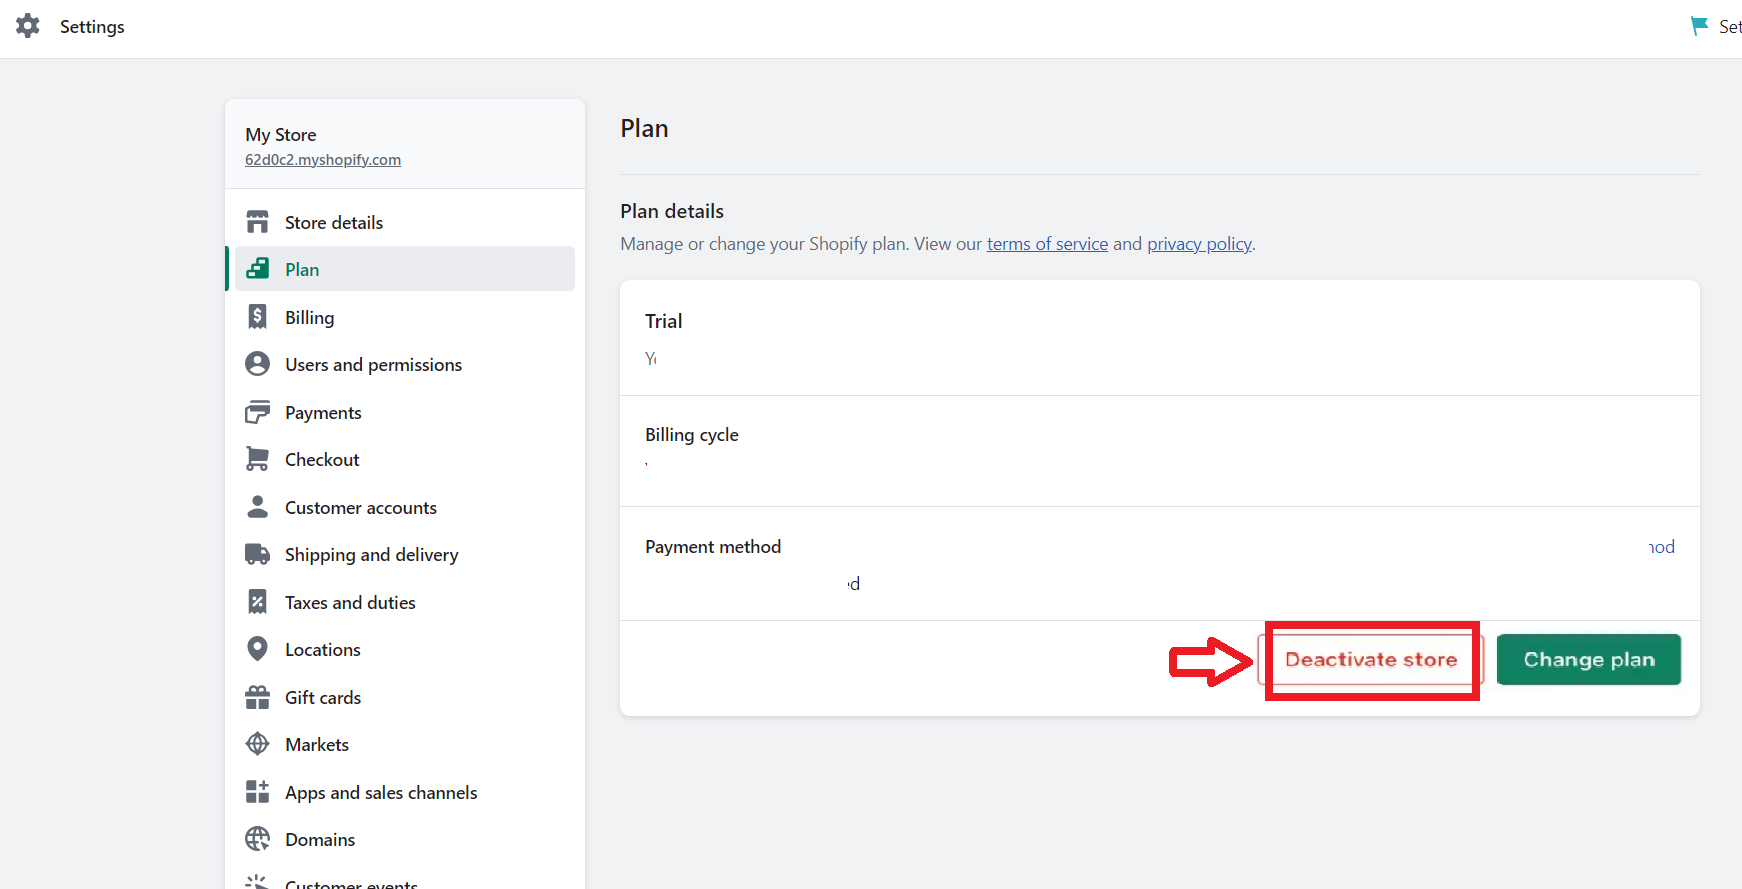
Step 3 – Once you’re in the “Plan” tab, scroll down until you see the “Deactivate Store” option. Click on this button to begin the process of pausing your subscription.
Step 4 – Next, a new window will pop up. So, if you want to pause your store for some time, and come back later, choose ” Pause and build”.
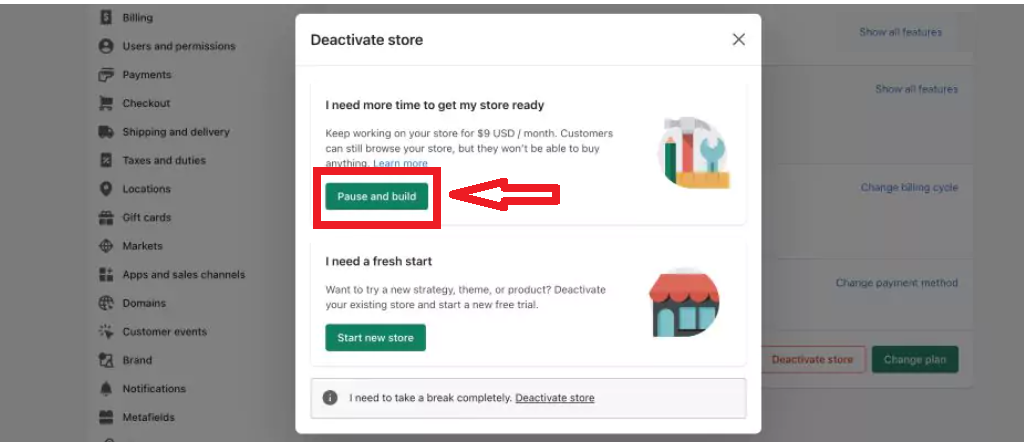
This way, you will be charged a reduced amount from your subscription, like $9/month. And, your store will be running. So, the customers can preview your products, but won’t be able to buy them.
Thus, pausing your Shopify account is the best choice if you want to take a little break. Plus, if you are selling products from a seasonal dropshipping niche, this is also your best choice.
How To Delete/Cancel My Shopify Subscription?
As I already mentioned, if you cancel your Shopify subscription, all your store data will be gone for good. Therefore, this is a way more serious decision to make. Hence, it drags more serious steps to take before even canceling the subscription.
Thus, here’s a step-by-step process I personally suggest you go through before canceling your Shopify subscription.
Step 1: Prepare Your Account
As I prepare to cancel my Shopify subscription, the first step I take is to access my account section. To do this, I log into my Shopify account from the homepage. Once I am logged in, I navigate to the “Accounts” section to review my account options before proceeding with the cancellation process.
Before I begin the cancellation process, it is crucial to ensure that I have taken care of any outstanding balances on my account. So, I always make sure to back up my store data. This ensures that I have a copy of all my business information and client data before it is deleted.
To export my Shopify store data, I simply go to my Shopify account and start to export my data like orders, products, customers, etc.
For example, let’s export my product list. What I do is, navigate to the “” section from the dashboard.
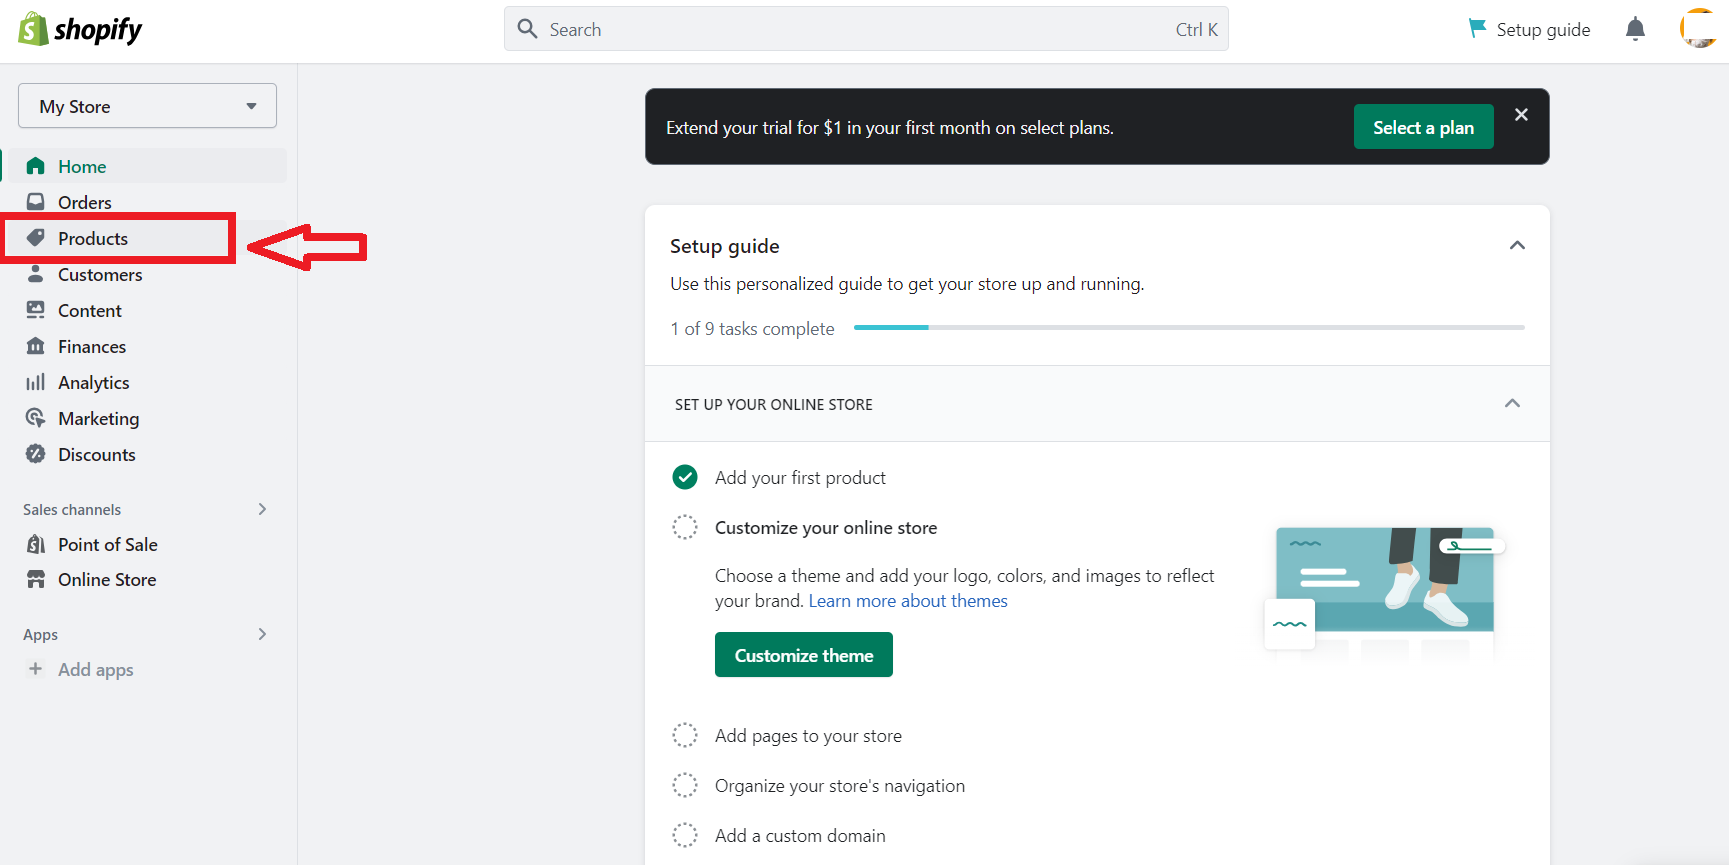
Next, I click on the “Export” button in the right corner.
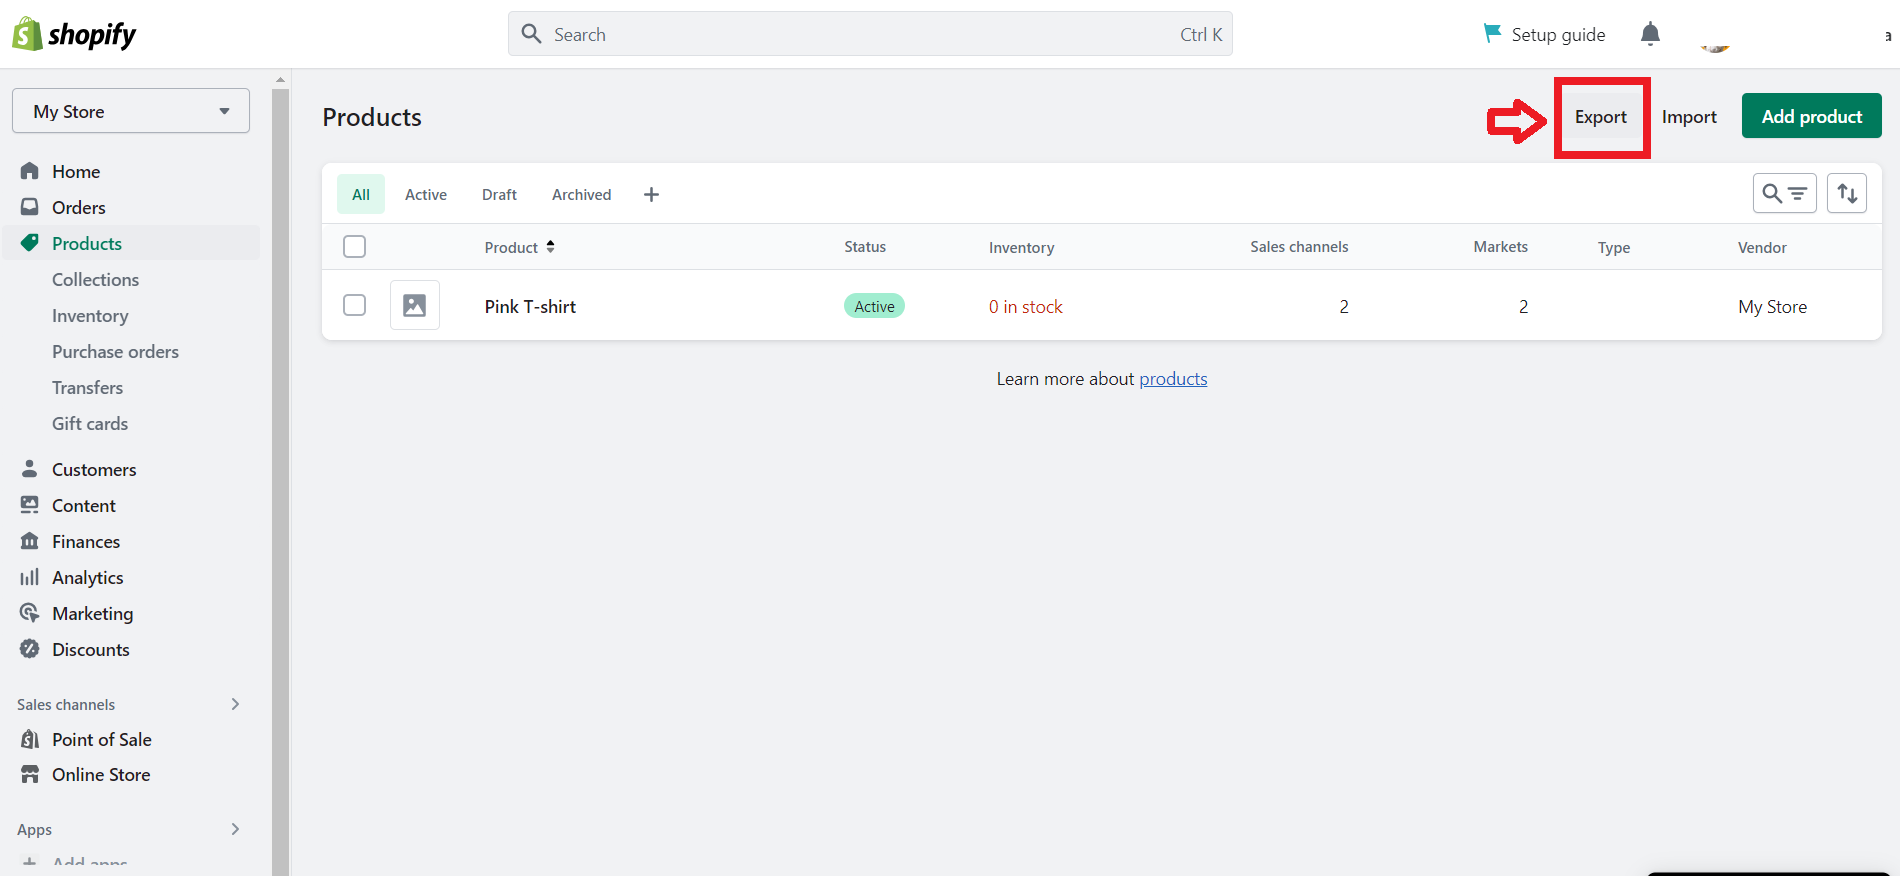
Furthermore, a pop-up window displays, so I select my options for files that need to be exported. Hence, since I want to cancel my Shopify subscription, I will export all products in CSV files. Once I set my options, I click on “Export products“.
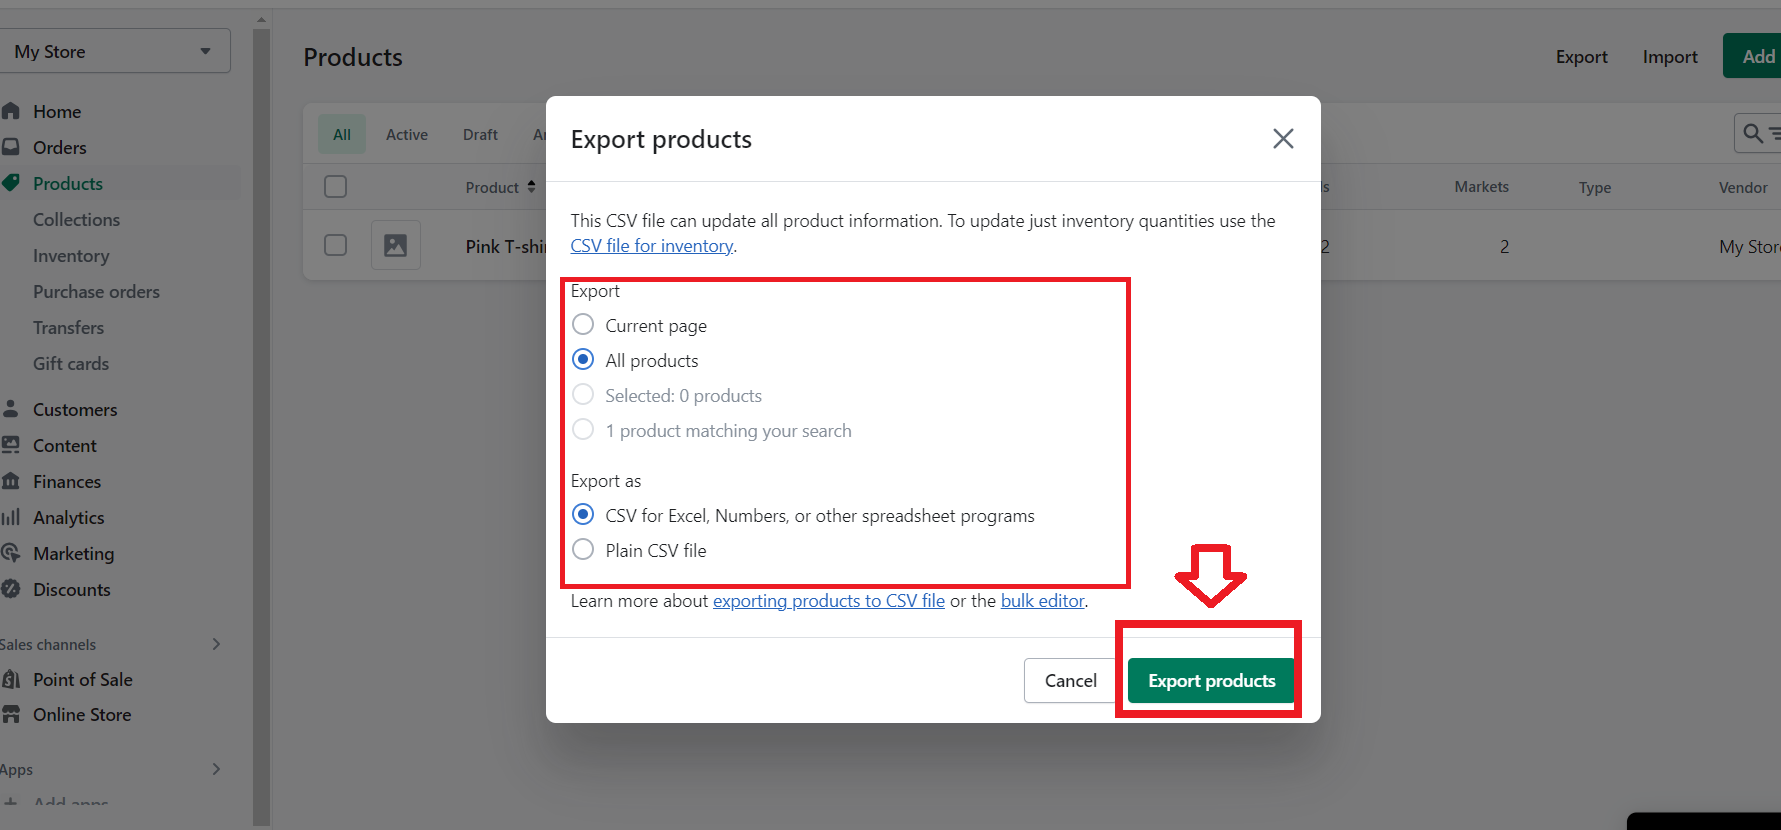
Hence, this is what I do with all the directories I mentioned above. It is important to save this data in a secure location for future reference.

Step 2: Transfer Your Custom Domain
So, one thing you need to keep in mind is that Shopify won’t renew your domain name automatically. So, if you want to transfer it. However, I found that it’s actually quite simple.
The first step is to access the Shopify Admin panel and click on “Settings”. Then choose “Domains“.
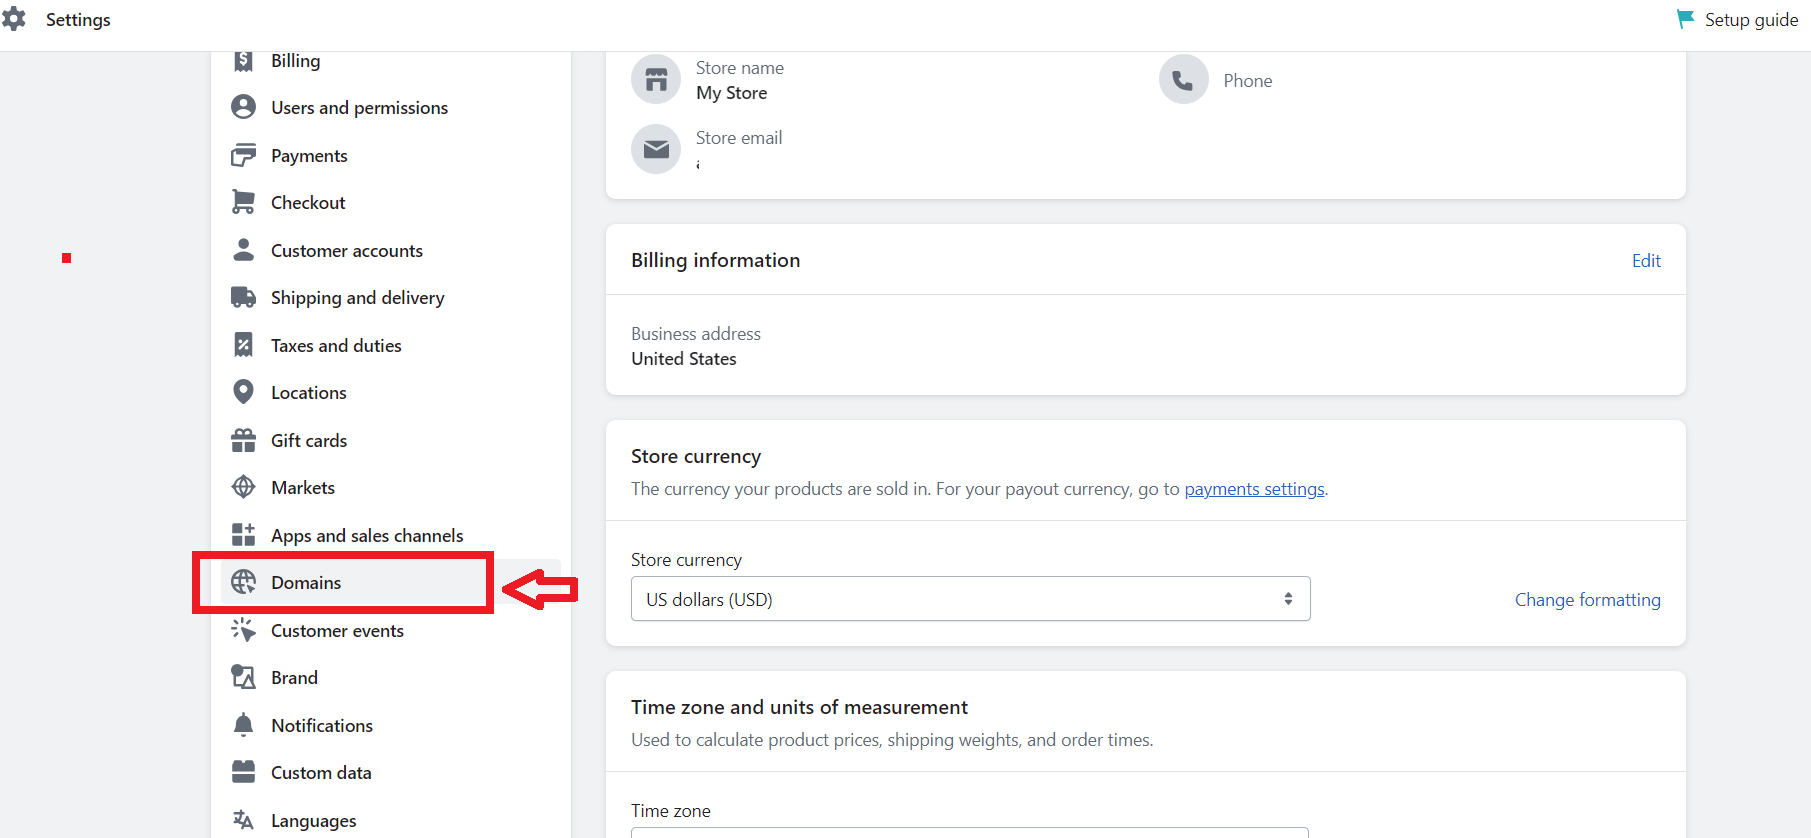
Once you’re in the Settings menu, scroll down the page until you see the “Domains” section on the left sidebar. Next, once you find the domain you want to remove, simply click on “Remove“, written in blue letters.
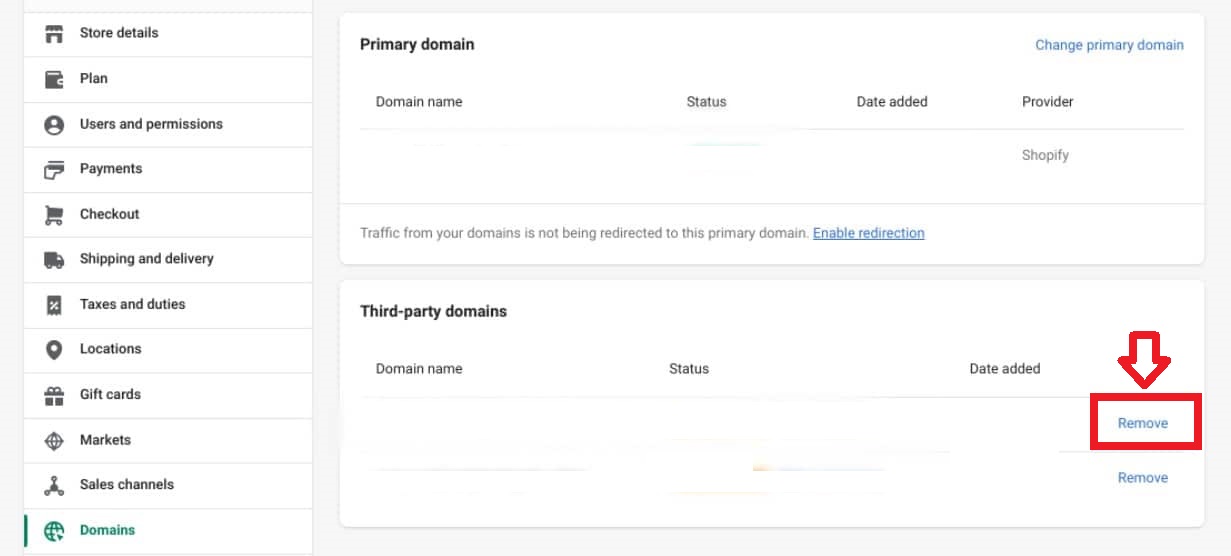
- On the other hand, if you want to transfer your third-party domain, just click on the “Transfer domain” option.
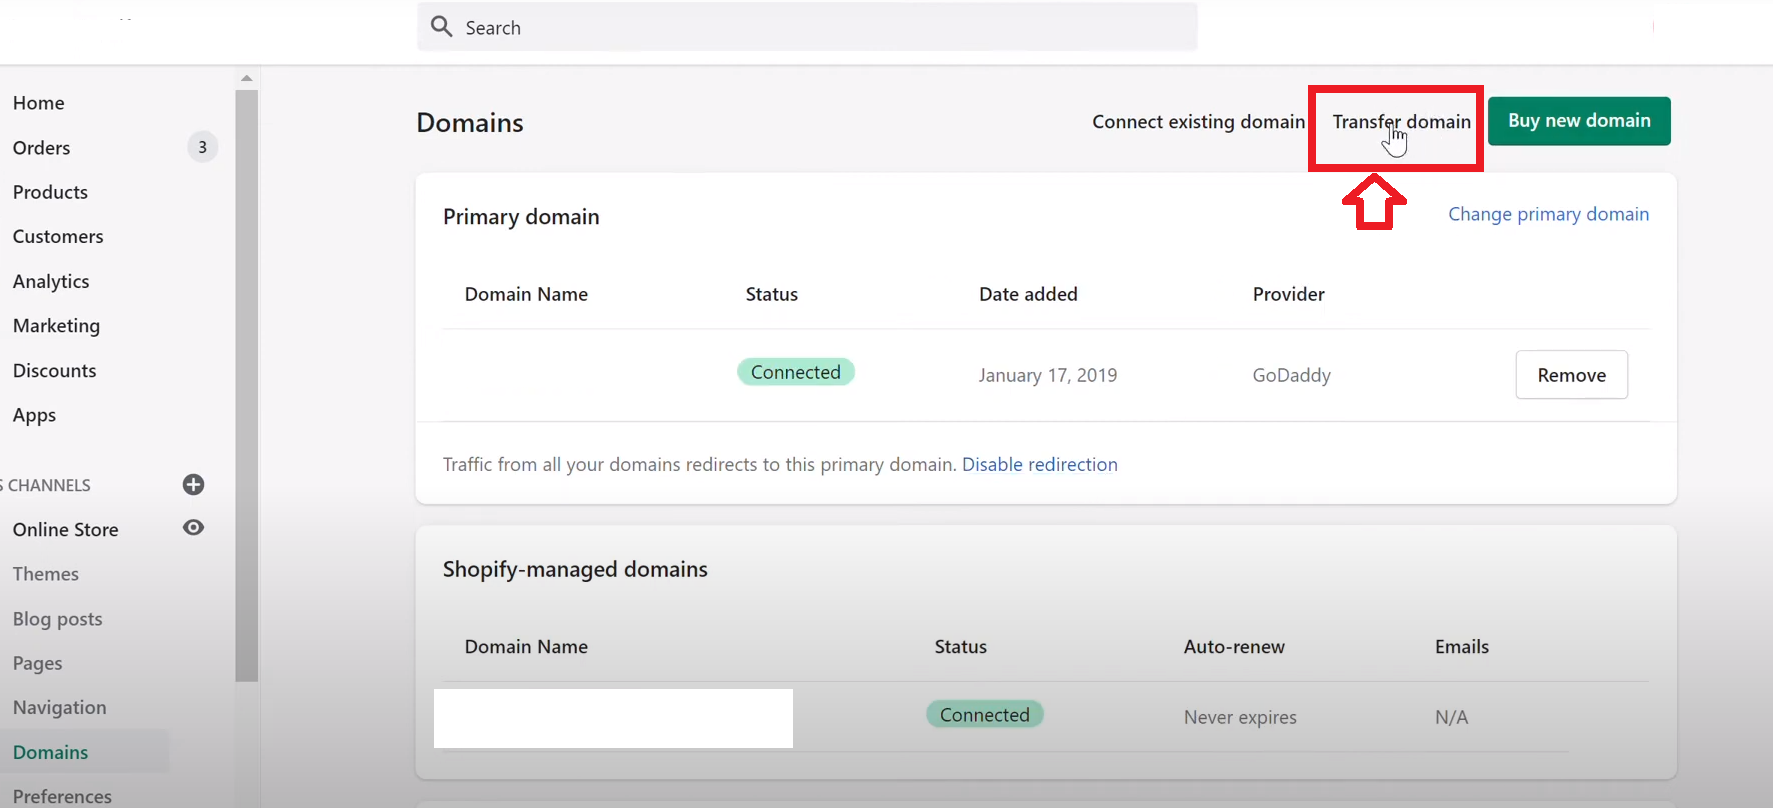
- The next step is to find the “Shopify-managed domains” section and click on the domain name that you want to transfer. This will take you to a page that has all the details of your custom domain.
- Now, you’ll need to click on the “Transfer Domain” link. This will take you to a new page where you’ll need to click on the Transfer to another provider link.
- Next, click on the button that says “Get authorization code”.
This will then reveal the authorization code that you’ll need to initiate the transfer. It’s important that you write down this code and keep it in a safe place. Hence, you’ll need this code to complete the transfer process with your new domain registrar.

Step 3: Uninstall Applications
When it comes to closing your Shopify store, it’s important to remember to uninstall all third-party apps to avoid continued billing. To do so, I access my Shopify account dashboard and click on “Settings“.
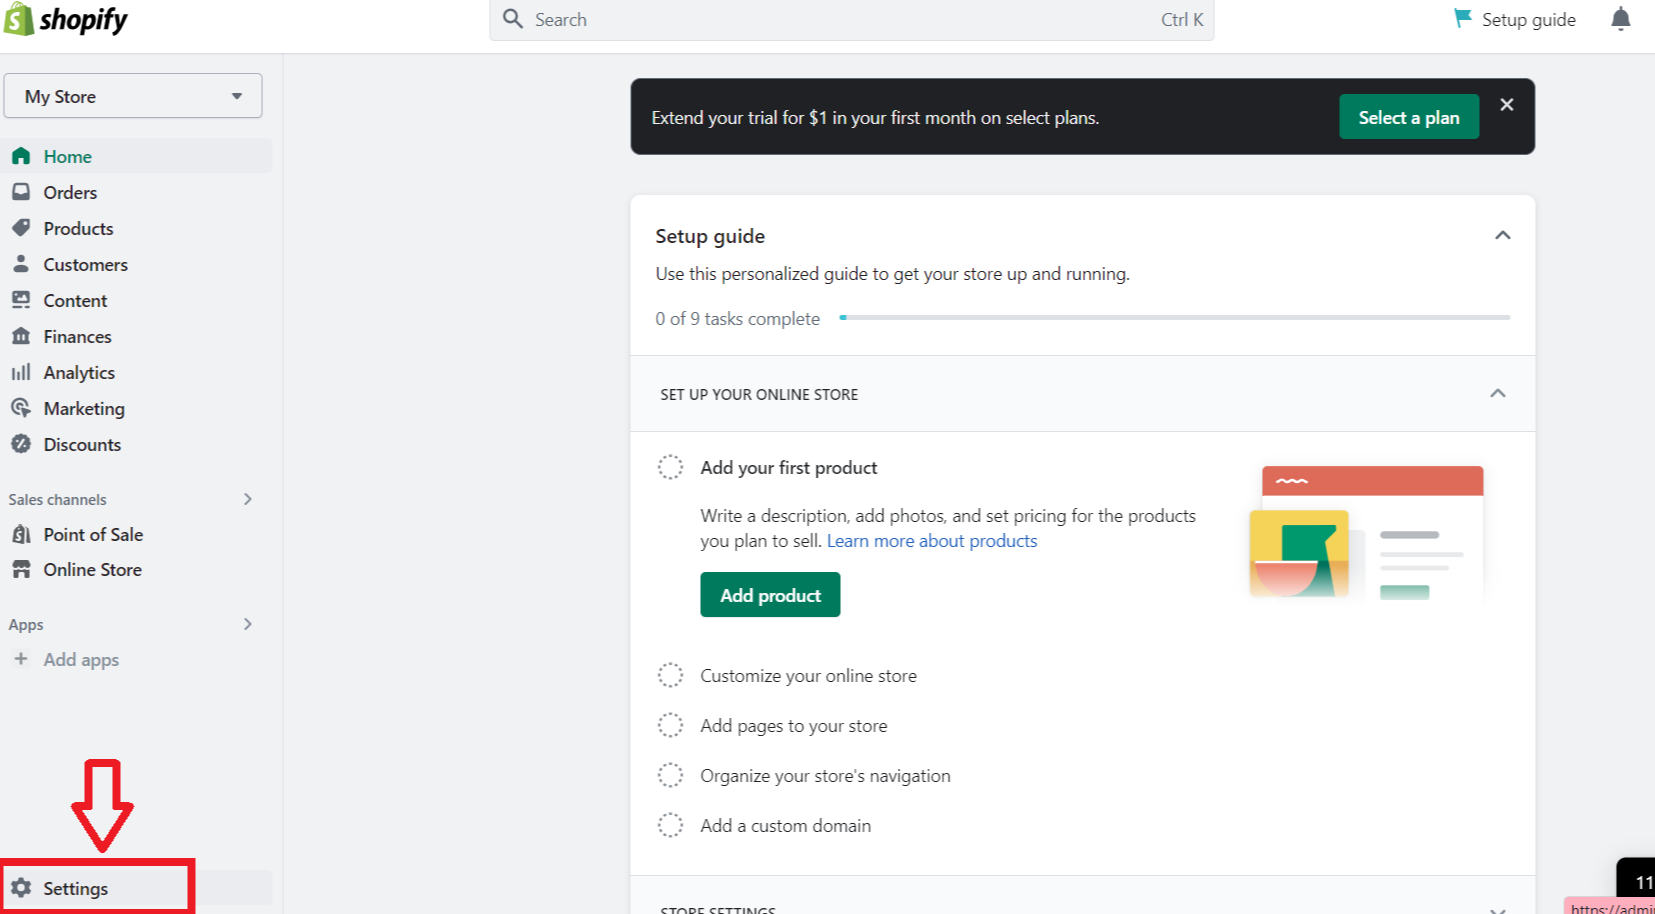
Next, I navigate to the sidebar and select “Apps and sales channels”. This takes me to a page where I can view all of the installed applications on my Shopify store.
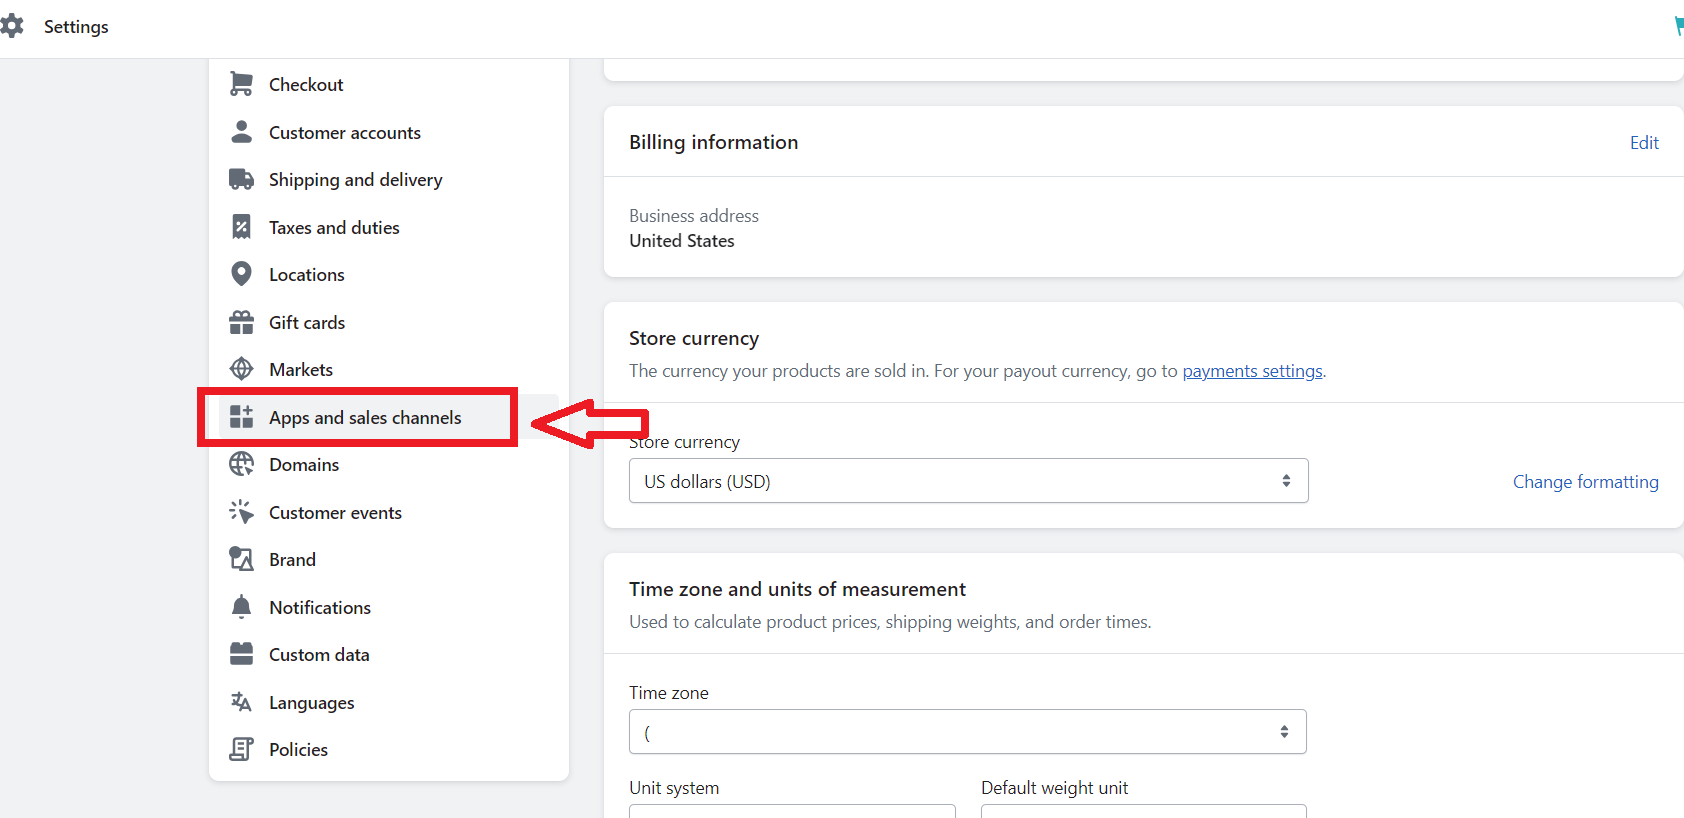
From here, I choose the “Uninstall” button located in front of each app I want to remove.
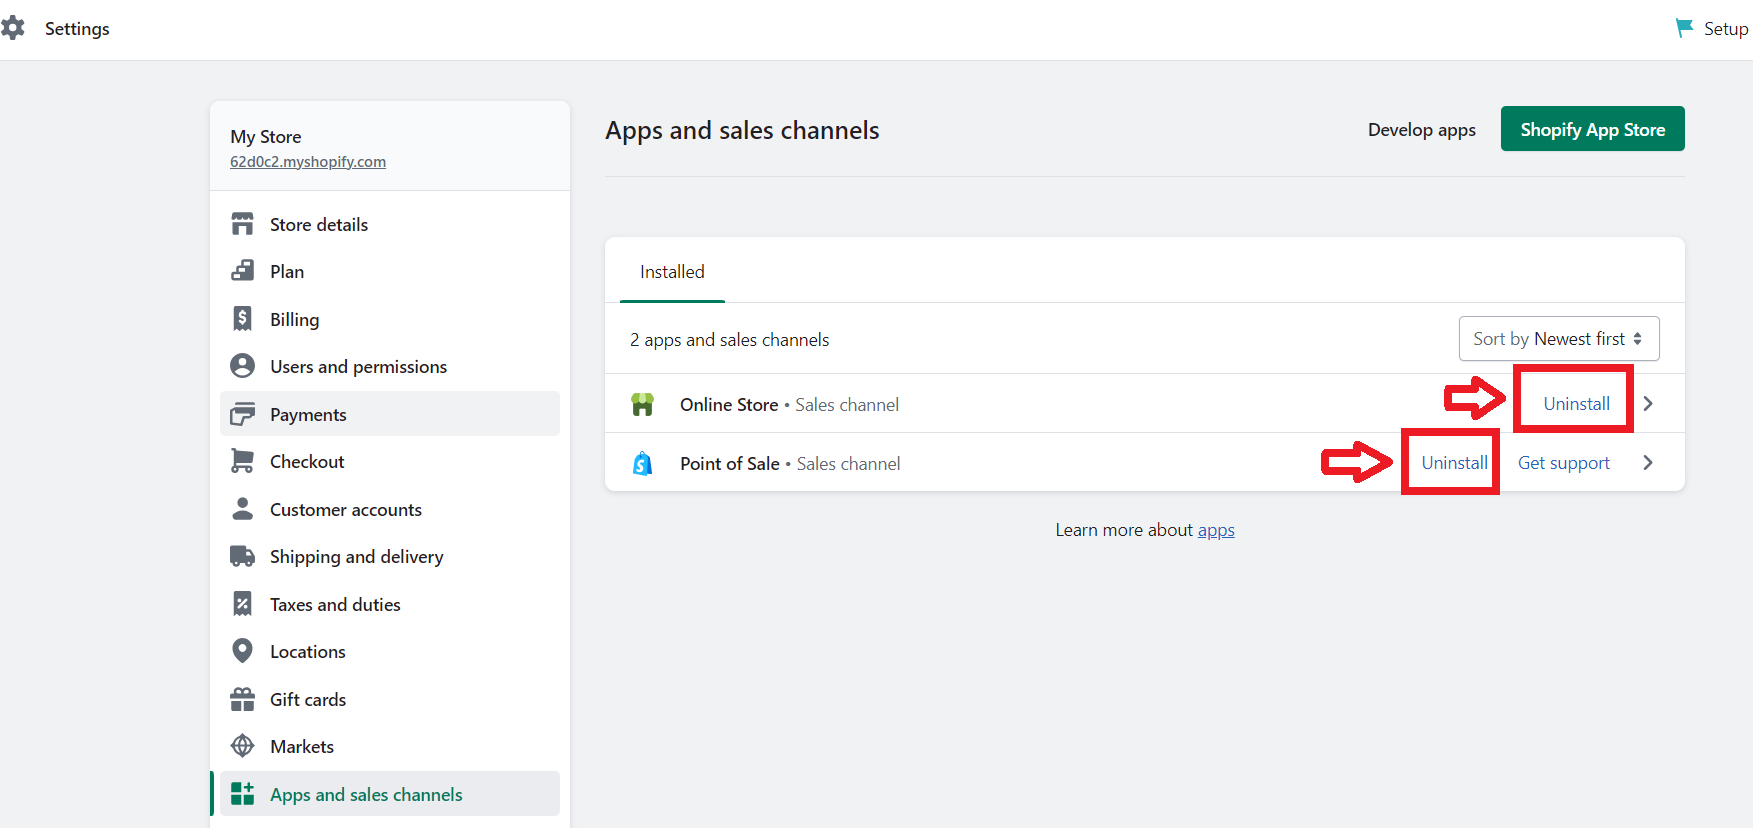
Finally, I repeat these steps for all links until there are no apps left.

Step 4: Go To Your Shopify Dashboard
Once I log in to my Shopify account I will be redirected to my Shopify Dashboard.
So, to start with my cancelation, I click on the ‘Settings‘ option located on the bottom left-hand side of your screen.
Once I’m on the Settings page, I see several categories, including ‘Plan‘. This category is where I can view and manage the details of my Shopify subscription.
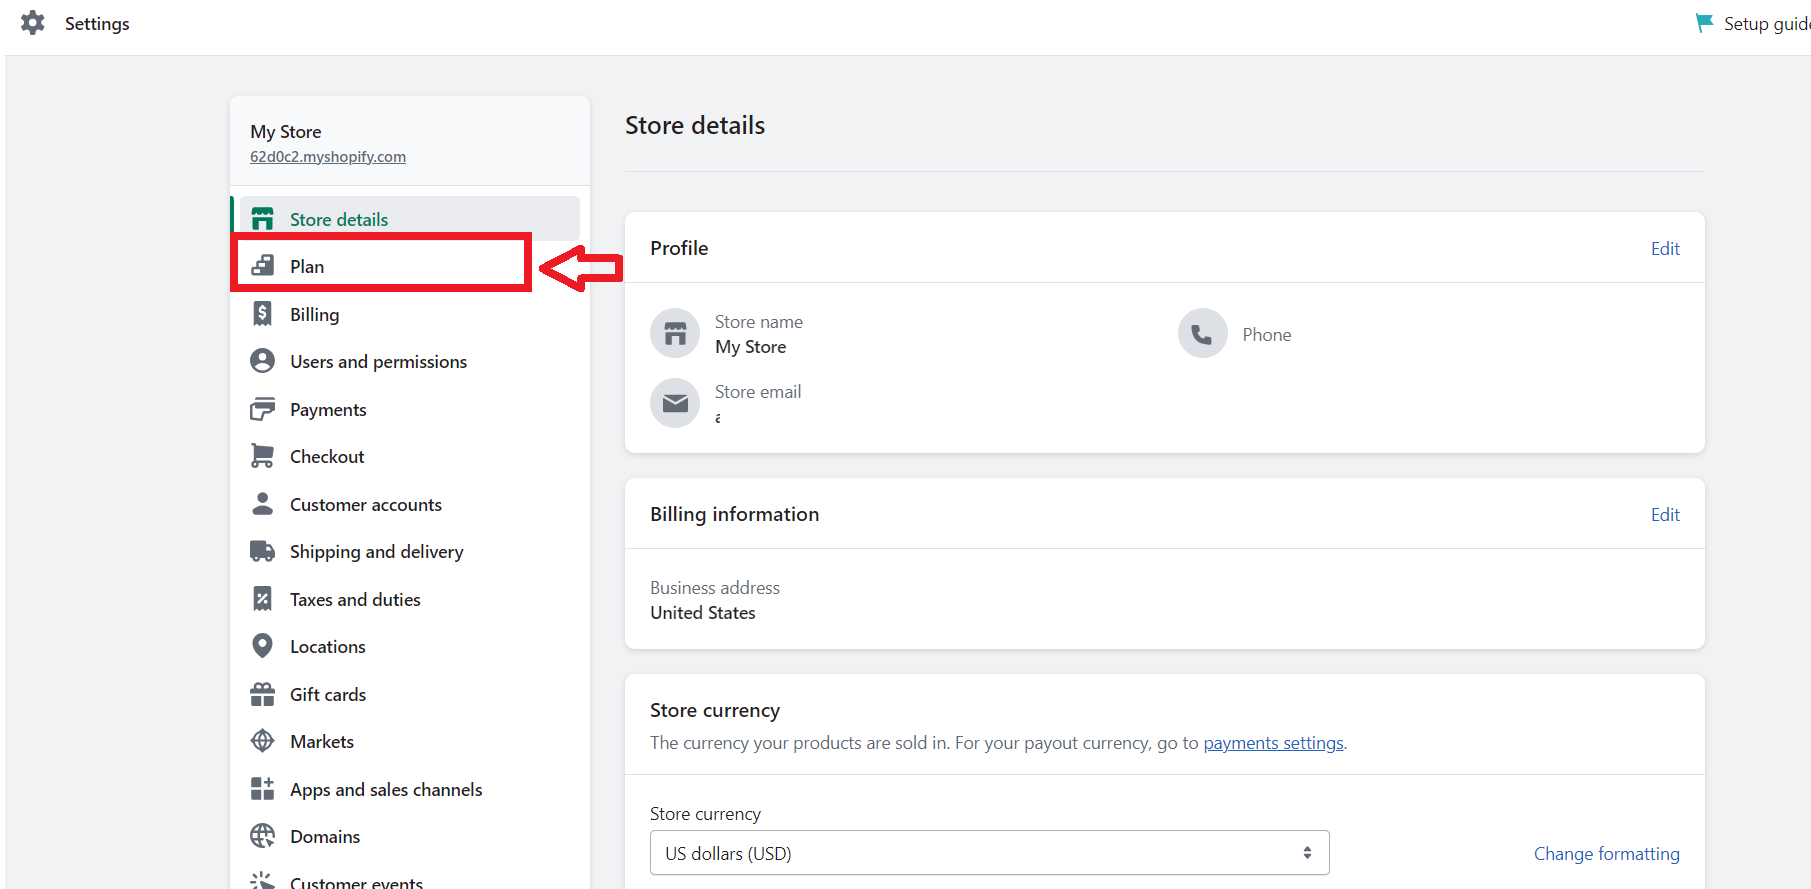
Now, I can easily change my Shopify subscription by clicking on the ‘Change Plan’ or ‘Pause Plan’ option, depending on my preference.
Overall, accessing the Admin Dashboard and navigating to my Plan and Permissions tools was a quick and easy process. Shopify makes it straightforward for users to manage their subscriptions and ensure that they are getting the most out of their online store platform.

 Step 5: Navigate To The “Plan” Section
When it comes to managing my Shopify subscription, involves accessing my plan-setting tools. Therefore, I simply go to my Shopify dashboard and navigate to the Plan Settings section.
From there, I’m directed to a page that displays my current pricing plan and billing cycle, as well as any outstanding charges or app subscriptions.
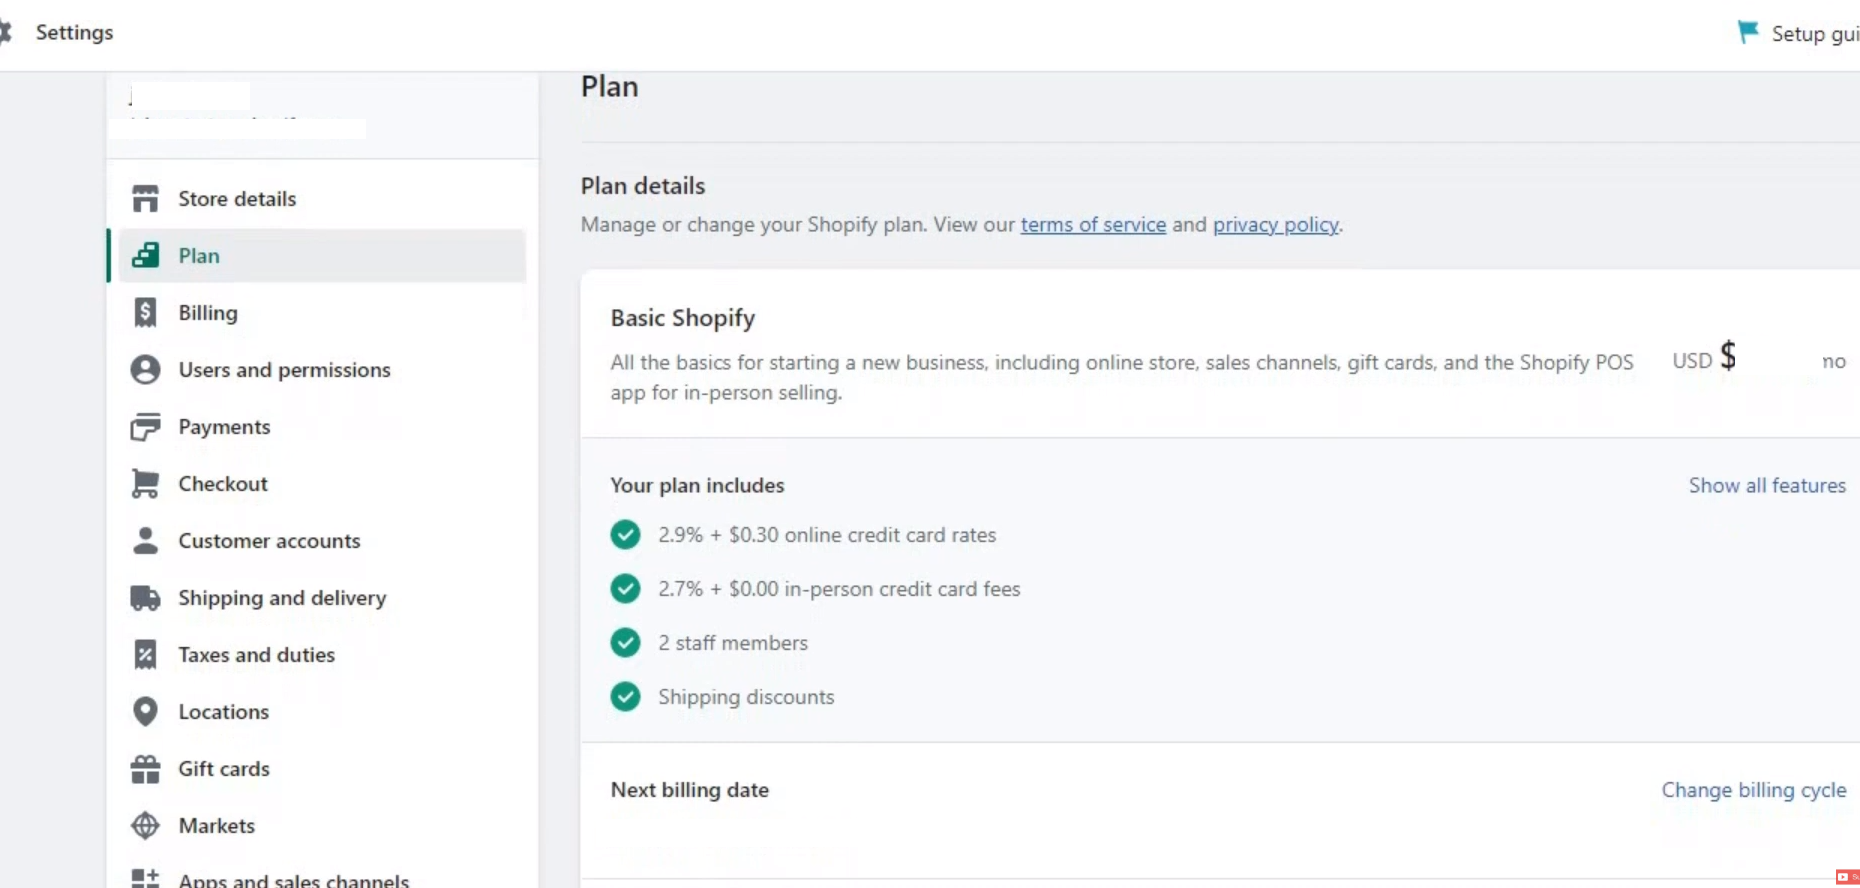
Once I’m in Plan settings, I have the ability to manage my subscription plans make changes accordingly. This includes reviewing my current pricing plan, billing cycle, and payment details.

Additionally, if I want to take a break from my subscription plan, I can also pause it from this same section. So, my choice, in this case, is to cancel the subscription.
Step 6: Cancel Your Subscription for 90 Days
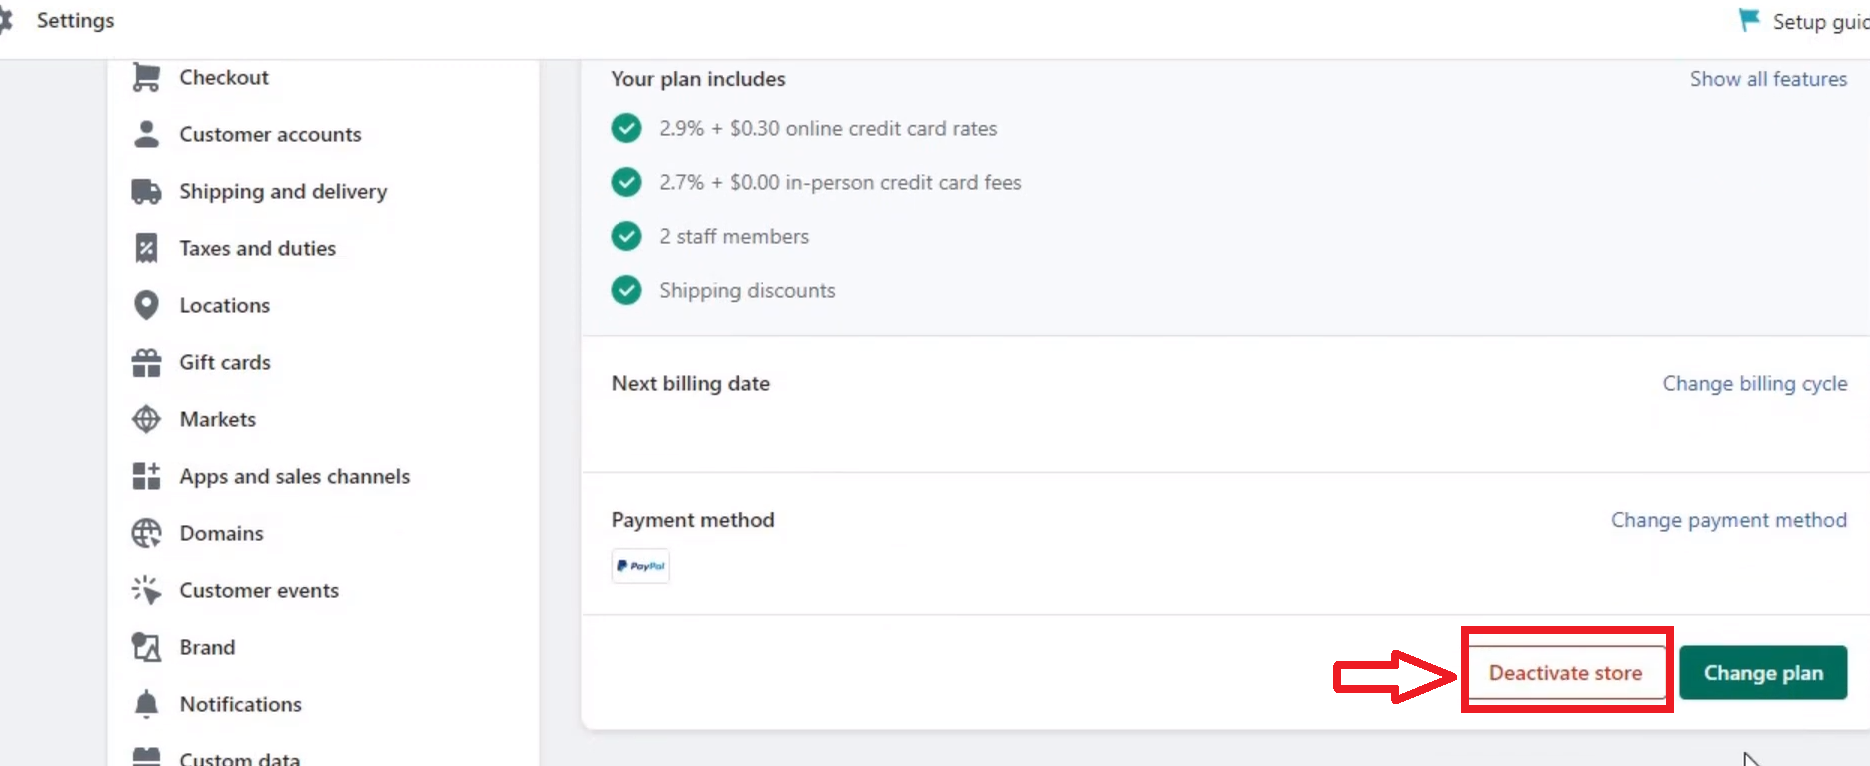
Now, since I am in the “Plan” section, I scroll down to find the “Deactivate store” button. And, once I do, I click on it.
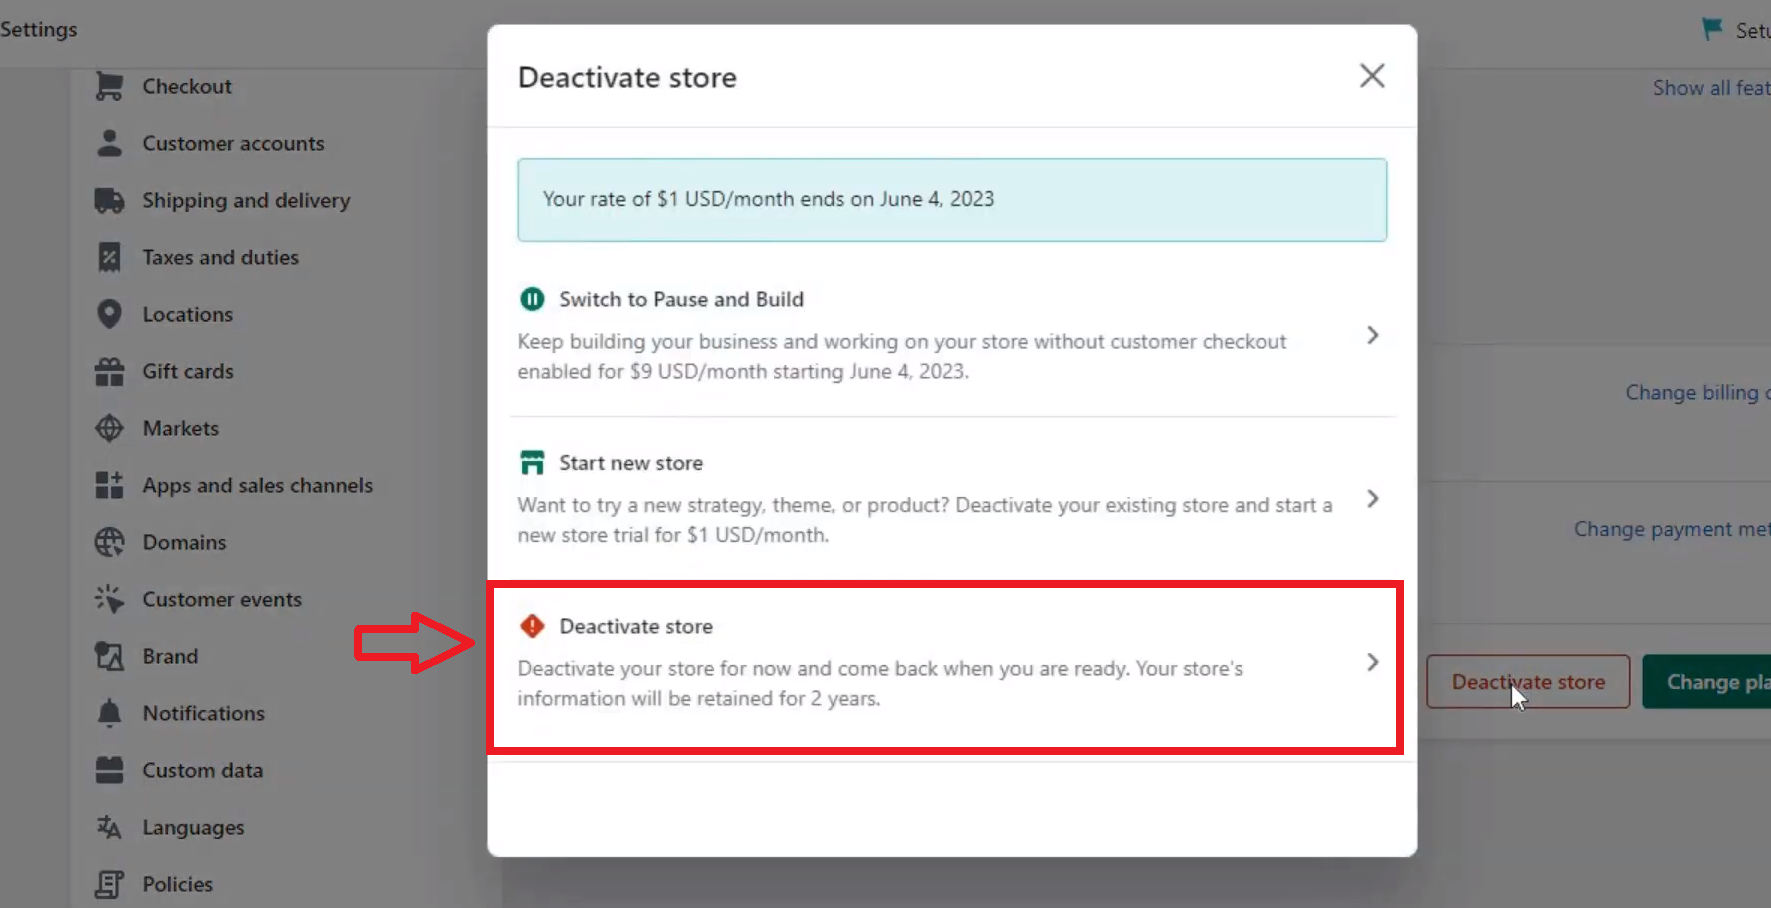
Then, another window will show up. Here I have three options: to pause my subscription, build a new store, or deactivate my store. Hence, since I want to cancel my subscription I will choose the third option.
 Step 7: Confirm Your Selection
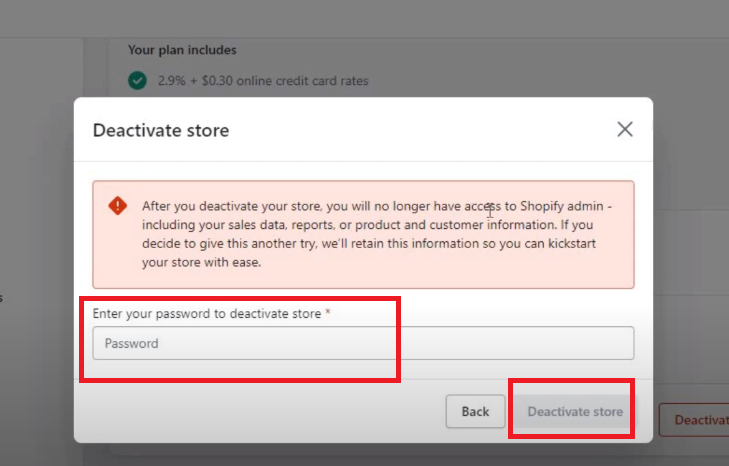
Now, once I clicked on deactivate store, there are a few more steps to take. First, I must give a reason why I decided to cancel. So, I will choose one of the following options:

Afterward, I will enter my passwords, and click on my final decision “Deactivate store”.

Why You Might Want to Pause or Cancel Your Shopify Subscription
1. Preserve Your Shopify Store Data While Taking a Break
If you’re stepping away from your online business temporarily, pausing your Shopify subscription is a great way to retain all your store data and settings.
This option ensures your business remains intact while you focus on other ventures or enjoy a vacation.
So, using the Shopify admin panel, you can easily pause your store without losing access to your customizations.
2. Avoid Losing Time and Effort When Reopening
By pausing your store instead of canceling, you save the hassle of starting from scratch later. All your Shopify store data, including product details and settings, stays secure. This is especially useful if you plan to resume selling but need a temporary pause.
Pro Tip: You can pause your store through the Shopify admin and reactivate it with minimal effort when you’re ready.
3. Start Fresh Without the Old Baggage
If you’re certain you no longer want to sell online or switch to another e-commerce platform, canceling your Shopify subscription is the cleanest option.
This allows you to shut down your store permanently and potentially reassign your custom domain.
For instance, if you are a retailer who has transitioned to physical stores might decide to delete your Shopify account to cut ties with online selling altogether.
4. Save on Costs and Avoid Unnecessary Transaction Fees
Canceling or pausing your Shopify subscription can help you cut down on expenses, especially if you’re not generating sales.
While pausing temporarily avoids full fees, canceling entirely eliminates all Shopify-related costs, including transaction fees.
Pro Tip: Before canceling, back up your Shopify store data to ensure you have records of everything important.
5. Simplify Your Exit from the Shopify Platform
Canceling your subscription is straightforward. Just log in to your Shopify account, head to “Settings” in your Shopify admin, and select click deactivate store.
This process ensures your exit is smooth, whether you’re leaving the platform or switching to another website builder.
For example, if you are not satisfied with limited payment options on Shopify, you may choose to move to a platform with more flexibility, canceling your Shopify account as part of the transition.
Read about How To Open and Manage Multiple Shopify Stores (Tips + Apps)
What To Consider Before You Cancel and Delete Your Shopify Account?
1. Settle Outstanding Charges
Personally, I believe that it’s crucial to settle any outstanding charges before you cancel your Shopify subscription. This will ensure that there are no unexpected charges or balances owed to Shopify after your account has been terminated.
In fact, you must make sure that you pay all outstanding charges in full before closing your account. Bear in mind that any charges left unpaid become payable upon account termination.
Not paying your outstanding charges can have negative consequences, such as affecting your credit score or future business opportunities.
Therefore, it is advisable that all pending payments be cleared before canceling or deleting your Shopify account.
2. Save Your Store Data
Losing critical information such as customer data and financial data can have long-lasting consequences and hinder any future business ventures. One way to save crucial stored data is by exporting CSV files.
So, when exporting CSV files, it’s essential to save all necessary data to ensure that you have access to it if needed. So, make sure you export your customer data, orders, products, etc.
It’s also crucial to save any discount codes you’ve used on your store as they can be valuable in bringing back customers in the future.
In my experience, I found that exporting my billing history was also helpful, as it allowed me to review any past charges on my account. By saving this information, I could track any unexpected charges and prevent any future errors.

3. Cancel Third-Party Application Subscriptions
Now, you might deactivate your Shopify account but don’t forget the third-party apps that you installed. Hence, Shopify is not responsible for them. And, you need to remove and unsubscribe all of them manually.
Plus, it’s important to note that most third-party apps charge a full month’s fee from the day they are installed. So, make sure to consider canceling them before closing your store to avoid unnecessary charges. This can save you a significant amount of money, especially if you have multiple apps installed.
4. Domain-Related Considerations
If you want to cancel your subscription with Shopify, it is important to remove your domain from the platform. This is because if you do not remove your domain, it will still be associated with your Shopify account, and you may continue to be charged for it even after you have canceled your subscription.
Additionally, if you do not remove your domain, it may cause issues if you decide to use it with another website or platform in the future.
4. Think About Selling Your Store Instead
So, if you are running a store, why not try to sell it, instead of canceling a Shopify subscription? Online store owners might find selling their store a more profitable option.
Thus, there are various platforms like Flippa or Empire Flippers, that can help you connect with people who want to buy a Shopify store.
5. Inform Your Customers
Before you close your store, it’s crucial to let your customers know. Send emails, update your social media, or even add a banner on your website to keep them informed. This helps avoid confusion and keeps your brand’s reputation intact.
For instance, if you’re moving to a new platform, you could say something like:
“We’re excited to announce our move to a new site! You’ll still have access to your account, but you may need to reset your password for extra security.”
6. Plan a Final Sale
If you’re closing for good, a liquidation sale can be a great way to clear out inventory while giving customers a last chance to shop. It’s also a good way to recover some of your investment.
For example, you might run a campaign like:
“Everything must go! Enjoy up to 50% off as we prepare to close our store.”
7. Complete Outstanding Orders
Make sure every customer receives what they’ve paid for. Fulfilling all orders is non-negotiable—it shows professionalism and care, even as you close down.
I suggest you send an update like this:
“We’re wrapping things up, but rest assured your order is on its way and will arrive on time.”
8. Save Billing and Payout History
Don’t forget to export your billing records and payouts for future reference, especially for tax purposes.
In my opinion, having a CSV file with all your transactions can save you a lot of stress during tax season or audits.
9. Address Shopify Financial Products
If you’ve been using Shopify Balance, Shopify Capital, or any other Shopify financial tools, it’s important to deactivate these as well.
I suggest reaching out to Shopify support to confirm everything is closed properly to avoid complications later.
10. Remove Custom Code or Scripts
If you’ve added any custom code, now’s the time to clean it up. This step helps avoid security risks once your store is inactive.
For instance, you can remove any tracking codes like Google Analytics or Facebook Pixel from your theme.
11. Download Financial Reports
Secure all your financial data, including sales reports and tax summaries, for your records.
For example, having a detailed report of your yearly sales will make your accounting process so much smoother.
12. Review Shopify’s Terms
Before finalizing, it’s a good idea to review Shopify’s terms of service to ensure there are no hidden surprises.
I suggest contacting Shopify support directly if you’re unsure about any specific obligations or fees.
Alternatives To Use When Cancel Shopify Subscription
If you’re ready to cancel your Shopify subscription and explore other eCommerce platforms, you’re probably looking for something that better suits your needs. Shopify is a powerful hosted eCommerce platform, but it isn’t perfect for everyone.
Whether you’re tired of limited payment options compared to other platforms, want to avoid transaction fees, or need more customization options, switching to a different eCommerce platform might be the right move for your business.
1. WooCommerce: The Open-Source Alternative

If you’re canceling Shopify because of relatively limited payment options or high costs, WooCommerce is worth a look. It’s a free plugin for WordPress that transforms your website into a fully functional eCommerce store.
Unlike Shopify, WooCommerce allows full control over customization and supports popular payment methods without extra fees.
However, WooCommerce isn’t as beginner-friendly as Shopify. While Shopify simplifies the process with its Shopify app and a hosted environment, WooCommerce requires hosting, domain setup, and plugin management.
But if you’re comfortable with WordPress, it’s a great way to avoid the limitations of a hosted eCommerce platform.
2. BigCommerce: Built-In Features Galore
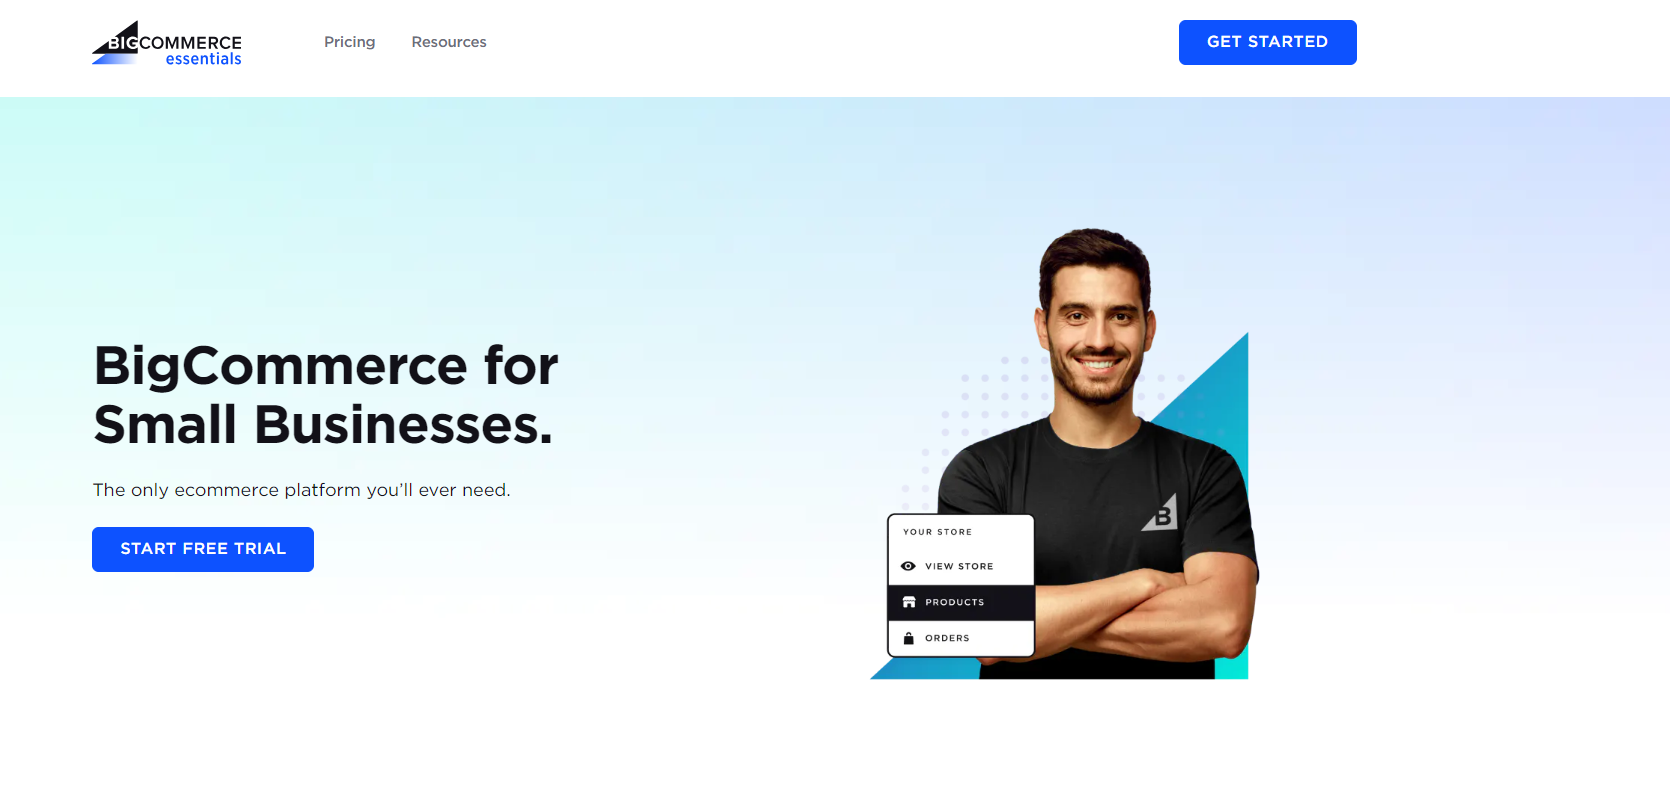
BigCommerce is another strong contender. It’s similar to Shopify but comes with more built-in features, so you’ll spend less on third-party apps. If limited payment options Shopify frustrates you, BigCommerce supports over 50 secure payment gateways.
It’s perfect for scaling your eCommerce store while keeping costs predictable.
That said, BigCommerce isn’t as simple to use as Shopify, especially for first-time store owners.
However, if your main goal is growth, this platform’s advanced commerce capabilities can take your business to the next level.
3. Wix: Easy for Beginners
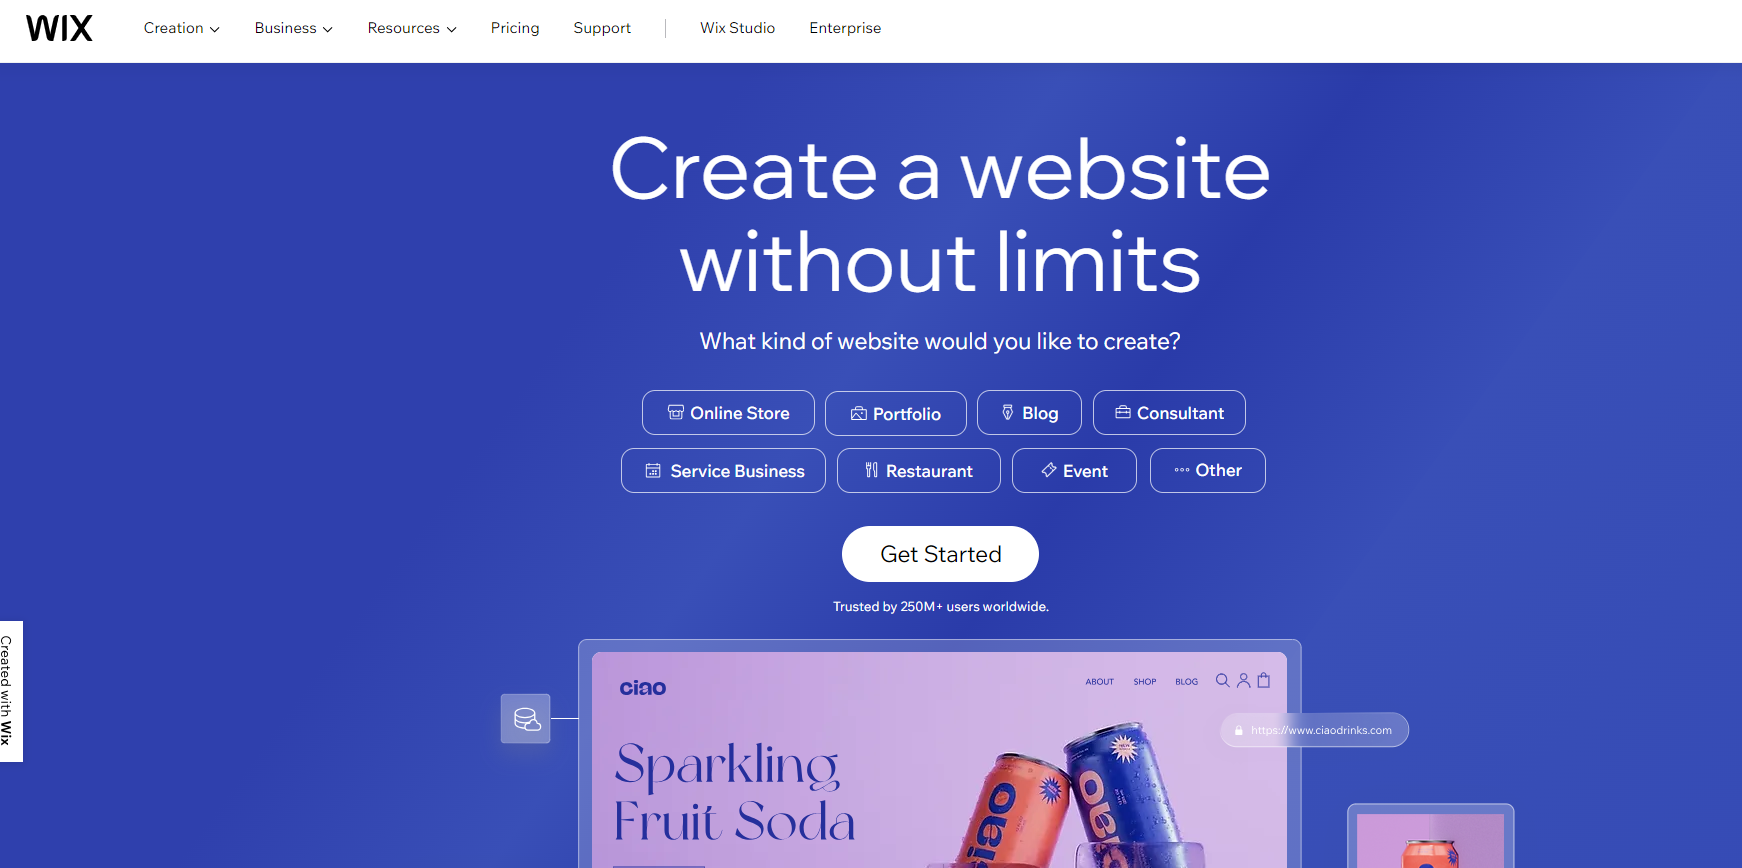
If you canceled Shopify because it felt too complex or expensive, Wix might be what you’re looking for.
This website builder is incredibly beginner-friendly with its drag-and-drop editor. Wix even handles hosting and domains, so you won’t have to worry about those extra costs.
Wix does have its downsides, though. It doesn’t scale as well as Shopify or BigCommerce, and while it supports many payment methods, its focus isn’t solely on eCommerce.
Still, for smaller stores, it’s an affordable and creative choice.
4. Squarespace: The Design-Focused Option

If your Shopify store didn’t match your vision for a sleek and modern design, Squarespace might be the answer.
Known as the “master of design,” Squarespace offers stunning templates perfect for small businesses or boutique-style stores.
However, it doesn’t support the same level of commerce capabilities as Shopify or BigCommerce, making it better for simpler stores.
Why Cancel Shopify?
You might want to cancel Shopify because it no longer meets your needs. Whether you’re tired of limited payment options compared to other platforms, want to avoid transaction fees, or feel restricted by Shopify’s customization, there are plenty of alternatives to consider.
Each platform—WooCommerce, BigCommerce, Wix, or Squarespace—offers unique features to help you run your eCommerce store with fewer limitations. Shopify is great, but if you’ve outgrown it, switching to another platform could open new doors for your business.
Reactivating Your Shopify Store
How to reactivate your store in a few clicks
If you’ve previously deactivated your Shopify store and are ready to get back to business, reactivating it is a straightforward process. Follow these simple steps to bring your store back online:
- Log In: Start by logging into your Shopify admin panel using your email address and password.
- Access Settings: Click on the “Settings” icon located at the bottom left corner of the screen.
- Navigate to Plan: In the settings menu, click on the “Plan” option.
- Reactivate Store: Click on the “Reactivate store” button.
- Review and Confirm: Review the plan details and click on “Reactivate store” to confirm your choice.
- Enter Payment Information: Provide your payment information and click on “Reactivate store” to complete the process.
Reactivating your store will restore all your store data, including products, customers, and orders. However, if you deleted any data or apps during the deactivation period, you might need to reinstall or reconfigure them to get everything back to its original state. This ensures that your Shopify store is up and running with minimal disruption.
FAQs on Canceling your Shopify Subscription
1. Can I Get a Refund for My Shopify Subscription?
It’s important to know that Shopify does not typically offer refunds for its subscription plans. According to their terms of service, all fees, including subscription fees, are non-refundable. This means that once you have paid for your subscription plan, you are committed to it for the billing period, which can be monthly or annually.
However, there may be exceptions to this policy, depending on your specific situation. If you have encountered unexpected problems with your subscription or have experienced technical difficulties that have affected the performance of your online store, you may be entitled to a refund.
The best course of action is to contact Shopify’s support team and explain your situation. They will review your case and tell you if you are eligible for a refund.
2. What Happens When You Cancel a Shopify Subscription?
Canceling your Shopify subscription means that your store will be permanently shut down.
This means that you won’t be able to manage your orders, products, or customers, and you’ll lose the ability to make changes to your store’s configuration and design.
3. Can I Migrate from Shopify to WooCommerce?
Yes, it is possible to migrate from Shopify to WooCommerce.
Migrating from Shopify to WooCommerce may seem like a challenging task, but it’s actually relatively straightforward. In this article, I’ll show you how to migrate from Shopify to WooCommerce.
The first step is to purchase WordPress hosting and transfer your custom domain, or register a new one. This is because WooCommerce is a plugin for WordPress, so you need to have a WordPress site first to install WooCommerce.
Lastly, suppose you don’t have the technical expertise or the time to handle the migration yourself. In that case, there are professional services available that can assist you in the entire migration from Shopify to WooCommerce.

4. How Can I Migrate from Shopify to WooCommerce?
Here is a step-by-step process for migrating from Shopify to WooCommerce.
- Export your Shopify data. The first step in migrating from Shopify to WooCommerce is to export your data from Shopify. This includes products, customers, orders, and other important information about your store.
- Set up your WooCommerce store. After exporting your data, you need to set up your WooCommerce store. You can do this by installing WordPress and WooCommerce on your hosting provider.
- Import your Shopify data to WooCommerce. Once your WooCommerce store is set up, you can import your Shopify data using a plugin like the WP All Import plugin. This plugin allows you to import your Shopify data directly into your WooCommerce store.
- Set up your payment gateway. After importing your data, you need to set up your payment gateway. WooCommerce supports a variety of payment gateways, including PayPal, Stripe, and Authorize.net.
- Customize your store. Once your data is imported and your payment gateway is set up, you can customize your store to match your brand. You can choose from a variety of WooCommerce themes and plugins to add functionality and features to your store.
- Test your store. Before launching your new store, it’s important to test it thoroughly. This includes testing your payment gateway, checkout process, and other important features of your store.
- Launch your store. Once you’ve tested your store and made any necessary adjustments, you can launch your new WooCommerce store. Be sure to promote your new store to your customers and followers to let them know about the change.
5. What’s the Best Way to Migrate With Little to No Downtime?
One reliable option I found was to choose a hosting provider that offers free migration services. After some research, I found Kinsta, a hosting provider that specializes in managed WordPress hosting. They have a team of experts who can help to ensure a smooth, seamless transition for your store and assist in identifying any performance-related issues.
Also, if your store has a lot of data, such as customers, orders, and SEO URLs, that you need to transfer over, in that case, it may be advisable to seek help from a Shopify Migration Expert.
These experts have the knowledge and tools necessary to transfer all your data quickly and accurately, minimizing potential downtime.
6. Is it hard to cancel Shopify?
Not really! Canceling your Shopify subscription is straightforward, but you’ll need to navigate your Shopify admin carefully.
To start the cancellation process, go to “Settings,” select “Plan,” and then click deactivate. Shopify will guide you through the steps, ensuring you understand how to cancel your Shopify subscription without losing important site’s data or missing out on anything crucial.
7. Does deleting a Shopify app cancel the subscription?
No, removing an app won’t cancel your Shopify subscription or your Shopify store. Apps are independent, and deleting them only stops their specific charges, excluding additional fees tied to your main plan. To fully cancel your Shopify subscription, you’ll need to deactivate your store through your Shopify admin.
8. What happens if I don’t pay my Shopify subscription?
Failing to pay will lead to Shopify suspending your store, and eventually, it will be deactivated. However, Shopify requires you to settle any unpaid amounts, including high transaction fees, before you can regain access to your store’s functionality or close it for good.
9. How do I remove my card from Shopify?
You can’t remove your credit card details unless there’s an alternative payment method on file.
Add a new payment method first, then delete the card you want to replace. This is to ensure Shopify can still process any outstanding charges or payments for third-party apps.
Conclusion
Deciding whether to pause, cancel, or delete your Shopify subscription is a crucial step that should align with your business goals and future plans.
Pausing your subscription is ideal if you want to retain your data while taking a break, while canceling or deleting your account is more permanent and requires careful preparation, such as backing up your data and transferring your domain.
From my experience, always consider the long-term impact before making a decision.
If you think there’s a chance you’ll return to Shopify, pausing is the safest bet. However, if you’re sure about moving on, prepare thoroughly by exporting critical information and notifying your customers to maintain trust and professionalism.
Before starting this process, evaluate your business needs, weigh alternative platforms, and think about your future direction.
Whether you’re scaling down or switching gears, taking the right steps now can save you headaches later. Shopify offers great tools, but understanding how to leave the platform properly ensures you’re in control of your business journey.


![The Top 21 3PL Companies Compared [2025 List & Guide]](https://images.weserv.nl/?url=https://prod-dropshipping-s3.s3.fr-par.scw.cloud/2024/03/Frame-3922469.jpg&w=420&q=90&output=webp)