How to Set Up Shipping on Shopify for Dropshipping in 2025?
I'm looking for...
Wondering how to set up shipping on Shopify for dropshipping in 2025? Getting your shipping strategy right is key to running a smooth and profitable store.
This guide breaks down everything you need to know—from creating custom shipping profiles to managing delivery times—so you can impress your customers and keep those profits rolling in. Ready to learn the secrets to success?
Let’s get started! Here’s the short overview.
Create Your Online Store in just 5 Minutes – For Free
Pick your niche, our AI builds your store, add 10 winning products and we teach you how start selling today. Start picking your niche
Key Takeaways
| Step | What To Do? |
|---|---|
| Create Shipping Profiles | Navigate to Shopify Admin → Settings → Shipping and Delivery. Click “Create New Profile,” name it (e.g., “International Shipping”), and assign products. Define zones like “United States” or “International” and set methods based on product size, weight, or other criteria. |
| Determine Shipping Rates | Add rates by clicking “Add Rate.” Choose between Flat Shipping Rates, Calculated Shipping Rates, or Free Shipping. Examples: – Flat Rate: $10 for orders up to 5 lbs. – Free Shipping: Orders over $50. |
| Use Calculated Rates | Enable “Use Carrier or App to Calculate Rates.” For example, use USPS or UPS for domestic shipping and set flat rates for international orders like $15 for up to 20 lbs. |
| Finalize Your Setup | Double-check shipping zones. Ensure all regions you want to ship to have corresponding zones. Save your shipping profiles to make them active. |
| Handle Shipping Costs | Decide if you’ll absorb shipping costs or pass them to customers. Use free shipping as a promotional tool by including it in your pricing strategy. Communicate all costs transparently. |
| Add Packages | Go to Settings → Shipping and Delivery, scroll to “Packages,” and click “Add Package.” Define dimensions and weight for accurate rate calculations. Name packages (e.g., “Standard Box”). |
| Enhance Customer Experience | Enable “Show Expected Delivery Date at Checkout” in your shipping profile. Use apps like Bespoke Shipping for advanced customization. |
| Manage Shipping Times | Regularly review supplier options and ensure they meet quality standards. Use tracking apps from Shopify’s App Store to provide updates and enhance customer trust. Offer express shipping options if supported by your supplier. |
What Is Shopify Dropshipping & How Does It Work?

Think of dropshipping as running a digital storefront where someone else does the heavy lifting.
You create a Shopify store, list products from suppliers, and market them like a pro. When a customer places an order, you forward it to the supplier, who ships it directly to the buyer.
No stockpiling in your garage, no packing tape disasters—just a smooth, streamlined process.
So, you can focus on what matters most—growing your brand. Marketing? Check. Customer service? You’ve got this. Fulfillment? That’s your supplier’s job.
How Does Shopify Dropshipping Work?
Picture this:
- Set Up Your Store: Create a Shopify account and choose a design that screams your brand. Think clean, professional, and easy to navigate.
- Find Your Suppliers: Apps like Dropshipping.com, AutoDS, Spocket, or DSers let you import products directly into your store. Make sure you vet suppliers for quality and shipping times (nobody likes waiting forever for their order!).
- List Products: Add eye-catching descriptions and gorgeous photos that make customers say, “Take my money!”
- Market Like a Pro: Use social media, SEO, and ads to draw traffic to your store. Shopify even has built-in tools to help you track and optimize.
- Handle Orders: Once an order comes in, your supplier takes over—shipping the product directly to your customer. All you do is forward the details.
Here’s how it goes: Imagine you’re selling minimalist watches. You list a watch for $50 but source it from your supplier for $20. When someone buys it, you pocket the $30 difference (minus Shopify and payment processing fees).
How to Set Up Shipping on Shopify for Dropshipping & Start Selling in 2025?
1. Select a Dropshipping Business Model
There are several business models you can choose for your dropshipping venture. You might opt for a niche store, which focuses on a specific product category, or a general store that offers a wide range of items.
Anyway, you can use product research tools like Minea, and see which products sell best. The app will give you valuable insights like product profit margins, engagement, target audience, etc.
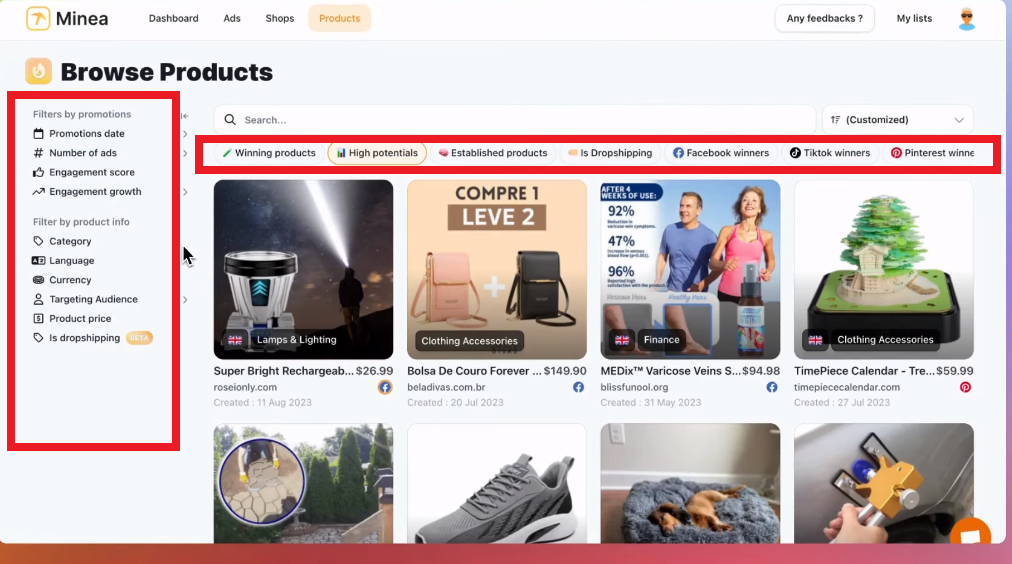
Hence, you can even spy on successful Shopify stores and check their shipping on Shopify for dropshipping, selling, and more.
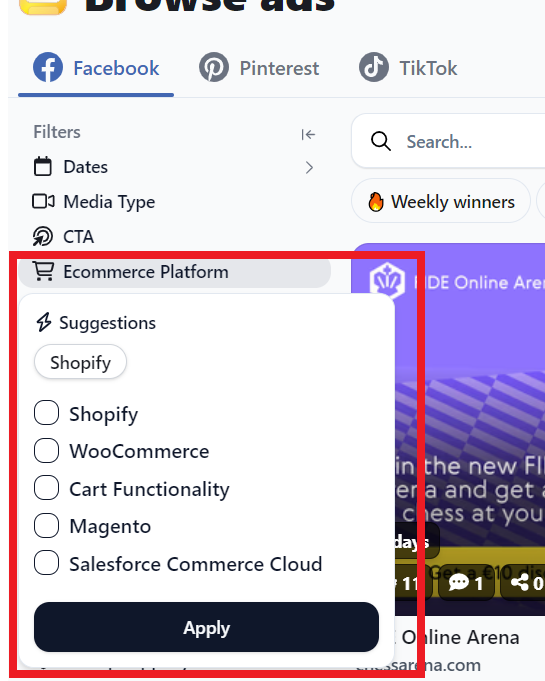
Moreover, consider your target audience and the market demand for the products.
2. Choose Your Dropshipping Suppliers
Selecting the right suppliers to provide good service for shipping on Shopify for dropshipping is essential.
Reliability, integration capabilities, and the right platforms can significantly affect your operations and customer satisfaction.
So, firstly, let’s find them. I suggest you look for suppliers on reputable supplier directories like DSCOM, or Zendrop.
For example, I use the Dropshipping.com supplier directory. It offers access to a vast directory of over 2,000 reliable suppliers.
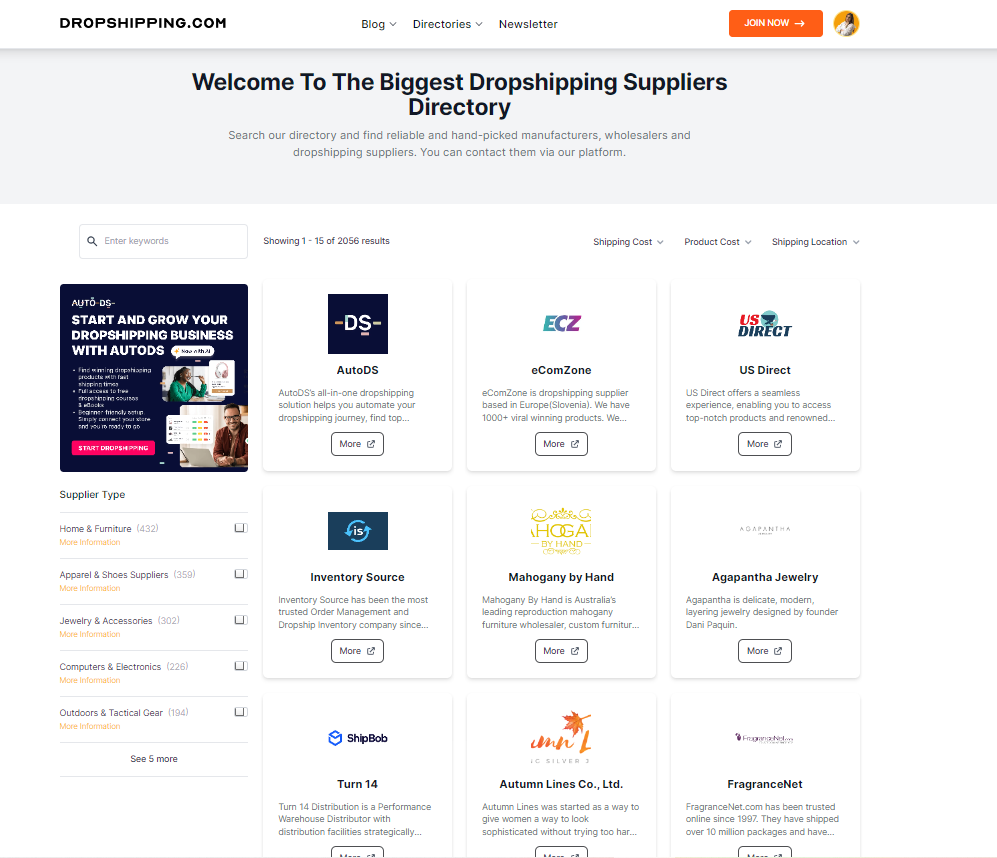
You can explore crucial supplier details at your fingertips. Learn about pricing, processing times, minimum order quantities (MOQ), warehouse locations, product offerings, and much more to ensure you’re partnering with the right fit for your store.
3. Evaluate Supplier Reliability
When choosing a dropshipping supplier, reliability is paramount. Therefore, if you want to set up good rates for shipping on Shopify, check if the supplier has a proven track record in fulfilling orders accurately and on time.
Look for customer reviews and ratings to gauge their service quality.
Consider suppliers that offer tracking information and have responsive customer service.
Also, a dependable supplier helps ensure that your customers receive their orders promptly, which enhances their experience.
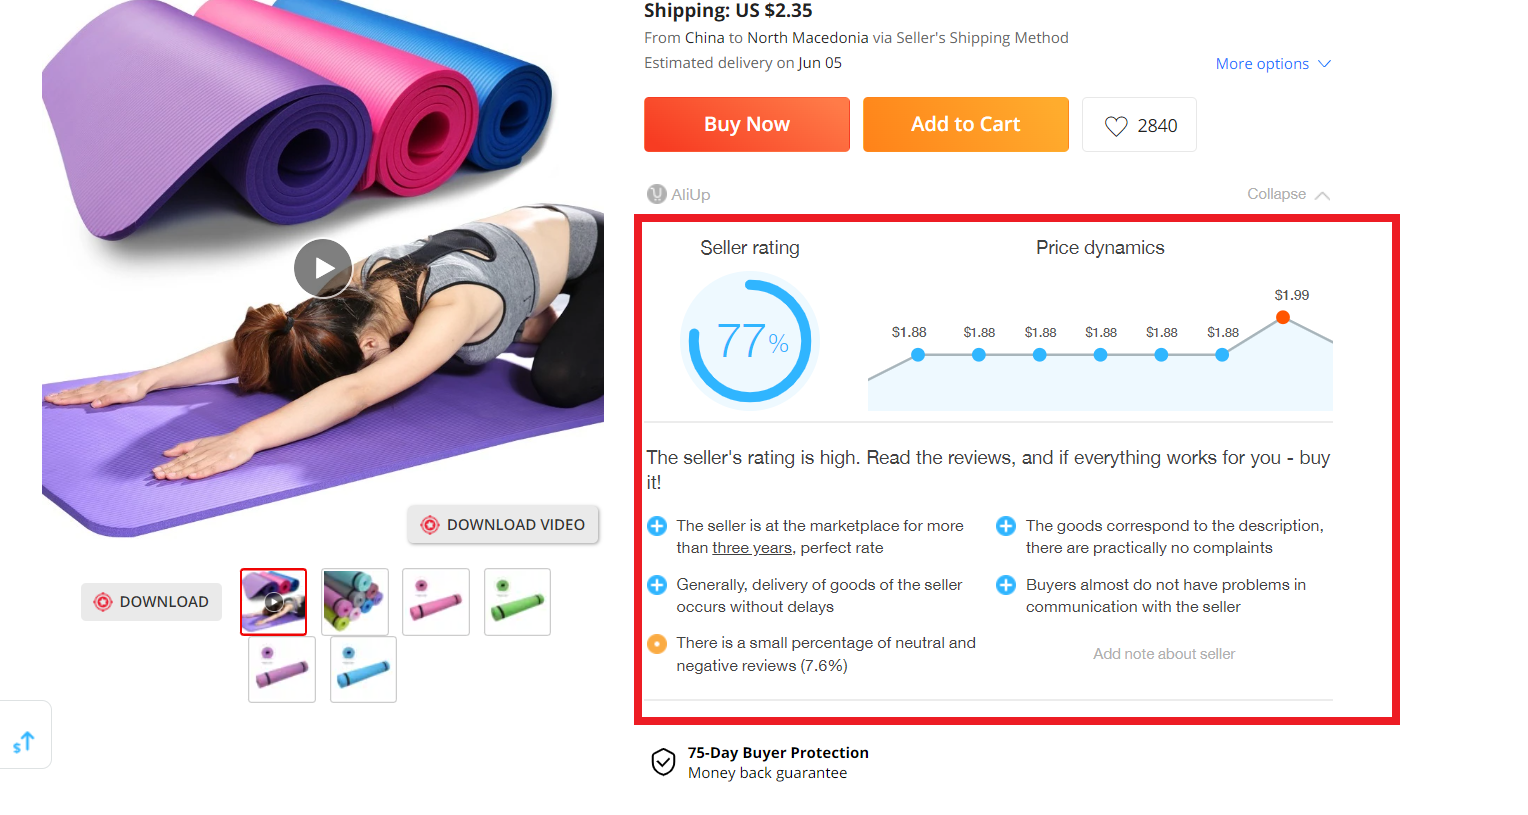
For example, platforms like AliExpress and Modalyst provide insights into supplier ratings, helping you make informed decisions. I personally use AliExpress Chrome extensions, and the tool gives me supplier ratings, comments, pros, and cons.
4. Integrate Suppliers With Shopify
Seamless integration between your chosen suppliers and Shopify is crucial for smooth operations and shipping on Shopify dropshipping.
Therefore, I advise you to look for suppliers that offer easy connectivity with Shopify. This feature allows automated order processing, reducing the chances of human error.
For example, I work with Zendrop, and here’s how my integration goes:
Once your Zendrop account is ready, the next step is linking it to your Shopify store. Simply input your Shopify domain name and hit “Connect.”
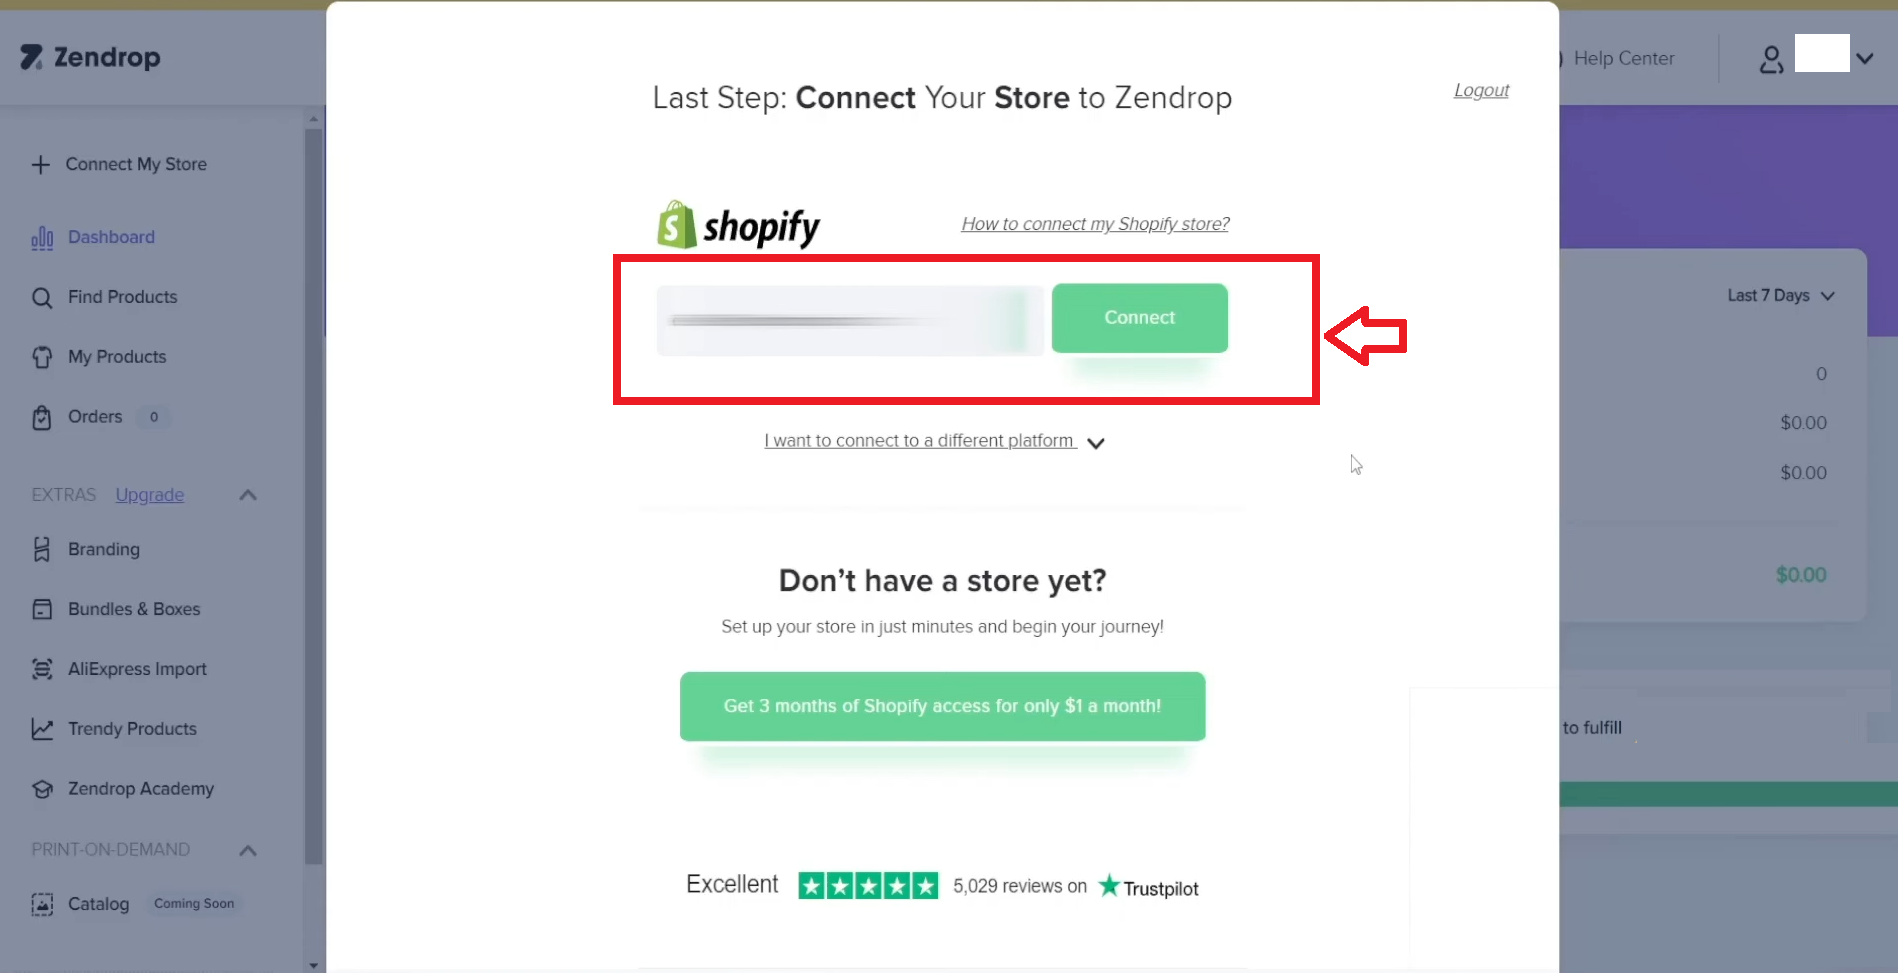
This action will take you straight to your Shopify store, where you can seamlessly install the Zendrop app.
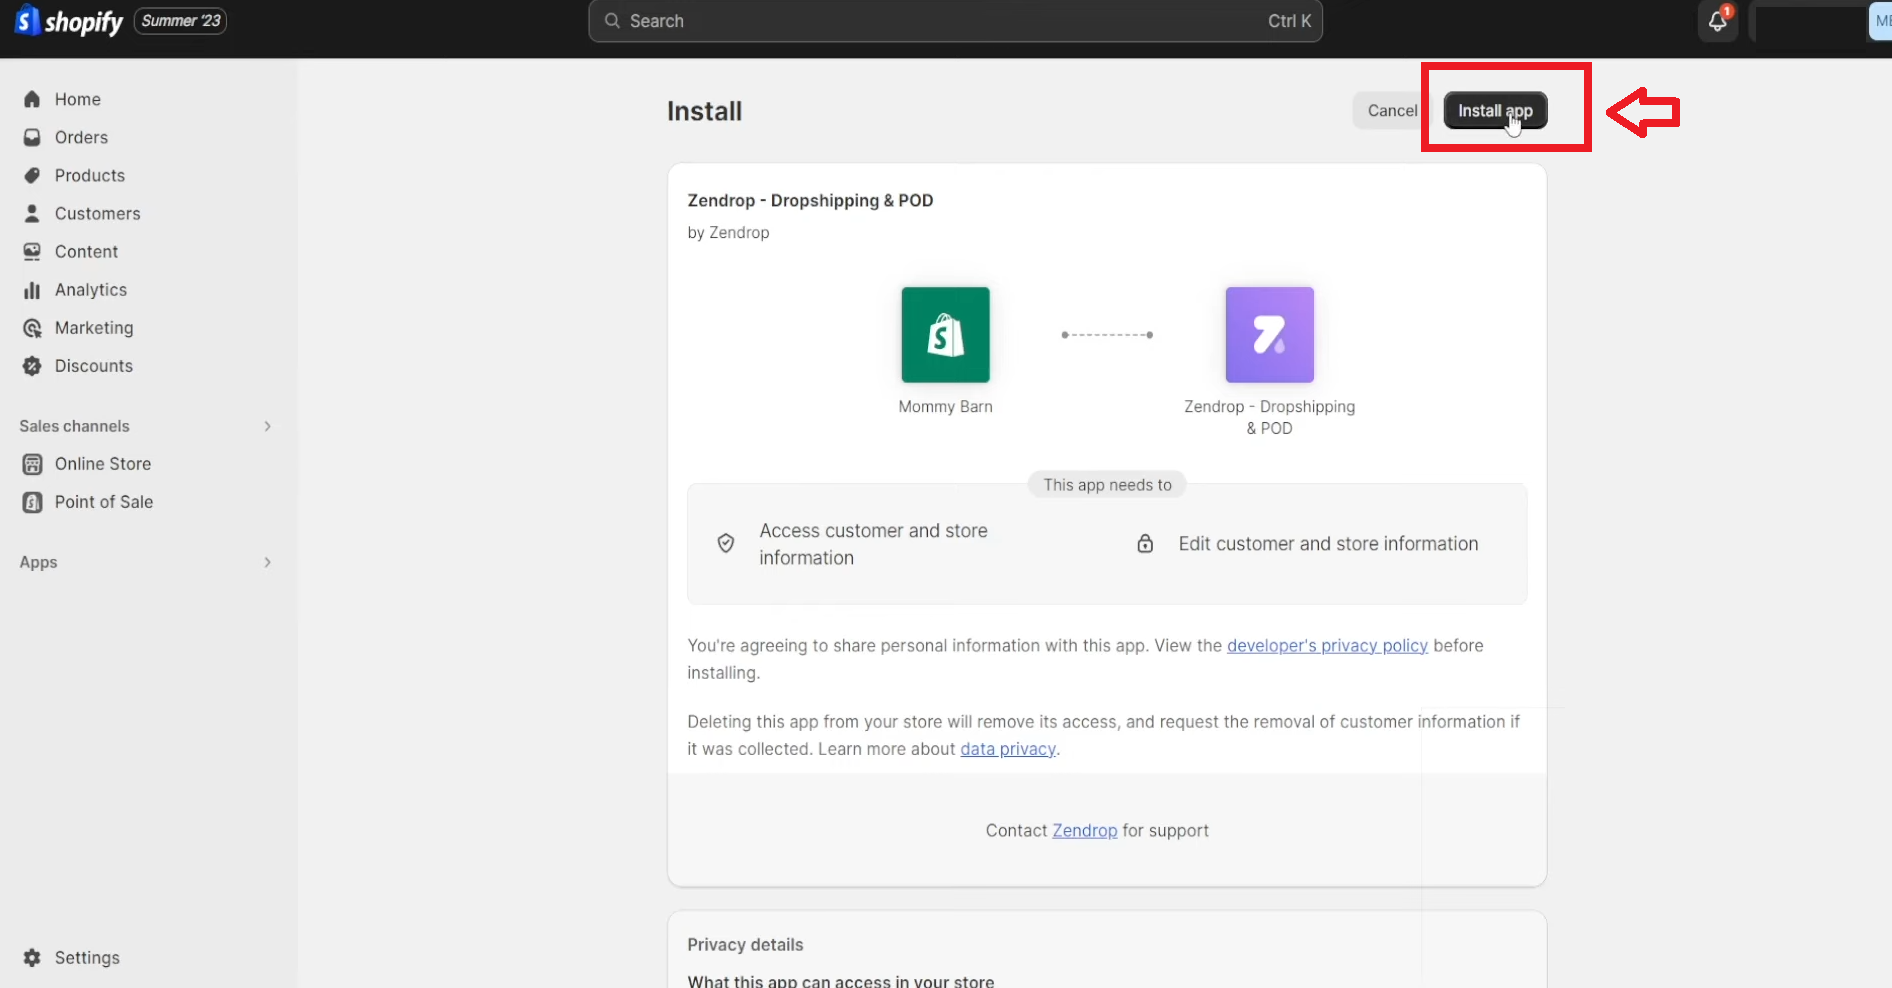
Once the connection is successful, head back to your Zendrop account to begin exploring products for your dropshipping store.
Also, using apps like DSers can simplify this integration. They enable you to import products and manage inventory with ease.
This automation not only saves time but also helps you focus on marketing and growing your business without getting bogged down by logistics.
5. Dropshipping Apps and Platforms
Choosing the right dropshipping apps can streamline your workflow. So, since you are dropshipping on Shopify, you will probably need apps for automating your order fulfillment, inventory tracking, pricing updates, marketing, shipping on Shopify, etc.
Fortunately, Shopify has a huge app store where you can search for apps and install them with ease. So, you can easily reach the Shopify App Store directly from your dashboard.
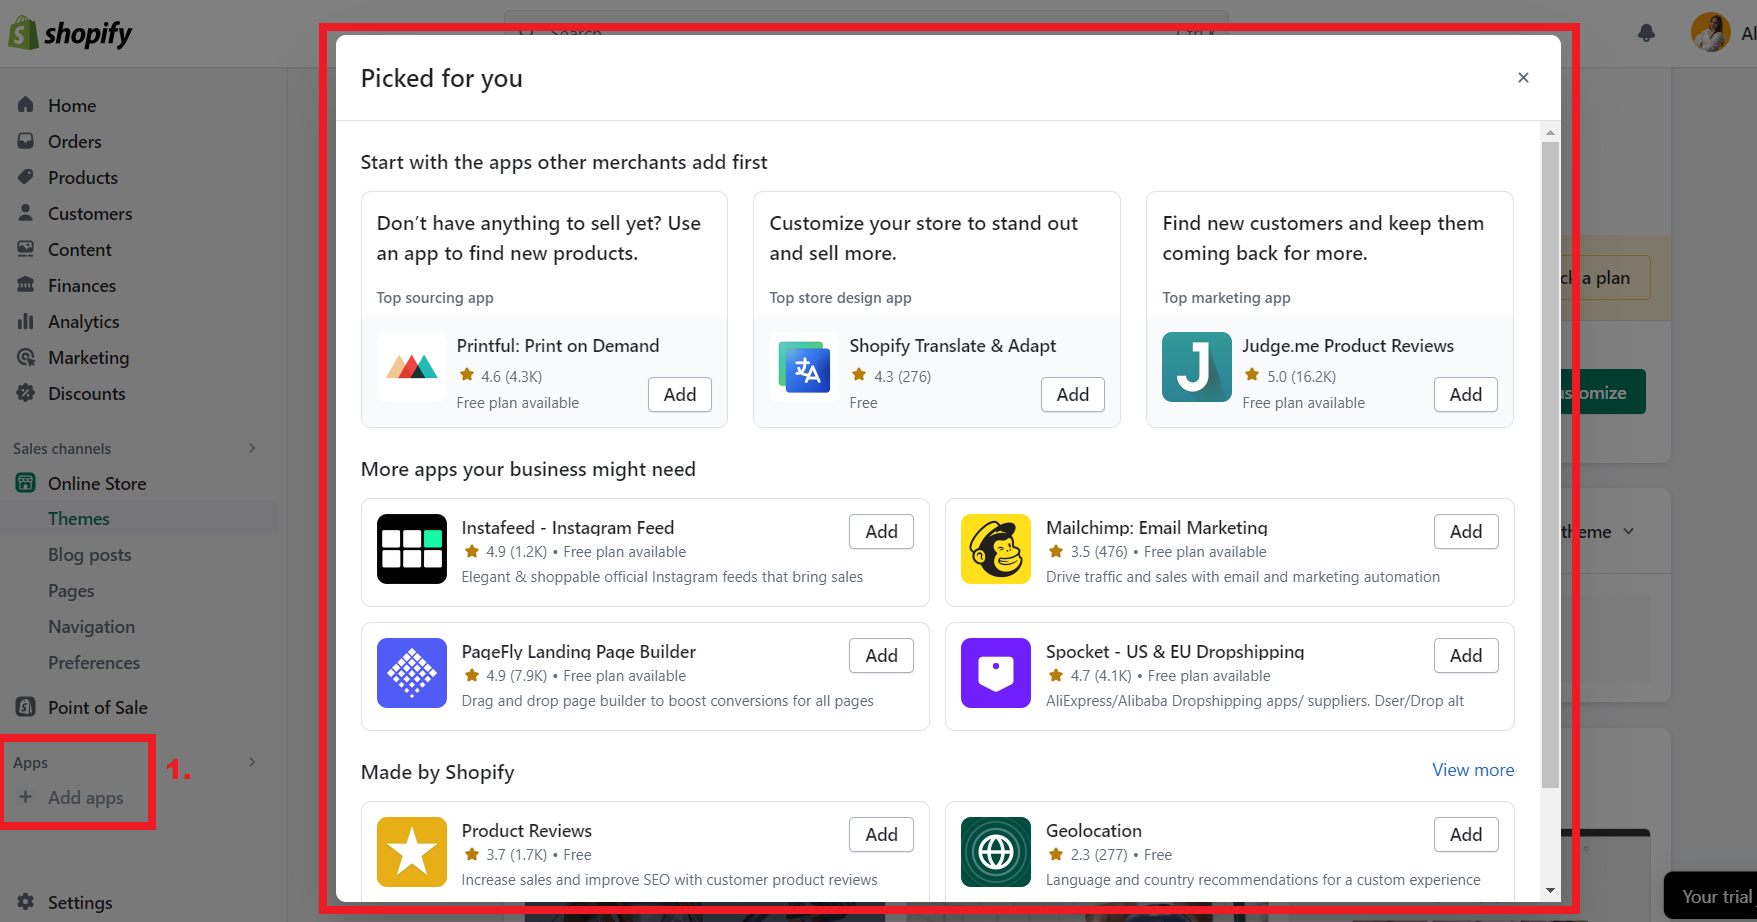
Alternatively, head over to the Shopify app store and search for the apps you need.
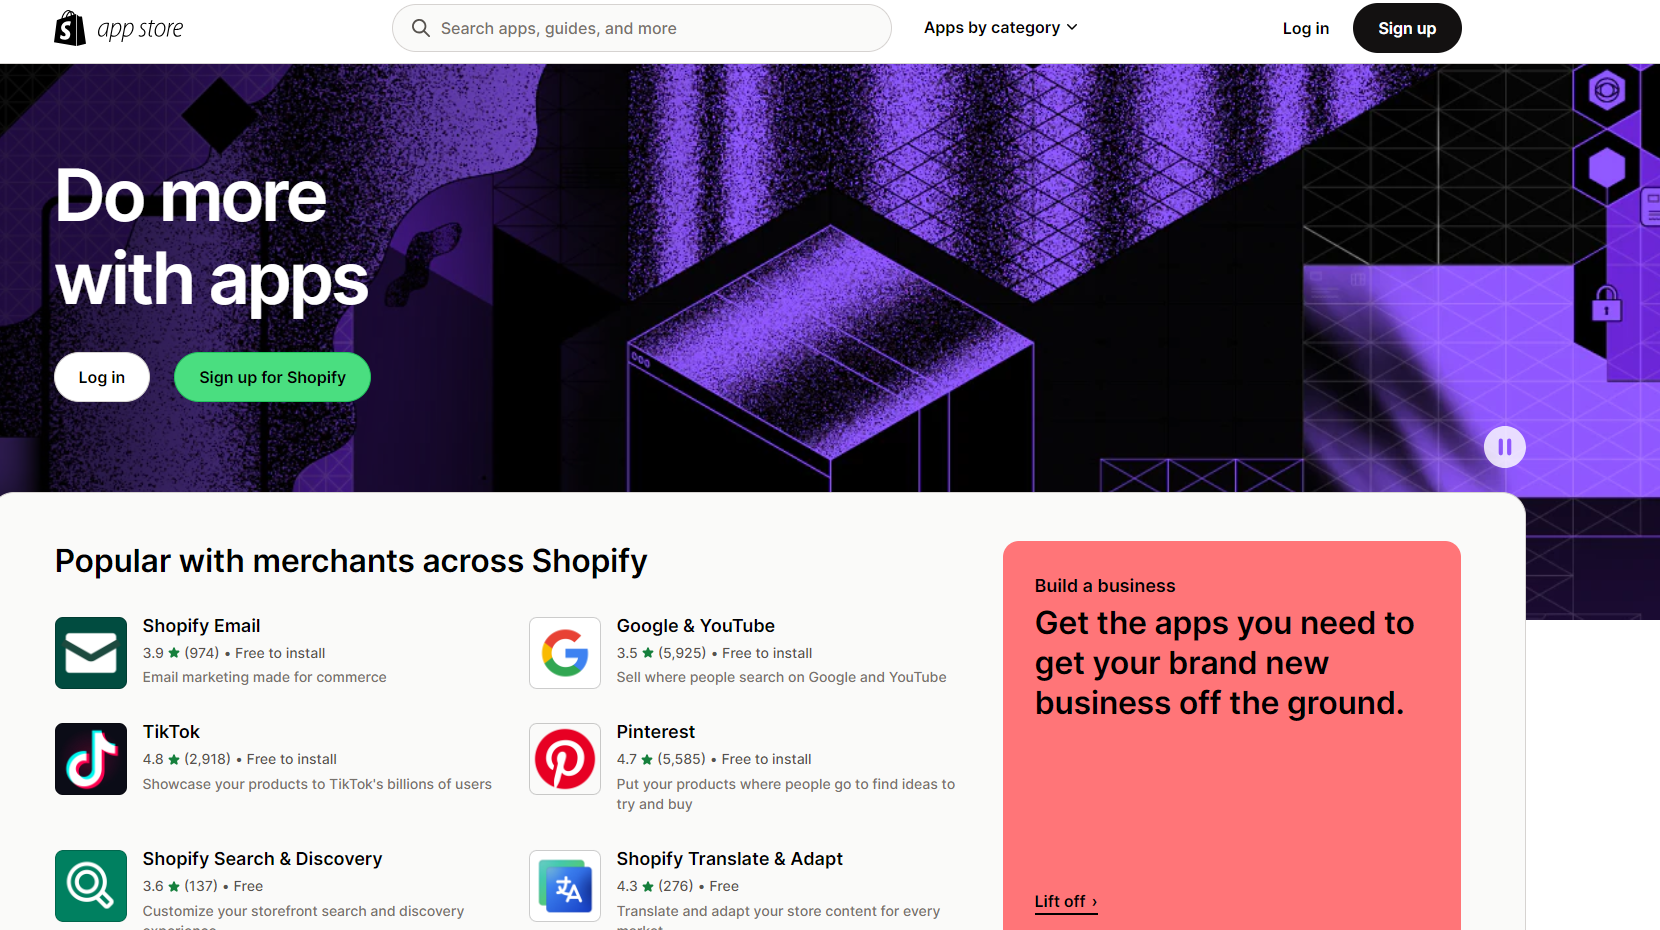
Once you’ve found the app you want, click “Add App” to get started.
Afterward, you can complete the installation right from your Shopify dashboard.
For example, top-rated Shopify dropshipping apps for connecting with suppliers and products include BigBuy, Spocket, and Inventory Source. These tools are perfect for building your store’s catalog.
These apps often come with added features such as bulk order placement, inventory management, and product pricing automation.
However, to choose the best app, I advise you to join a dropshipping community that can also provide valuable resources and tips for navigating these platforms effectively.
6. Import Products To Your Store
To start, head to the ‘Products’ section on your Shopify dashboard and click the ‘Add your product’ button to create your first product listing.
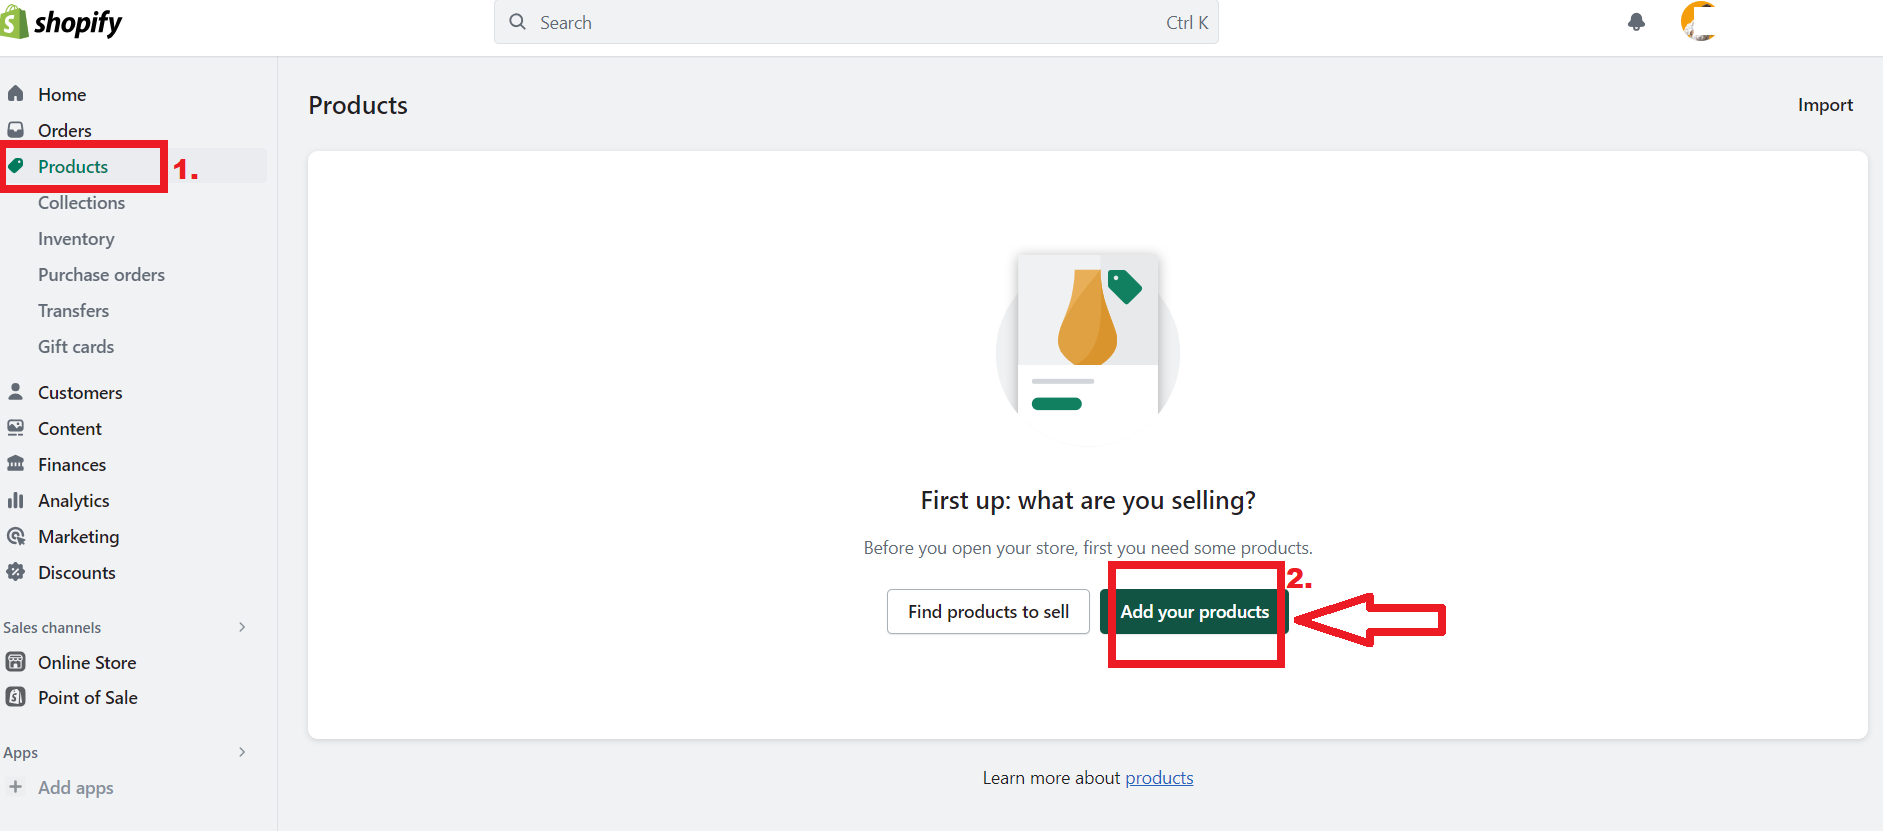
If you’re not sure what to sell, Shopify makes it easy by offering a built-in option to find products. Clicking that button takes you to the Shopify App Store, where you’ll find plenty of product research tools to explore.
Since I use Zendrop, here’s my process:
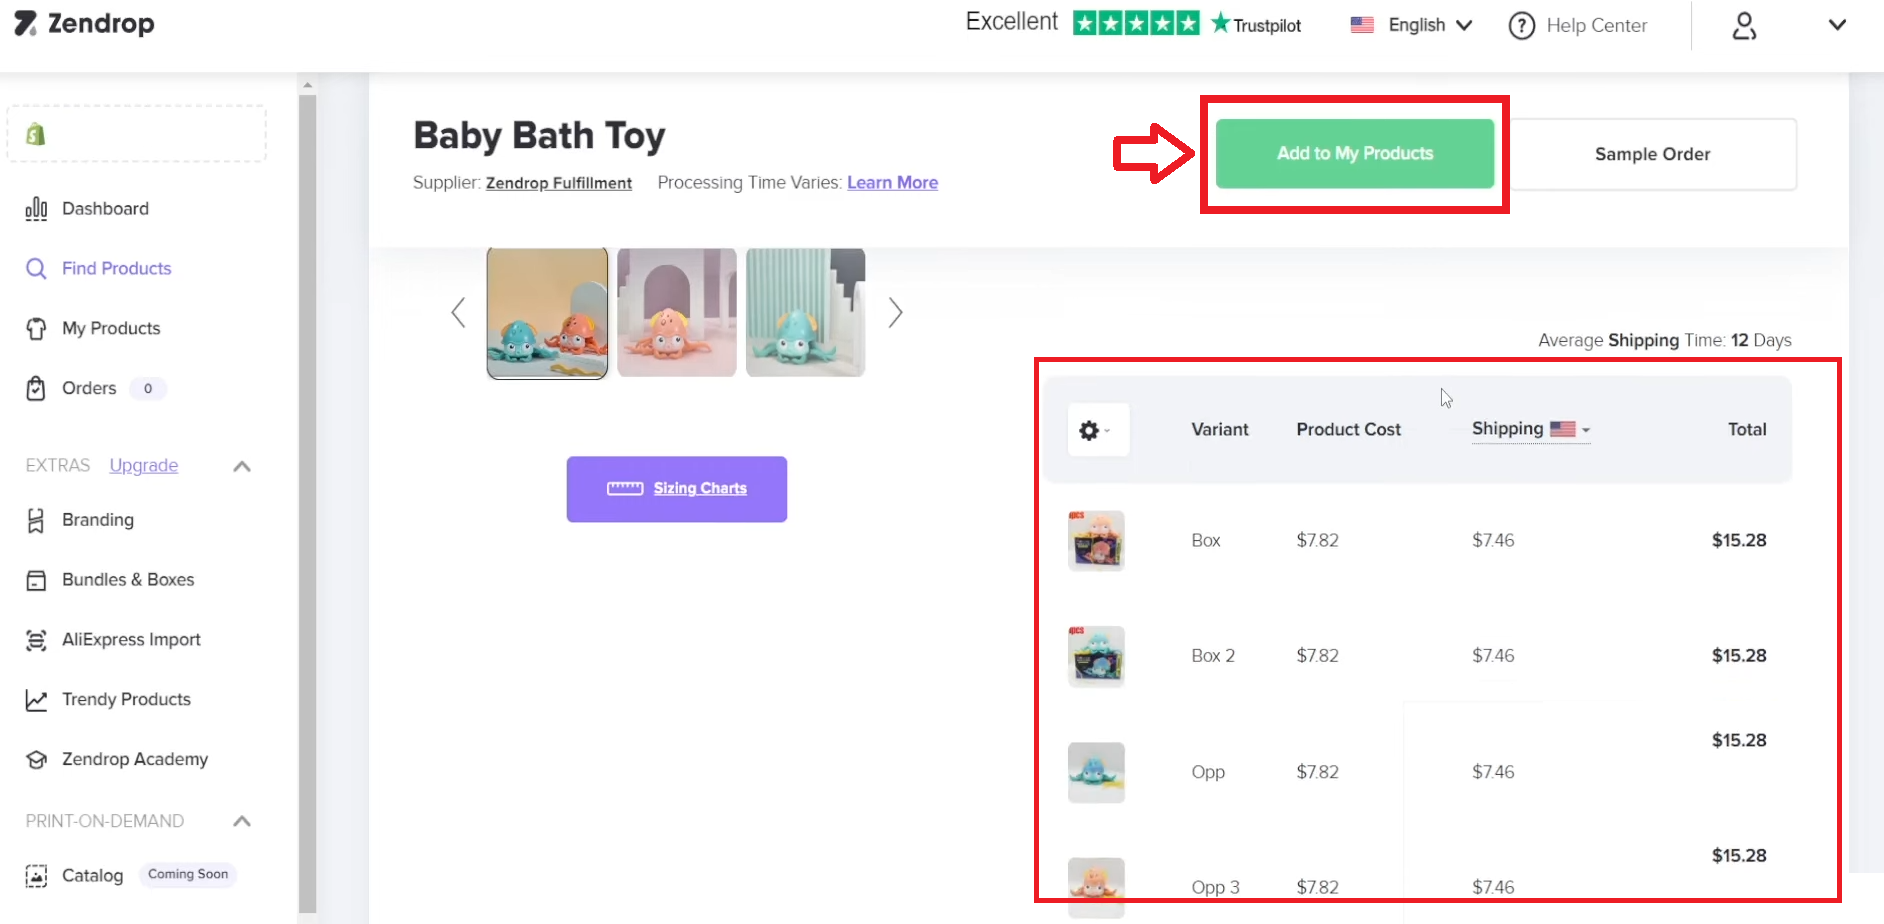
Once you spot a product you like, click on it to see details such as a description, shipping times, and costs.
Review important data like shipping fees, total cost, and potential profit margins. If it looks good, hit “Add To My Products.”
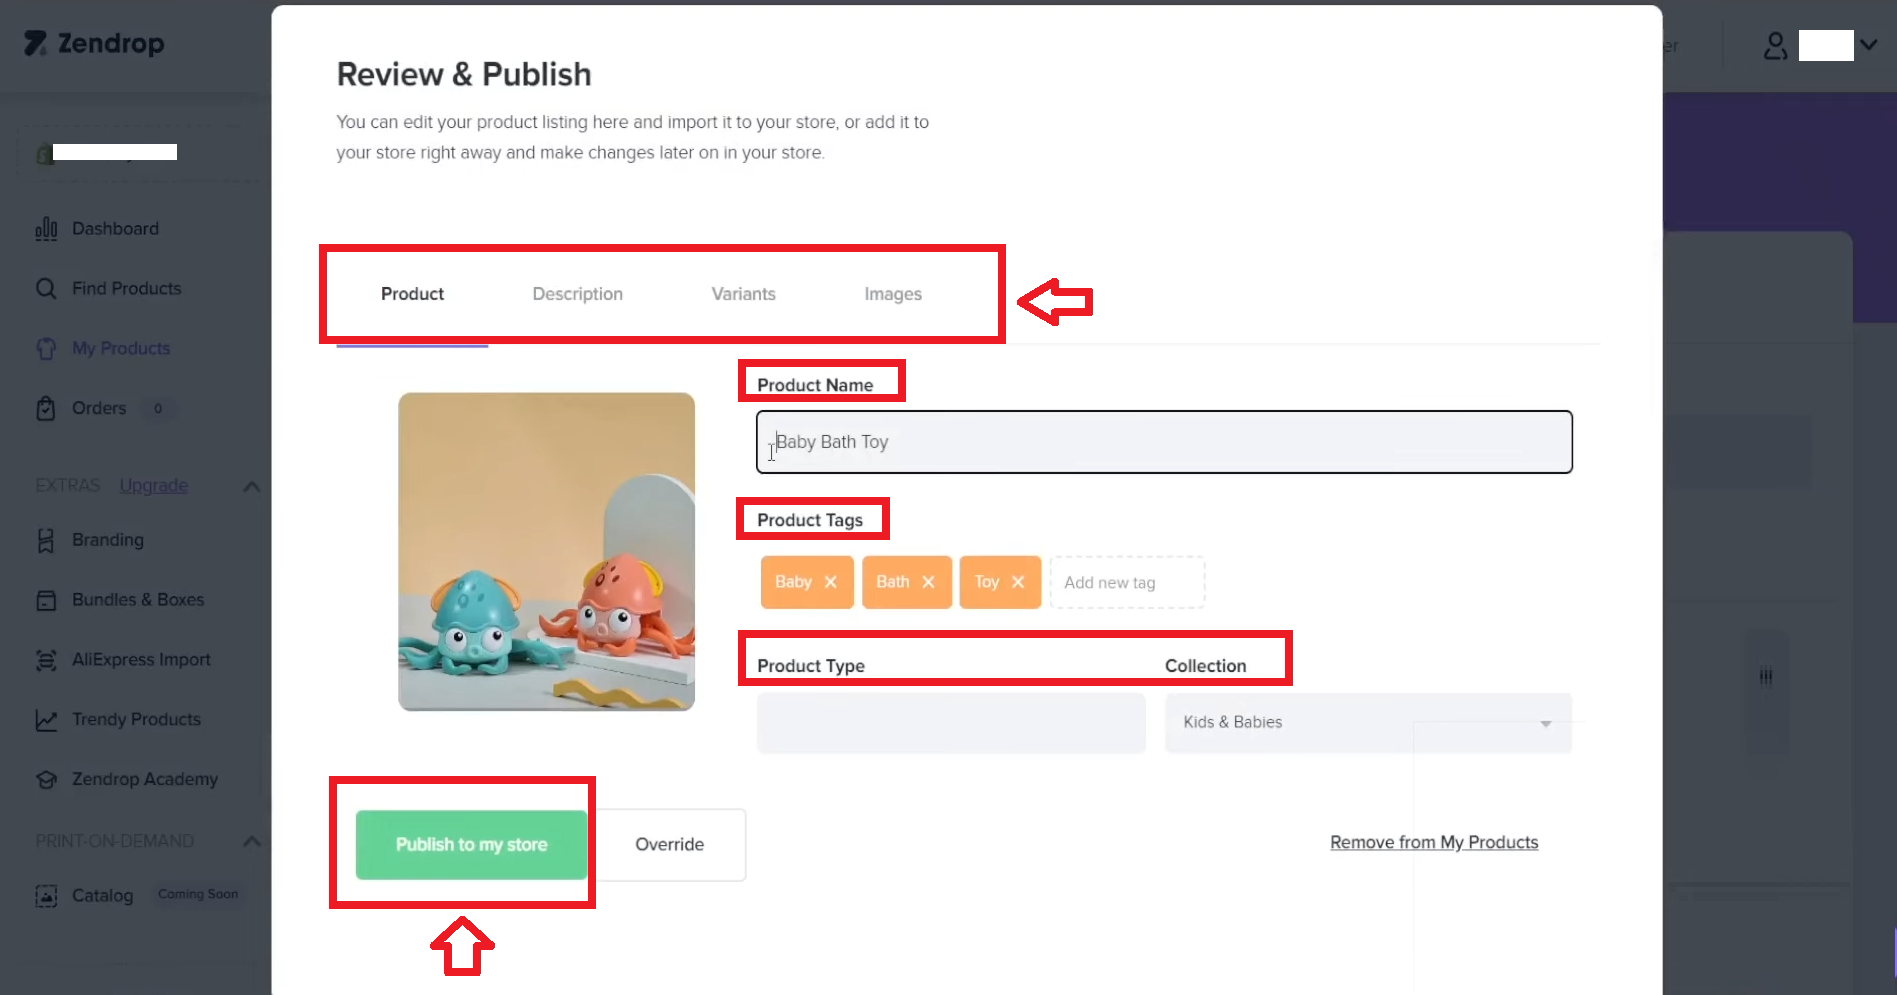
Next, head to the ‘My Products’ section, open your Import List, and click “Review and Publish.”
When you’re ready, select “Publish to My Store” to make the product live.
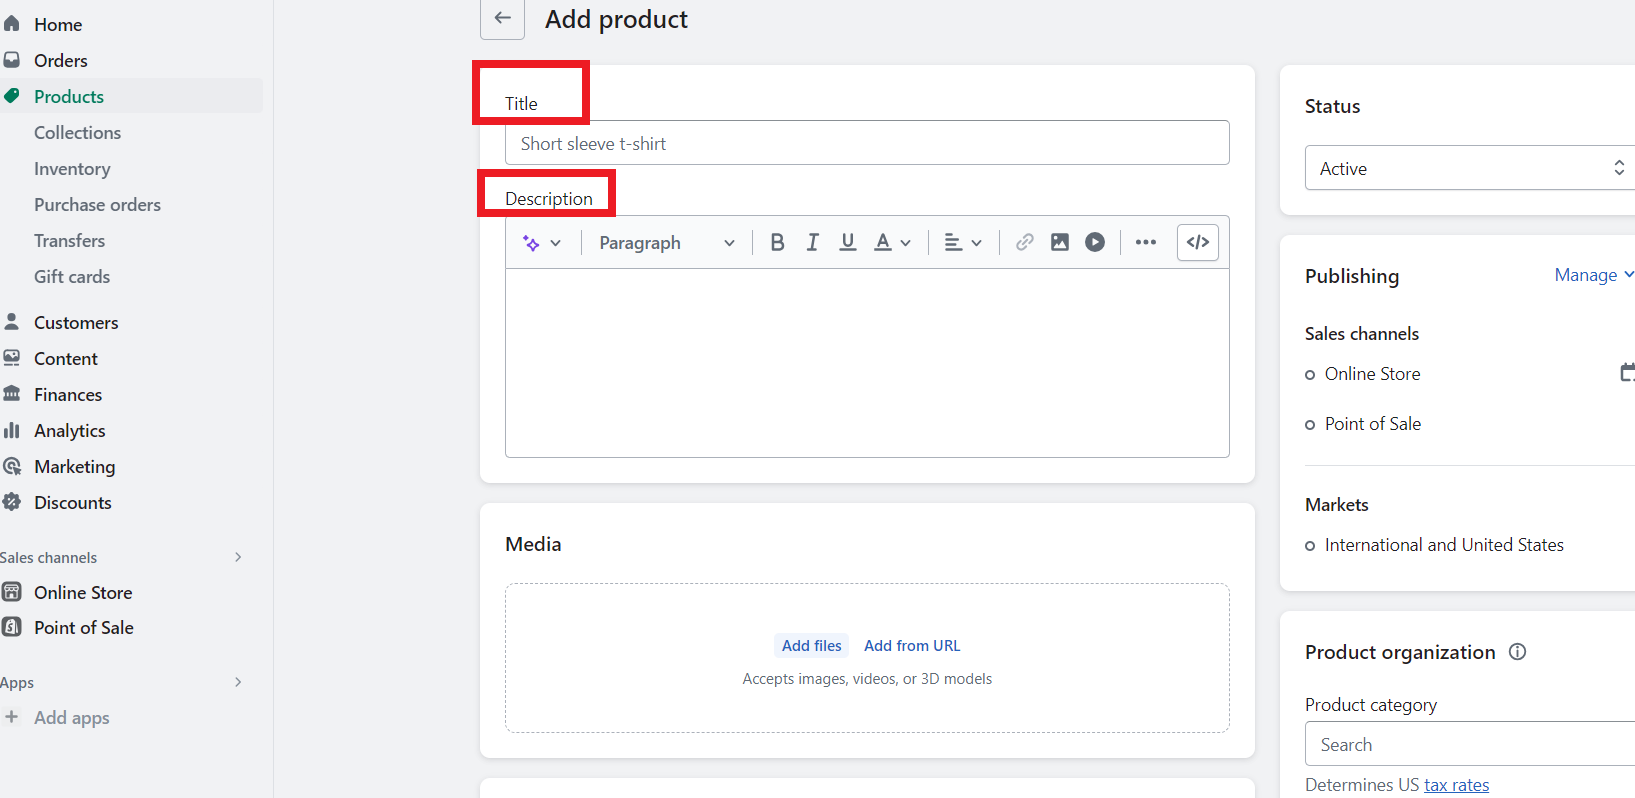
Once the products are in your Shopify store, Shopify gives you full control to tweak your listings.
You can:
- Improve product titles and descriptions,
- Add eye-catching images or product variations,
- Adjust pricing to match your profit goals, and
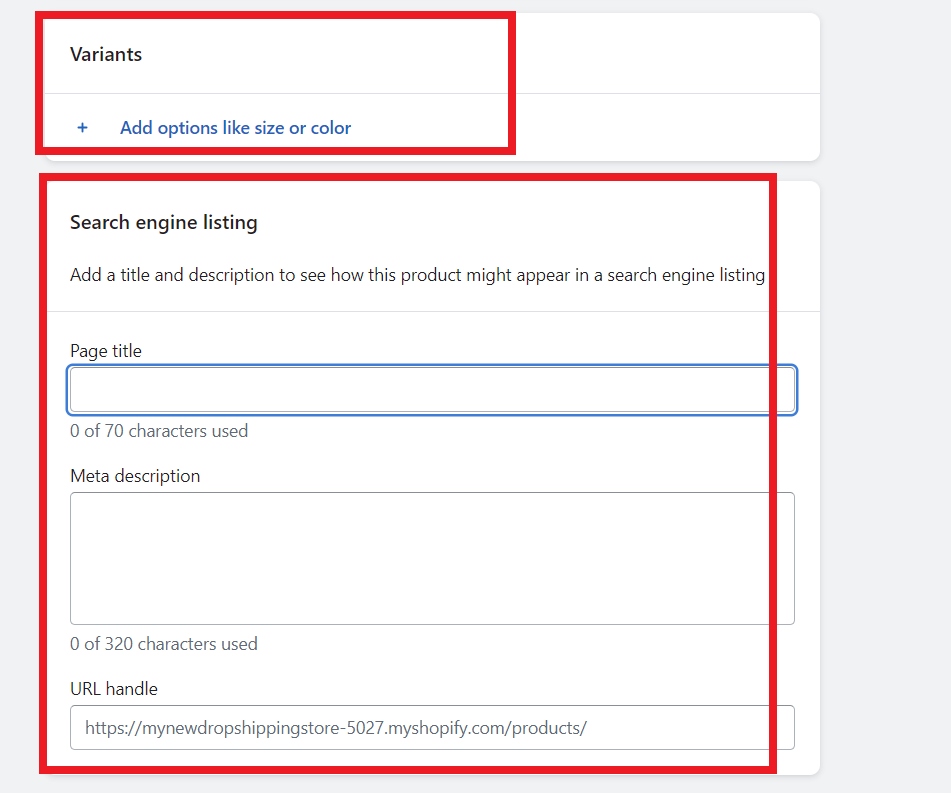
- Optimize your product pages with SEO-friendly keywords and meta descriptions (look for these options at the bottom of the product page).
How To Set Up Shipping On Shopify For Dropshipping?[Step-By-Step Guide]
And, finally – it is time to set up your shipping on Shopify for dropshipping. Establishing effective shipping and handling procedures is crucial for your dropshipping business.
So, here’s how it goes:
1. Create Shipping Profiles on Shopify
To start, navigate to your Shopify admin panel and select Settings. From there, click on Shipping and Delivery. You can create a shipping profile tailored to your business needs.
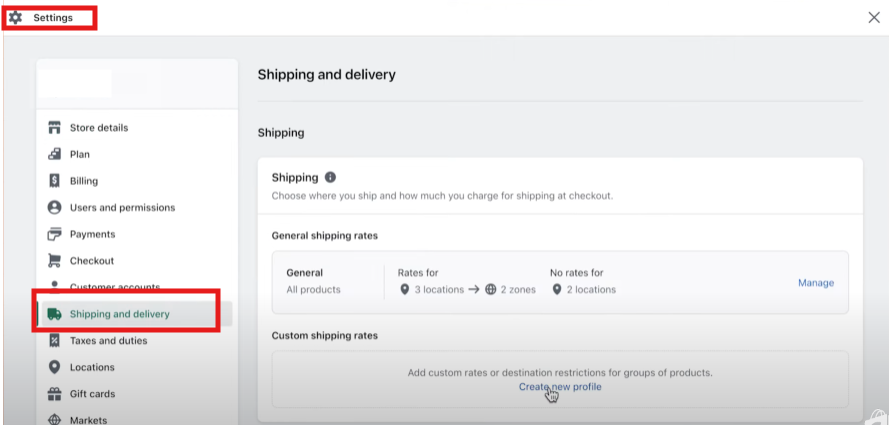
Look for the option to “Create New Profile” and click on it. Next, give your profile a name that makes sense for its purpose, like “International Shipping”, or “Standard Shipping”. In fact, think of this as a label that keeps things organized.

Now, it’s time to choose which products will follow the rules of this shipping profile. Select the items you want to include.
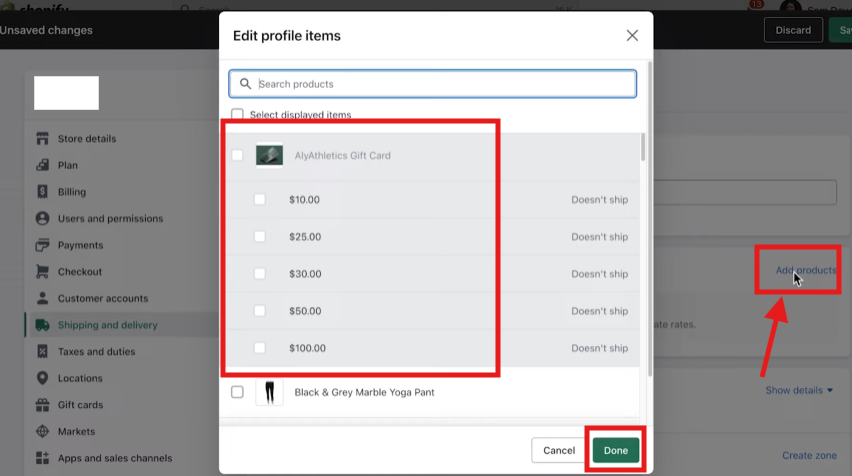
In these profiles, specify the Shipping Zones where you’ll ship your products. For example, set zones for domestic and international shipping.
Also, you might decide to apply this profile only to apparel if that’s what you sell. Next, you’ll create a zone to define where you ship. For instance, since I am shipping within the United States, I will set “United States” as my zone.
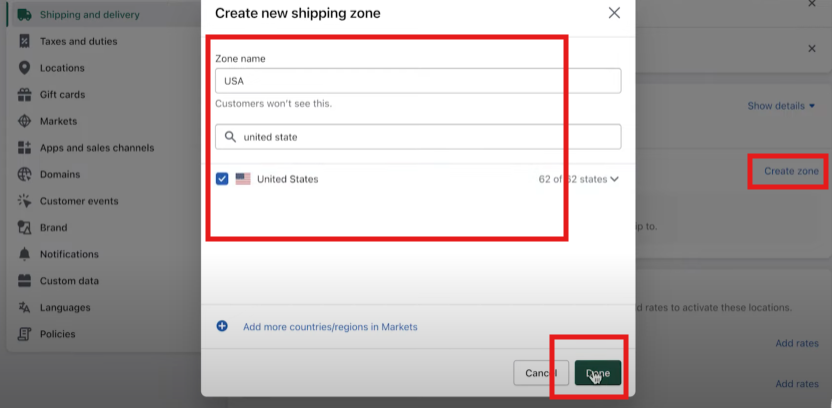
Each zone can have distinct shipping methods and prices, allowing flexibility in handling different regions.
Assign your products to the appropriate shipping profiles based on their size, weight, or other characteristics. This customization aids in accurately reflecting costs to customers.
2. Determine Shipping Rates and Options
Next, decide on the shipping methods to offer. You can choose from Flat Shipping Rates, Calculated Shipping Rates, or even Free Shipping for promotional purposes.
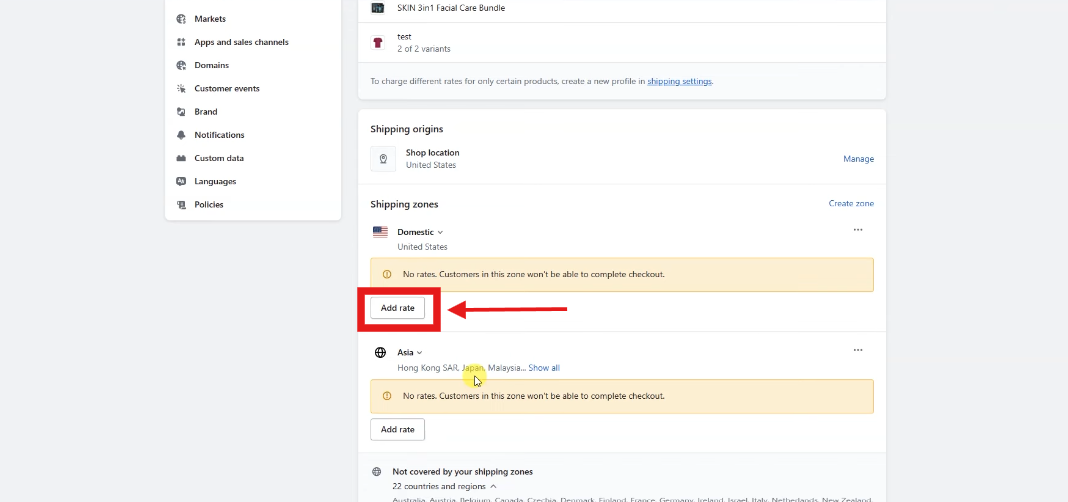
When you click on “Add Rate,” Shopify gives you two options: you can either create your own rates or use a carrier to calculate rates.
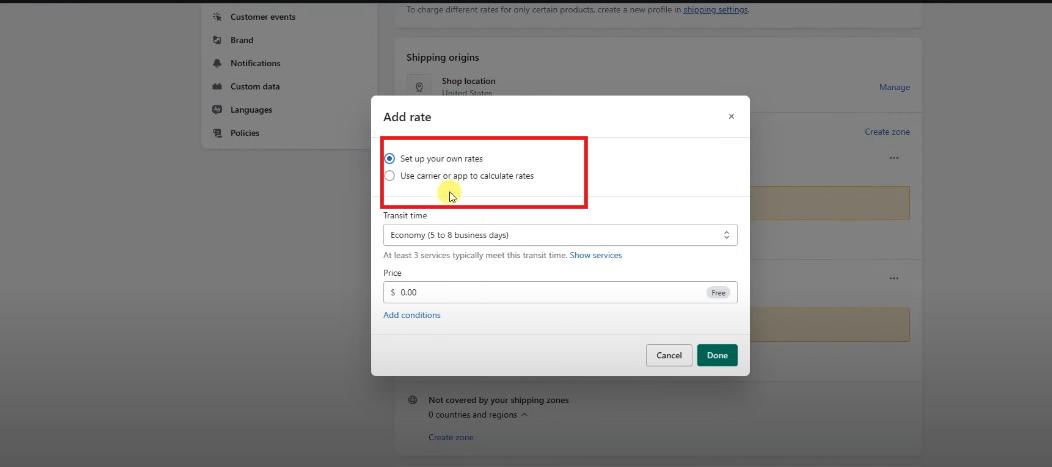
So, let’s start with setting up your own rates.
Flat Rate Shipping
Imagine you want to charge a flat $10 for shipping without any conditions. In the “Rate Name” field, enter something simple like “Flat Shipping.”
Next, under “Price,” enter $10. You can choose to leave the rate as is, without any conditions, or set specific rules.
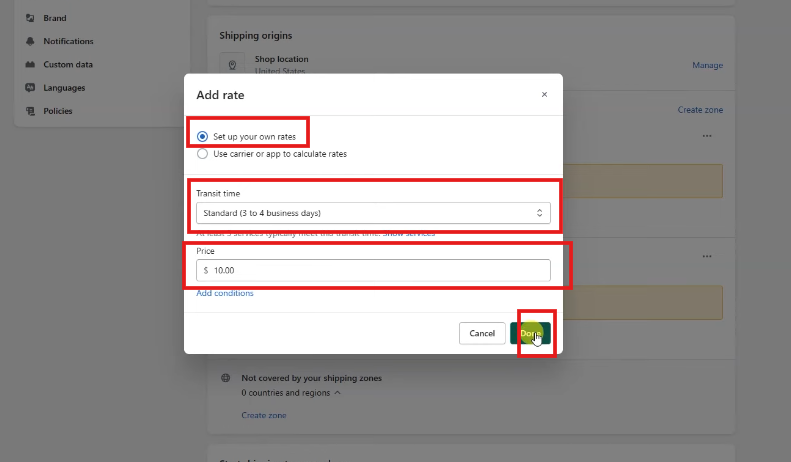
For instance, if you want this rate to apply to orders between 1 and 5 pounds, click “Add Conditions” and select “Based on Order Weight.” Enter the range (1 to 5 lbs), then click “Done.”
Free Shipping for Large Orders
Free shipping is a great way to encourage larger purchases. So, add another rate, name it “Free Shipping,” and set the price to $0.
Then, under conditions, select “Based on Order Price.”
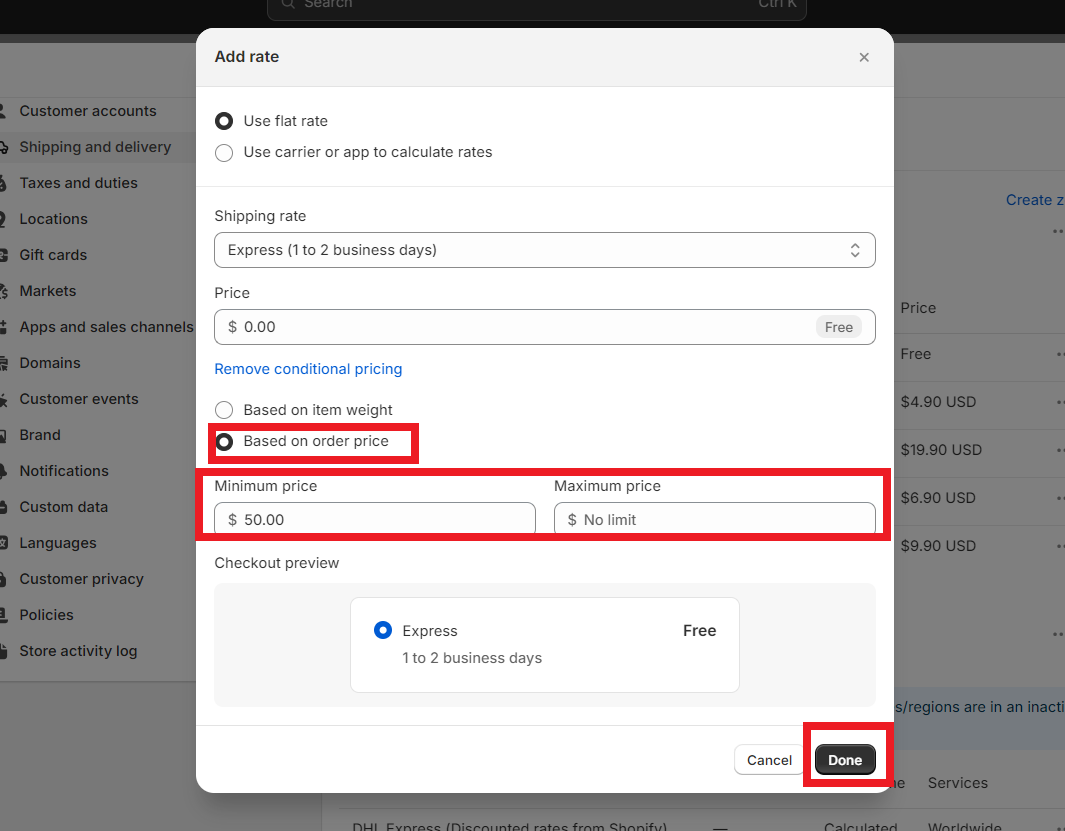
Set the minimum price to $50 so that any order over $50 automatically qualifies for free shipping. Click “Done” to save the rate.
3. Use Calculated Rates
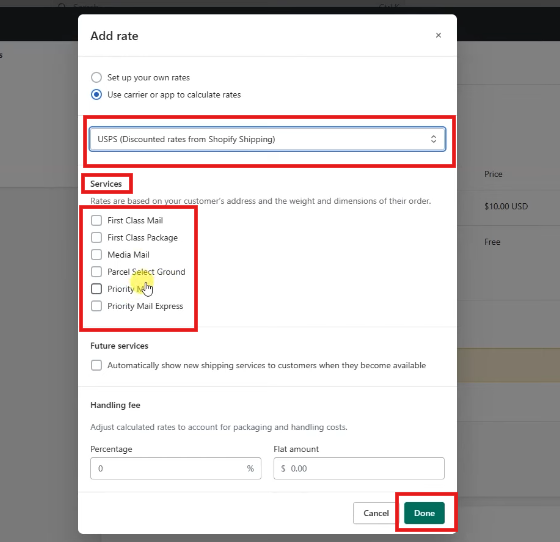
If you prefer calculated rates, Shopify makes this just as straightforward. Click on “Use Carrier or App to Calculate Rates.”
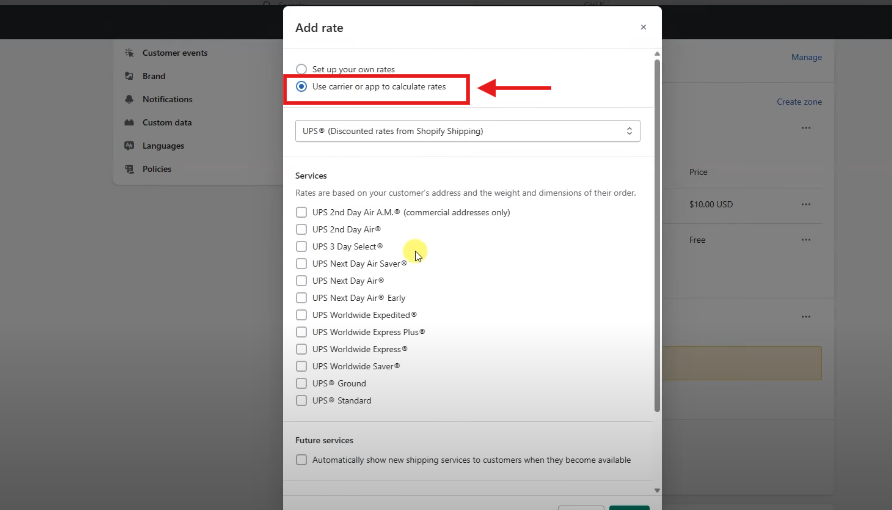
For domestic shipping in the U.S., you can choose services like UPS or USPS. Select the options you want to offer, such as Priority Mail or Ground Shipping.
For international customers, let’s set up a flat rate. Add a new rate and name it “International Shipping.”
So, set the price at $15 with no conditions, or add weight-based conditions for more precision. For example, orders up to 20 lbs could be $15, while orders over 20 lbs are $25.
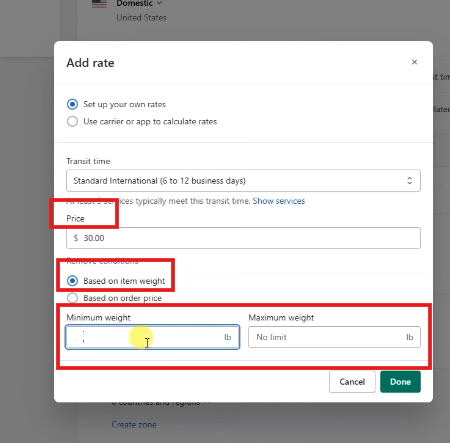
Simply adjust the conditions to reflect these ranges (e.g., “Order Weight: 0-20 lbs” and “Order Weight: 21 lbs and up”) and save the rate.
This way, your international shipping costs remain fair and manageable based on the order size.
These rates are calculated at checkout based on the customer’s location and package weight. You can also add a handling fee here, but be cautious—adding fees might lower conversion rates unless they’re absolutely necessary.
Click “Done” once you’ve configured everything.
4. Finalize Your Setup
Once your rates of shipping on Shopify for dropshipping are set, double-check your shipping zones. Shopify will display any countries or regions not covered by your shipping profile at the bottom of the page.
Moreover, make sure every region you want to ship to has a corresponding zone—otherwise, customers from those areas won’t be able to check out.
Lastly, click “Save” to finalize your shipping profile. It’s that simple! Now your store is ready to offer tailored shipping options that meet your customers’ needs while keeping your costs in check.
5. Handling Shipping Costs and Fees
Understanding Shipping Costs and any associated handling fees is fundamental. These should be factored into your pricing strategy to maintain profit margins.
Establish whether to absorb these costs or pass them on to customers. For example, many businesses opt to offer free shipping over certain order thresholds to encourage sales.
Clearly communicate any additional Handling Fees associated with specific products to ensure transparency. This can help set customer expectations and reduce cart abandonment due to unexpected costs.
By carefully managing these aspects, you enhance your customers’ shopping experience while optimizing your operations.
6. Add Packages To Manage Shipping Rates Better
To add packages to your Shopify store, start by heading to the Shipping and Delivery section in your settings.
So, scroll to the Packages area and click on Add Packages to begin.
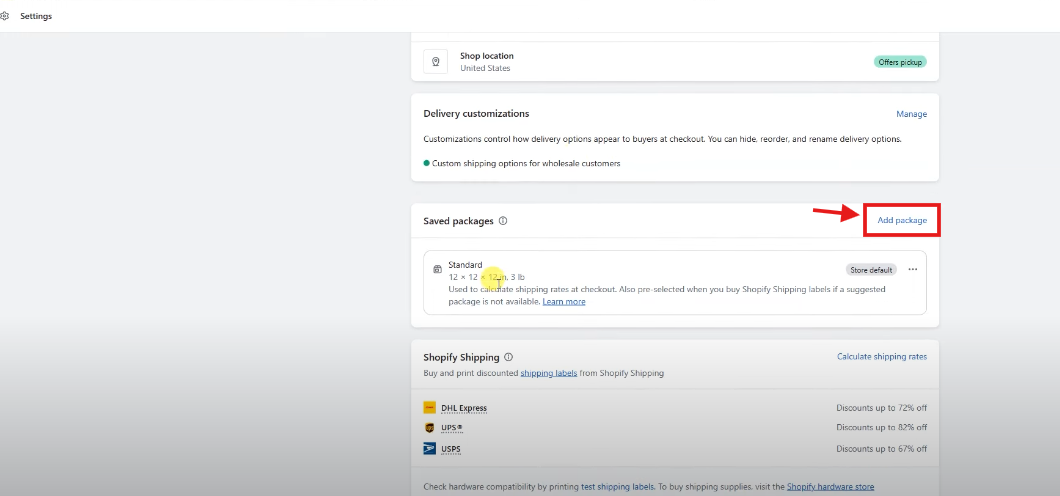
From there, you can create custom packages by giving them a recognizable name, such as “Normal Box,” and inputting dimensions like 10x10x5 inches.
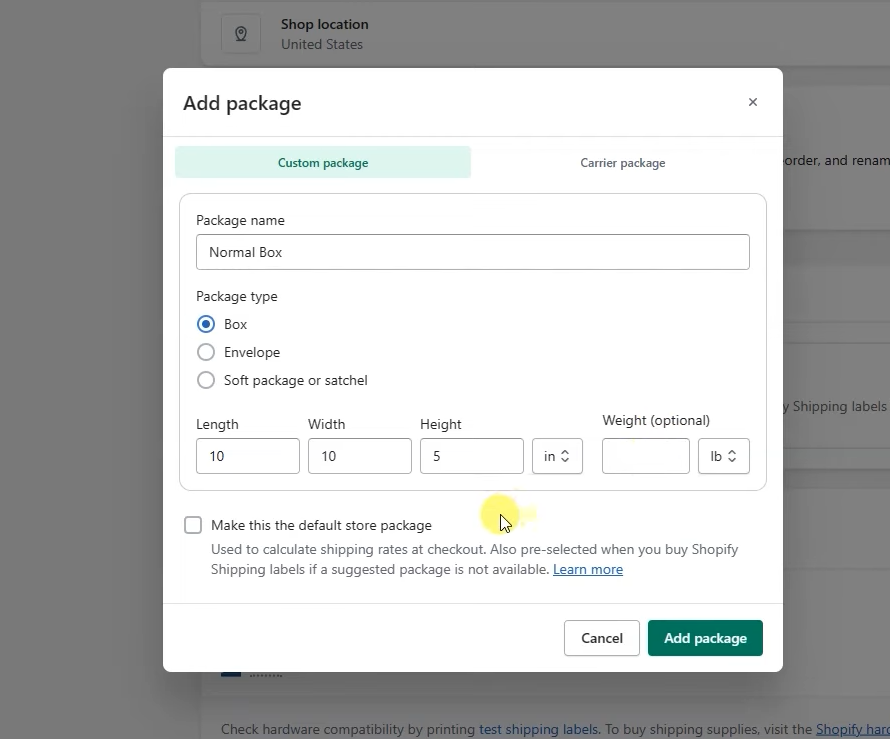
Also, make sure to include product weights for accurate carrier-calculated rates, but don’t worry too much about the weight of the package itself—Shopify factors that in automatically.
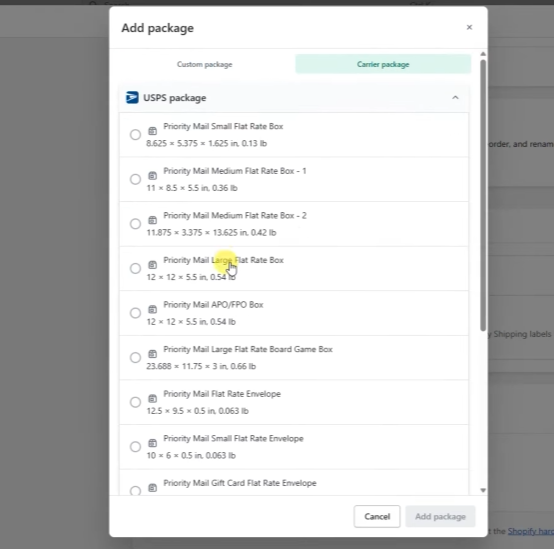
If this package will be the one you use most often, select it as the default to save time during order fulfillment.
For stores with a variety of box sizes or packaging types, you can add multiple packages by repeating the process for each type.
If you’re using carrier-specific packages, such as USPS Priority Mail Flat Rate boxes, select the appropriate size—whether it’s small, medium, or large—to ensure the calculated rates align with what you’ll pay.
Also, since you are dropshipping, the order fulfillment process is probably done by a third-party supplier. Therefore, you can simply add the custom fulfillment service.
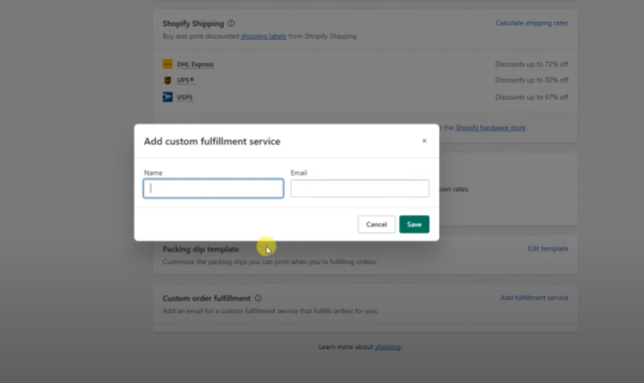
Once everything is set up, click Save, and double-check that your default package is selected.
7. Enhance Customer Experience
Focusing on customer experience is crucial when it comes to shipping on Shopify for dropshipping. And, for that, you must streamline order fulfillment, manage shipping times, and provide effective customer support can significantly boost customer satisfaction and foster loyalty.
So, the first thing I will advise you is to add shipping times to your checkout page. Hence, this adds value for customers.
Therefore, from your shipping profile, you can just select the ” show expected delivery at checkout” option.
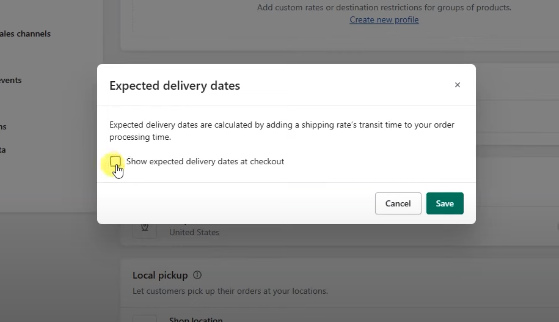
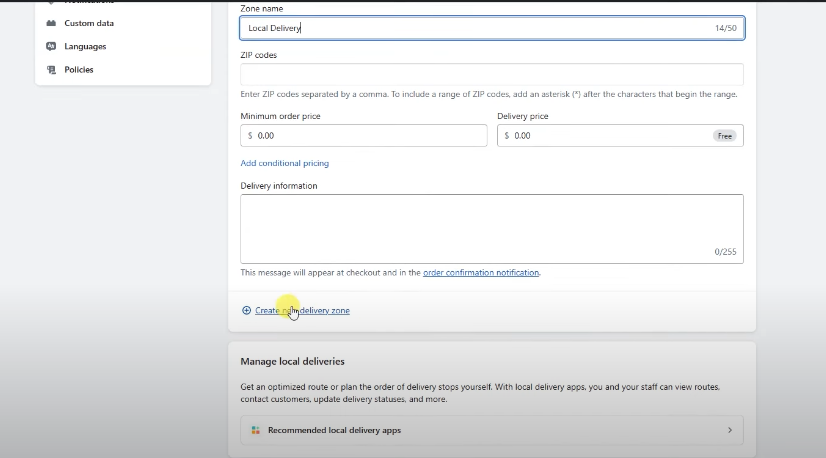
Also, you can write more detailed delivery or pickup information for customers. Thus, this can lower your abandon cart rate.
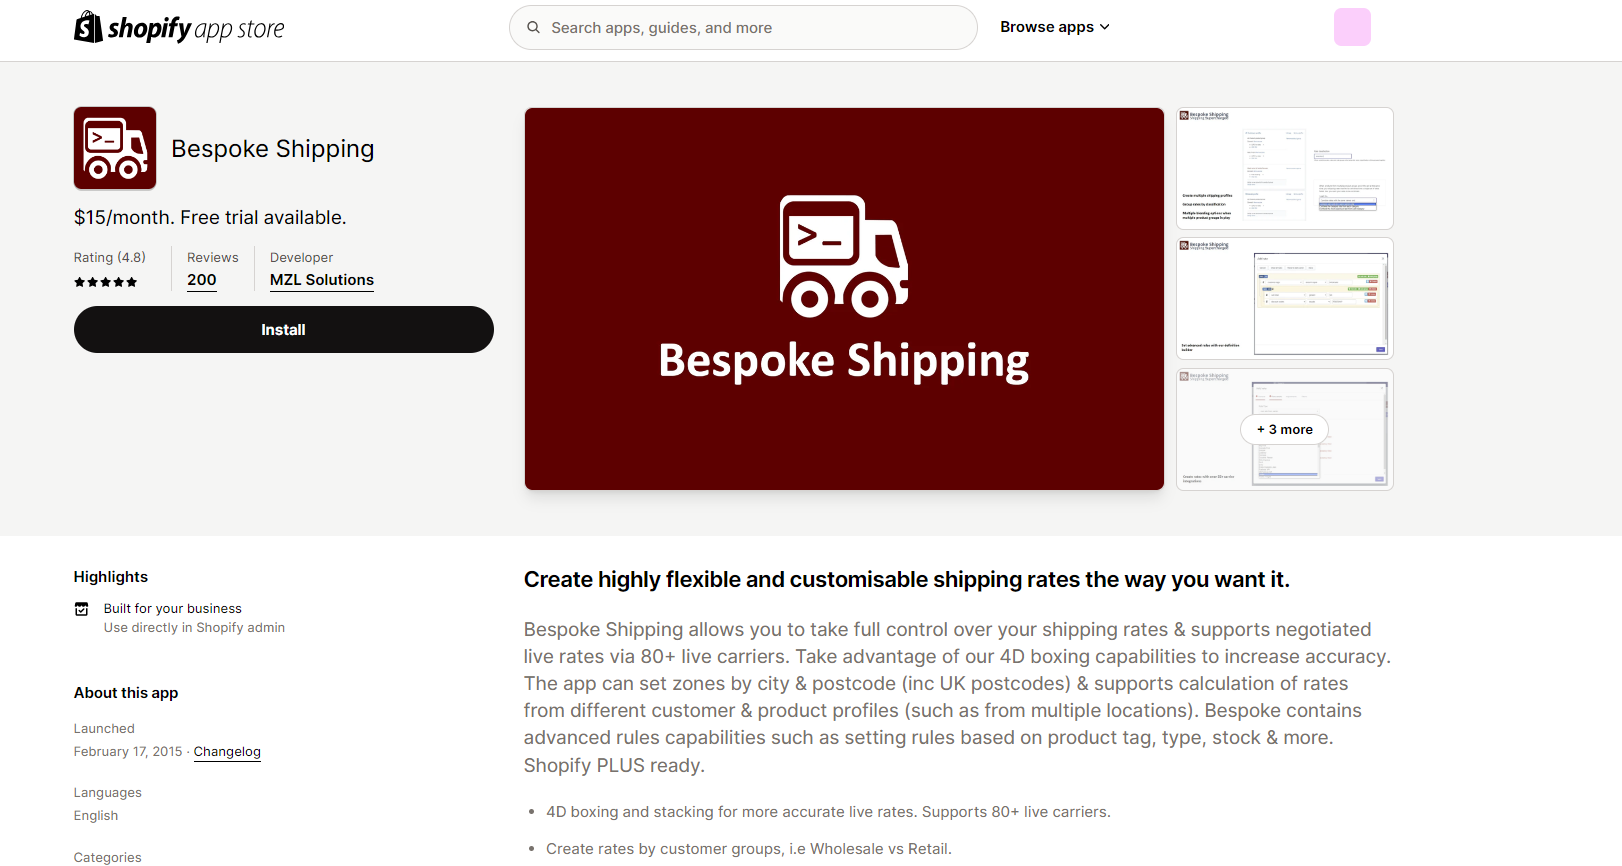
Moreover, if you want control over your shipping rates, consider apps like Bespoke Shipping.
8. Manage Shipping Times and Expectations
Shipping times are a vital aspect of customer satisfaction. So, shipping on Shopify for dropshipping does not stop only when setting shipping profiles. This step can prevent cart abandonment and improve trust.
So, regularly review your supplier options to maintain quality. A curated directory of vetted suppliers can simplify this process, ensuring you work with those who meet your standards consistently.
Therefore, clearly communicate estimated delivery times at various stages of the purchasing process.
So, use tracking numbers to provide updates, which can help manage customer expectations and reduce inquiries regarding order status.
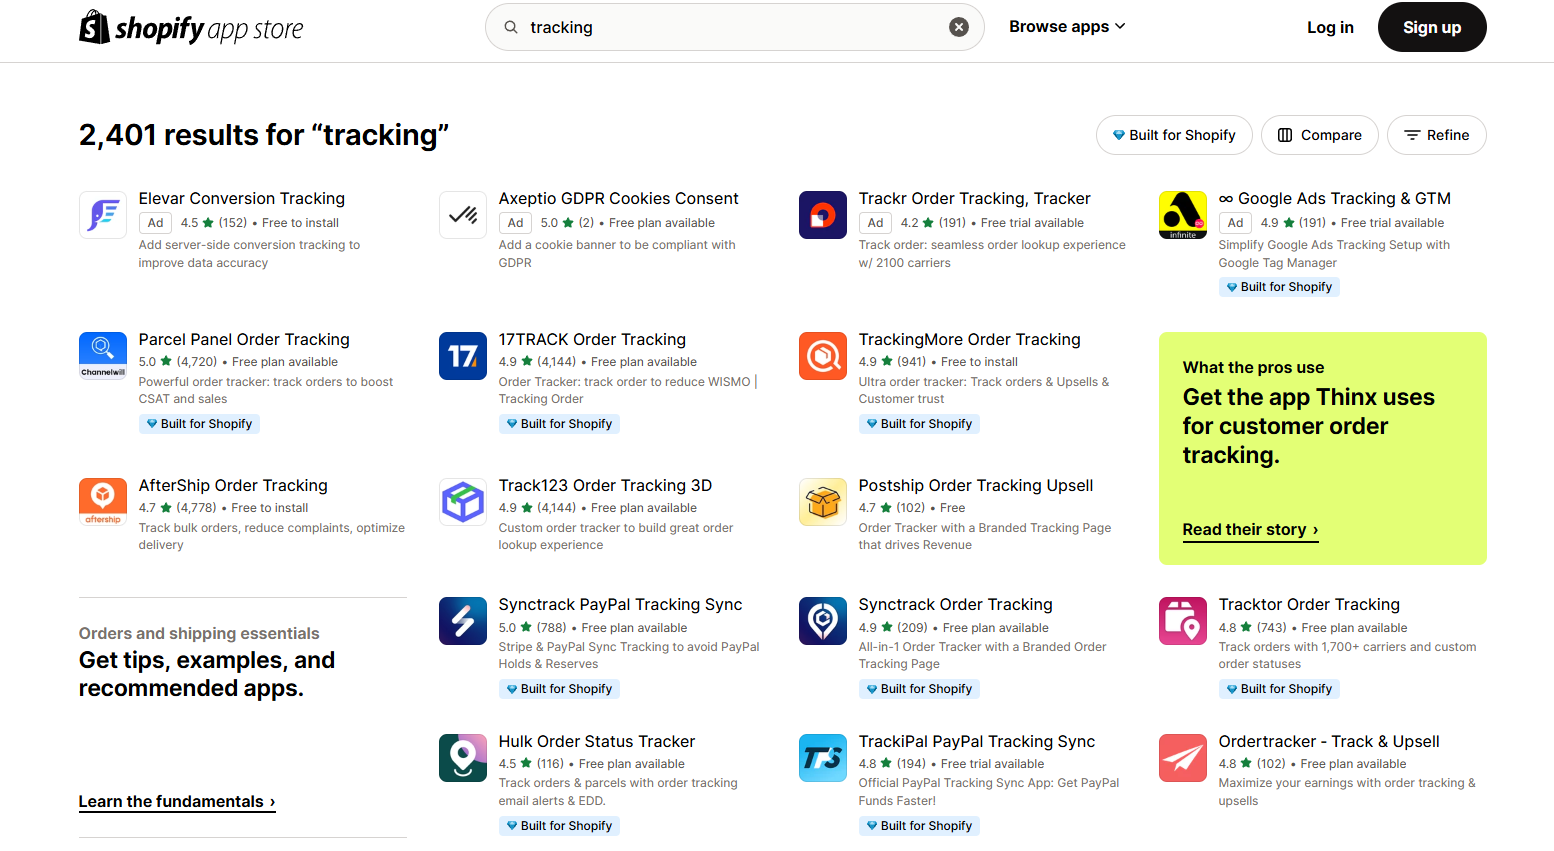
Shopify has over 2400 apps for order tracking on their app store, and most of them are free. So, you can install it and manage your shipping times with ease.
You may also want to offer express shipping options for an additional fee. This allows customers to choose based on their urgency and willingness to pay. Plus, ensure that your logistics and suppliers can support these times for reliability.
By offering transparent shipping options, you can enhance customer trust and likely increase your profit margin.
Conclusion
Setting up shipping on Shopify for dropshipping can seem daunting but it’s a must to have a successful store. From creating custom shipping profiles to integrating with suppliers and apps, every detail counts.
My advice? Start by understanding your target market and what they expect—fast delivery or affordable shipping options.
Remember: choose good suppliers, integrate them with Shopify, and offer clear competitive shipping rates. Don’t forget to review your shipping strategy regularly to make sure it aligns with your profit margins and customer satisfaction goals.
Before you start, think about your shipping costs, supplier reliability, and your target market’s shipping expectations.
By getting these basics right you’ll set your store up for success and give your customers a seamless shopping experience. Shipping isn’t just logistics it’s part of your brand. Get this right and you’re already winning!


![The Top 21 3PL Companies Compared [2025 List & Guide]](https://images.weserv.nl/?url=https://prod-dropshipping-s3.s3.fr-par.scw.cloud/2024/03/Frame-3922469.jpg&w=420&q=90&output=webp)